


In this tutorial, we will guide you on how to save specific or selected Excel columns as a CSV (Comma Separated Values) file. Whether you want to export data for analysis in another program or share it with colleagues, this step-by-step guide will help you accomplish that efficiently and accurately.
Whether you're a data analyst, researcher, or business professional, being able to export specific Excel columns as CSV will save you time and effort. Say goodbye to manual extraction and formatting tasks, and embrace a streamlined workflow that allows you to focus on extracting insights and making informed decisions.
Let's get started!
Table of Contents
- Import or export text (.txt or .csv) files
- Import a text file by connecting to it (Power Query)
- Export data to a text file by saving it
- Change the delimiter that is used when importing a text file
- FAQs
- Final Thoughts
Import or export text (.txt or .csv) files
You have two methods to import or export text files (.txt or .csv) in Excel: opening the file directly in Excel or importing it as an external data range. When exporting data from Excel to a text file, you can use the Save As command and select the desired file type from the drop-down menu.
Here's a step-by-step guide on importing a text file by opening it in Excel:
- Open Excel and go to the "File" menu.
-
Click on "Open" and navigate to the location of the text file.

- Select "Text Files" from the file type dropdown list in the Open dialog box.
- Locate and double-click the text file you want to open.
- If the file is a text file (.txt), Excel will launch the Import Text Wizard to guide you through the import process. Follow the steps and click "Finish" to complete the import.
- If the file is a .csv file, Excel will automatically open it and display it in a new workbook.
Note: When opening a .csv file, Excel uses the default data format settings to interpret the columns. You can use the Import Text Wizard if you need more flexibility in converting columns to different data formats.
Import a text file by connecting to it (Power Query)
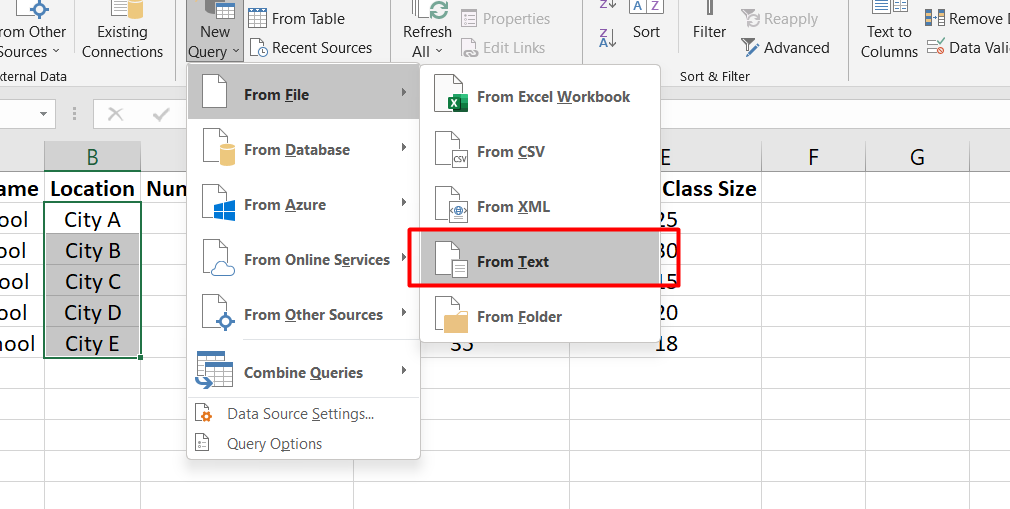
Another method to import a text file into Excel is by connecting to it using Power Query. Here's how you can do it:
- Open Excel and navigate to the "Data" tab.
-
In the "Get & Transform Data" group, click "From Text/CSV." This will open the "Import Data" dialog box.
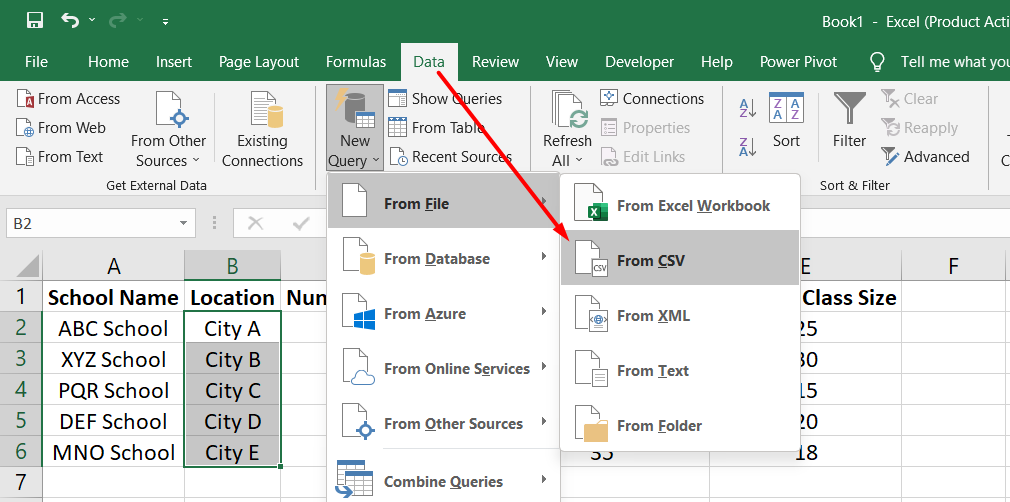
- Locate and double-click the text file you want to import, then click "Import."
- In the preview dialog box, you have several options:
- Select "Load" to load the data directly to a new worksheet.
- Alternatively, select "Load to" to load the data to a table, PivotTable/PivotChart, an existing/new Excel worksheet, or create a connection. You can also choose to add your data to the Data Model.
-
Select "Transform Data" to load the data to Power Query and make edits before bringing it into Excel.
If Excel doesn't convert a specific column of data to the desired format, you can convert it after importing. For more information, refer to the "Convert numbers stored as text to numbers" and "Convert dates stored as text to dates" articles.
Export data to a text file by saving it
You can use the Save As command to export data from Excel to a text file. Here's how you can do it:
- Open the Excel worksheet containing the data you want to export.
- Go to the "File" tab and click on "Save As."
- Click on "Browse" to specify the location where you want to save the text file.
-
In the "Save As" dialog box, choose the desired text file format from the "Save as type" dropdown menu. For example, you can select "Text (Tab delimited)" or "CSV (Comma delimited)".
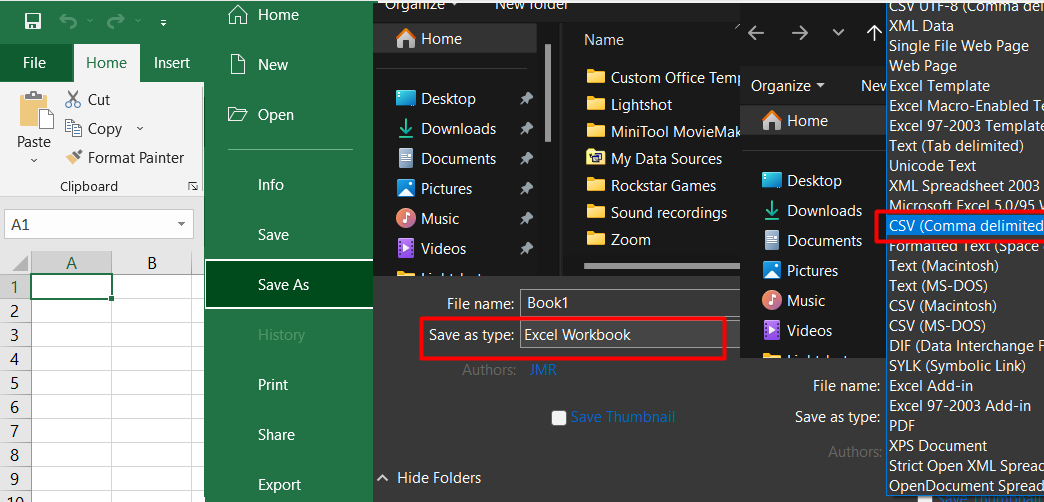
Note: Different formats support different feature sets, so choose the format that suits your requirements.
- Browse to the desired location and click "Save" to save the worksheet as a text file.
- A dialog box may appear, reminding you that only the current worksheet will be saved to the new file. If you are sure that the current worksheet is the one you want to save, click "OK." Repeat this procedure for each worksheet if you want to save multiple sheets as separate text files.
Note: An alert may appear below the ribbon, indicating that some features might be lost when saving the workbook in CSV format.
Once saved, the Excel data will be exported to a text file in the chosen format at the specified location.
Change the delimiter that is used when importing a text file
To change the delimiter when importing a text file in Excel, the method varies depending on your import process. Here are the steps for each method:
Using the Text Import Wizard:
- Open Excel and go to the "Data" tab.
-
Click "From Text" in the "Get External Data" group to open the Text Import Wizard.
- In Step 1, choose the text file you want to import and click on "Import."
- Step 2 will show a data preview with different delimiter options. Select the desired delimiter from the list or enter a custom delimiter in the "Other" field.
- You can also choose how to handle consecutive delimiters, such as consecutive quotation marks, in the "Text qualifier" section.
- Preview the data preview window changes and adjust the delimiter as needed.
- Continue with the remaining steps of the Text Import Wizard to complete the import operation.
FAQs
How do I export a specific column from Excel to CSV?
To export a specific column from Excel to CSV, you can copy the desired column, open a blank CSV file, and paste the column data into the first column of the CSV file.
How do you save only selected columns in Excel?
To save only selected columns in Excel, select the desired columns by clicking and dragging the column headers, right-click on the selection, choose "Copy," open a blank CSV file, and paste the selected columns into the first columns of the CSV file.
How do I export selected rows and columns in Excel?
To export selected rows and columns in Excel, select the desired rows and columns by clicking and dragging the row and column headers, right-click on the selection, choose "Copy," open a blank CSV file, and paste the selected data into the CSV file.
How do I convert selected cells to CSV?
To convert selected cells to CSV, select the desired cells, right-click on the selection, choose "Copy," open a blank CSV file, and paste the selected cells into the CSV file.
How do I import selected columns in Excel?
To import selected columns in Excel, open a new or existing Excel file, go to the "Data" tab, click on "From Text/CSV," select the CSV file containing the desired columns, and follow the import wizard to specify the settings and choose the columns to import.
Final Thoughts
Saving specific or selected Excel columns as a .csv file can be a useful way to extract and share specific data without including unnecessary information. By following a few simple steps, you can accomplish this task efficiently. This method allows you to create a focused and concise dataset that can be easily shared or used for further analysis. Double-check the exported .csv file to ensure the desired columns are correctly saved before sharing or utilizing the data.
One more thing
If you have a second, please share this article on your socials; someone else may benefit too.
Subscribe to our newsletter and be the first to read our future articles, reviews, and blog post right in your email inbox. We also offer deals, promotions, and updates on our products and share them via email. You won’t miss one.
Related articles
» How to Recover Unsaved Excel File: Step-by-Step Guide
» How to View Your Saved Passwords in Microsoft Edge
» Excel Formulas Not Working? Here's How to Fix Them