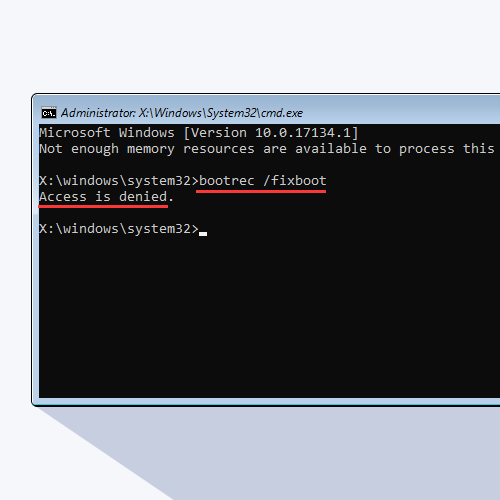
Windows 10 is a great operating system, but it has its quirks like all others. One of the common issues people experience is the "Access is denied" error when trying to run the /fixboot command from an administrator Command Prompt. The bootrec command is one of the most useful tools in the Windows 10 boot configuration toolkit.
Unfortunately, it also has one of the most cryptic error messages: "/fixboot Access is denied." This article will help you fix this problem and get your computer back up and running as quickly as possible!
What is Bootrec /fixboot?
Microsoft supplies customers with this utility. When your machine fails to boot, Windows will run the Windows Recovery Environment automatically thanks to the Bootrec feature. In the Windows RE, you have access to various functions such as Startup Repair and Command Prompt, which can assist you in repairing your computer.
If there’s an issue with this, your computer may not be able to recover from a boot error. This is why the “Bootrec /fixboot Access is denied” error is so frustrating. It’s often related to the Master Boot Record (abbreviated MBR), which is a critical part of every hard disk partition.
If the MBR on your primary hard disk fails, your computer will fail to boot into Windows. You can encounter terms like "fixboot access denied" or "Windows 10 fixboot access denied" at that moment.
But you don’t have to worry — we’re here to help you resolve the problem.
Fixed: Bootrec /fixboot Access is denied
In this section, we'll walk you through several different ways to fix your device when you see the Bootrec /fixboot Access is denied error on Windows 10.
Method 1. Run Startup Repair
Instead of jumping straight into complex methods, try the Startup Repair tool. This very simple tool can instantly resolve the majority of issues preventing your computer from booting properly.
- Reboot your computer and hold the F8 key on your keyboard while the boot screen is visible to enter the Windows Recovery Environment (WinRE). On certain devices you may need to hold down the Fn (function) key as well.
- Tip: If you can’t boot into WinRE using the keyboard shortcut, keep turning your computer on and off until it automatically starts in the repair environment. You need to turn the computer on and off about three times on average.
-
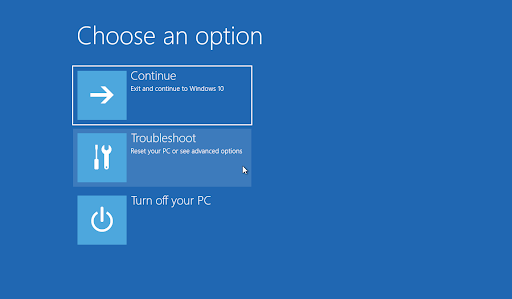
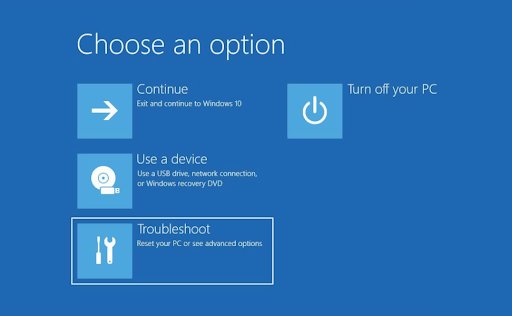
Select Troubleshoot from the available options. You’ll be able to access some tools to help restore your computer without being able to boot into the system itself.
-
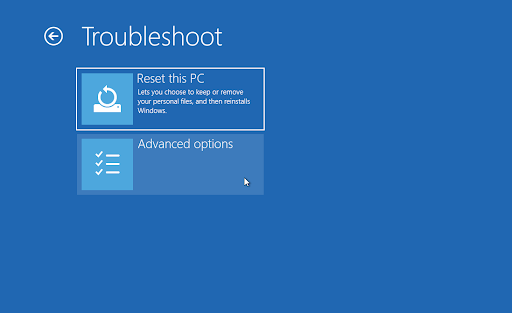
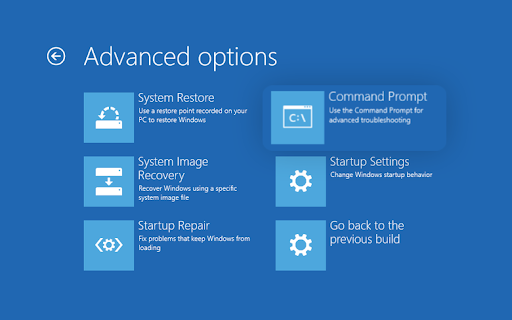
On the next page, click on Advanced options from the available options.
-
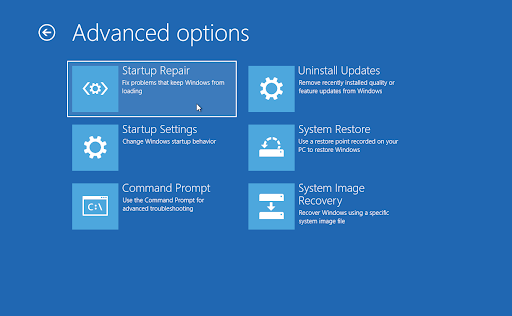
Once the Advanced options menu loads, click on Startup Repair. This tool attempts to identify and fix problems that may cause Windows 10 to not be able to boot as expected.
-
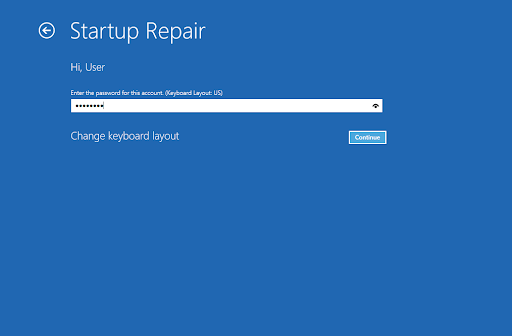
Your computer will begin rebooting now, and will automatically start with Startup Repair running. Once the menu loads, select your local user.

-
Enter your local account password, and then click Continue. If your account doesn’t have a password, simply leave the field empty.
- Wait for Windows to diagnose your computer and detect any problems. If there are issues with startup, you’ll be able to see them and choose how Windows handles them.
Method 2. Recreate EFI structure and reconfigure your boot files
You may overcome this problem by re-creating the EFI structure. This requires advanced steps, make sure to pay extra attention to our guide.
- Reboot your computer and hold the F8 key on your keyboard while the boot screen is visible to enter the Windows Recovery Environment (WinRE). On certain devices, you may need to hold down the Fn (function) key as well.
- Tip: If you can’t boot into WinRE using the keyboard shortcut, keep turning your computer on and off until it automatically starts in the repair environment. You need to turn the computer on and off about three times on average.
-
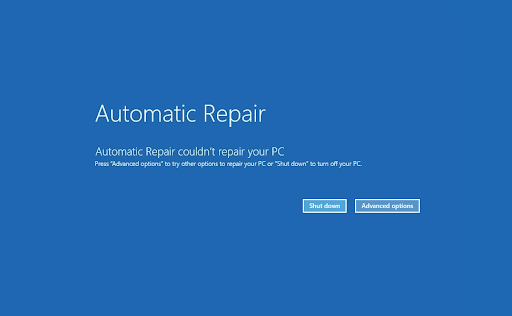
You should see the Automatic Repair screen show up on your monitor. Click on the Advanced options button.
-
Select the Troubleshoot option from the advanced repair functions.
-
In the troubleshooting section, navigate to Advanced options > Command Prompt. This is going to launch a regular Command Prompt app where you can execute several commands to help with resolving problems.
-
Input these two lines one by one into the Command Prompt window and hit Enter on your keyboard to run them both on your computer in order
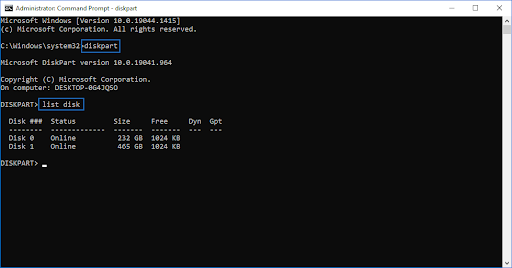
> diskpart
> list disk
-
Next, input the following commands and make sure to replace the highlighted parts with your information:
> select disk disk
> list vol
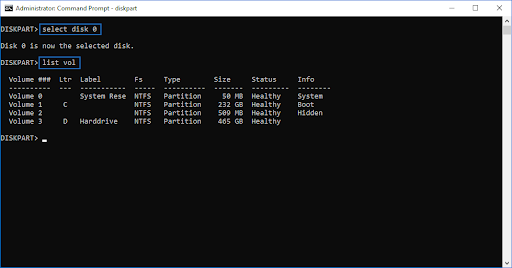
“disk” should be replaced with the number of the HDD drive on which Windows is installed. It's “Disk 0” on this machine, so the command would be “select disk 0”.
- Next, input the following command and make sure to replace the highlighted part with your information:
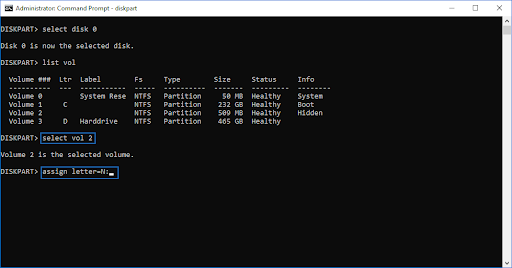
> select vol volume
“volume” should be replaced with the number which indicates your EFI (Extensible Firmware Interface) partition. The EFI partition typically has 100 MB of storage and is formatted in FAT32, so it's easy to identify.
-
Next, execute the following command by inputting it into the Command Prompt and pressing Enter on your keyboard:
> assign letter=N:
-
Execute the following commands in order:
> exit (Exit from the DISKPART interface.)
> N: (Select the EFI partition to work with.)
> bcdboot C:\windows /s N: /f UEFI (Repair your bootloader.)
- After completing these steps, your computer should restart. Click Continue and see if you still get the same error.
Method 3. Execute the CHKDSK command
Try running Check Disk to repair your PC. The CHKDSK command attempts to identify and get rid of disk issues, which may help you with resolving issues with the boot loop at hand.
- Reboot your computer and hold the F8 key on your keyboard while the boot screen is visible to enter the Windows Recovery Environment (WinRE). On certain devices you may need to hold down the Fn (function) key as well.
- Tip: If you can’t boot into WinRE using the keyboard shortcut, keep turning your computer on and off until it automatically starts in the repair environment. On average, you need to turn the computer on and off about three times.
- From the Choose an option screen, navigate to Troubleshoot > Advanced options > Command Prompt.
-
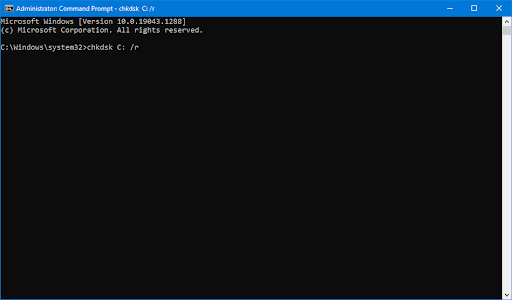
Type in the following command and press Enter to execute it: chkdsk C: /r
- Wait for the scan to finish.
Method 4. Rebuild BCD
You can try executing a command in the Command Prompt to rebuild your computer's BCD to repair the "/fixboot Access is denied" problem. Many people stated that this was the solution to the problem.
- Reboot your computer and hold the F8 key on your keyboard while the boot screen is visible to enter the Windows Recovery Environment (WinRE). On certain devices, you may need to hold down the Fn (function) key as well.
- Tip: If you can’t boot into WinRE using the keyboard shortcut, keep turning your computer on and off until it automatically starts in the repair environment. You need to turn the computer on and off about three times on average.
- From the Choose an option screen, navigate to Troubleshoot > Advanced options > Command Prompt.
-
Type in the following commands and press Enter after each line to execute it:
> bootrec /rebuildbcd
> bootrec /fixmbr
> bootrec /fixboot
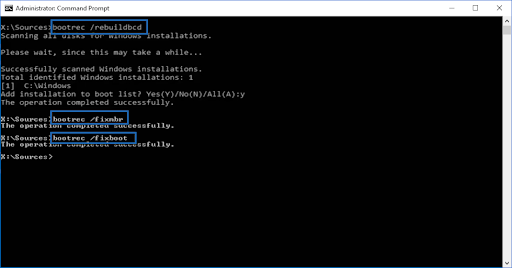
- After completing these steps, you should be able to tell if the error returns.
Method 5. Recover your files
If none of the methods above worked, the last thing you can try is recovering the files on your hard drive before reinstalling Windows. To do this, you need an application capable of file recovery. You can use freeware software such as AOMEI Partition Assistant Standard or invest in a premium application like EaseUS Data Recovery Wizard Pro.
If you need help with Windows installation, check out How to Install Windows 10, 8.1 or 7 Using a Bootable USB. You can also get in touch with one of our technicians for free personal assistance if you purchase Windows from us!
Final thoughts
If there are any questions left unanswered or problems not addressed, please feel free to reach out — our team of experts would love to help! In the meantime be sure to keep up with all things tech by checking back for more articles about troubleshooting, and following us on social media.
Follow our Blog for more great articles like this one! In addition, you can check our Help Center for a wealth of information on how to troubleshoot various issues.
One more thing
Sign up for our newsletter and get early access to our blog posts, promotions, and discount codes. Thank you for reading! We hope to see you again soon.
Recommended articles
» How to Fix Inaccessible Boot Device Error in Windows 10
» Solution for No Boot Device Found on Windows 10
» How to Create a Bootable USB Using Rufus
Feel free to reach out with questions or requests you’d like us to cover.