


“Windows Shell Experience Host” is an official part of Windows. Windows 10 users often run into a seemingly mysterious process running on their device, often using up a large amount of memory. Windows Shell Experience Host is responsible for this process, which is also referred to as ShellExperienceHost.exe.
When your Windows 10 computer starts acting sluggish, it's always a good idea to fire up Task Manager to see what could be causing the problem. If you did that and discovered that a process called Windows Shell Experience Host is using 100% of the CPU’s resources, you might be wondering how you can get it to behave again.
Below, we'll discuss potential fixes you can try to get Windows Shell Experience Host to stop impacting your Windows 10 PC’s performance so much. You'll even learn more about this process along the way.
Jump to:
- What Is the “Windows Shell Experience Host” Process?
- Why does the Windows Shell Experience Host use so much memory?
- How to fix the Windows Shell Experience Host high memory usage
- Method 1: Uncheck the “Automatically pick an accent color from my background” option
- Method 2: Turn off slideshow backgrounds
- Method 3: Run the System File Checker
- Method 4: Limit the CPU usage of ShellExperienceHost.exe
- Method 5: Update Windows 10 to the latest version
What Is the “Windows Shell Experience Host” Process?
The “Windows Shell Experience Host” is an official part of Windows. It is responsible for presenting universal apps in a windowed interface. It is also involved with handling a number of graphical elements of the interface, such as Start menu and taskbar transparency, and the new visuals for your notification area flyouts.

The Windows Shell Experience Host can be seen using a significant amount of memory in the Task Manager.
The Windows Shell Experience Host is part of Windows 10 itself. It's used for many different things, making it an essential part of your system
For example, it shows universal applications in a windowed interface, allowing you to better navigate your device. It also takes care of several graphical parts that make Windows 10 a beautiful operating system
It's responsible for the Start menu and taskbar transparency, as well as the visual look of notifications, the clock, calendar, and so on. It also handles visual elements on your desktop, such as your background images.
While it's not malware or any malicious software, however, it can still cause issues.
Why does the Windows Shell Experience Host use so much memory?
Especially during the launch of Windows 10, many new users started to report that the Windows Shell Experience Host (ShellExperienceHost.exe) process uses an alarmingly high amount of CPU power.
This is certainly not normal, however, there are some possible causes for it.
If you’re having issues with the process, you should notice that the CPU usage is rather inconsistent. Most of the time, you should be able to see it use little to no memory, then jump up to consume up to 25-30% CPU or several hundred MB of memory and drop back down shortly after.
This happens whenever graphical elements change on your system. For example, if you have a slideshow background, whenever your background image changes, the Windows Shell Experience Host (ShellExperienceHost.exe) process will temporarily start to consume more memory.
Luckily, this can easily be fixed.
How to fix the Windows Shell Experience Host high memory usage
If you’re having issues with the Windows Shell Experience Host (ShellExperienceHost.exe) process using high memory, you’re in the right place. Below are several methods used to fix this error, making your computer faster and easier to use.
Method 1: Uncheck the “Automatically pick an accent color from my background” option
The first thing you should try, especially if you use slideshow desktop backgrounds, is turning off automated accent colors.
Whenever your background changes, your computer will pick a new accent color to use. This slows your system down temporarily, as the Windows Shell Experience Host (ShellExperienceHost.exe) process takes care of the visual changes.
Here’s how you can turn off automatic accent colors on Windows 10.
-
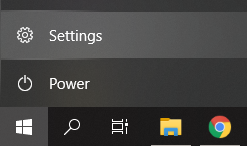
Click on the Windows icon in your taskbar to open the Start menu, then choose Settings. Alternatively, you can use the Windows + I keyboard shortcut.

-
Click on the Personalization tile.

-
Choose Colors from the left-side menu.

-
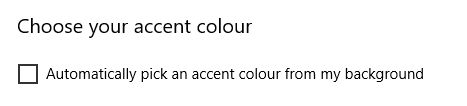
Scroll down until you see the “Choose your accent color” section. Here, make sure that the box next to “Automatically pick an accent color from my background” is empty.
- Close the Settings app and wait a few minutes to check if the CPU usage jumps up again. If the Windows Shell Experience Host uses a consistently low amount of memory, you’ve successfully fixed the issue.
Method 2: Turn off slideshow backgrounds
If simply turning off automatic accent colors didn’t help, the next thing to try is getting rid of slideshow backgrounds as a whole. Whenever your background changes to a different image, the Windows Shell Experience Host process has to make visual changes — this can temporarily take up a lot of memory.
Here’s how to turn off slideshow backgrounds in Windows 10.
-
Click on the Windows icon in your taskbar to open the Start menu, then choose Settings. Alternatively, you can use the Windows + I keyboard shortcut.
-
Click on the Personalization tile.
-
Make sure to stay on the default Background menu.
-
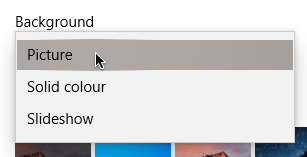
Under the Background section, select either “Picture” or “Solid color”. These options are static, meaning that no changes are done on the go that affects the Windows Shell Experience Host.
- Close the Settings app and wait a few minutes to check if the CPU usage jumps up again. If the Windows Shell Experience Host uses a consistently low amount of memory, you’ve successfully fixed the issue.
Method 3: Run the System File Checker
The System File Checker, also known as an SFC scan can help you fix even more issues, as it uses the Command Prompt to look further into your system. You’re able to run it with one simple command.
To find out how you simply have to follow the next steps.
-
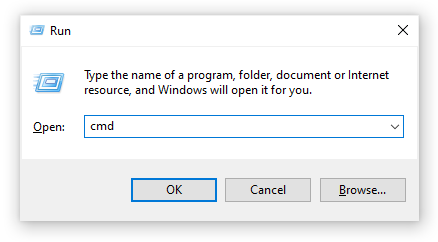
Press the Windows + R keys on your keyboard to launch the Run utility. Type in “cmd” and press Ctrl + Shift + Enter. This is going to open the Command Prompt with administrative permissions.
-
Type in the following command and press Enter: sfc /scannow
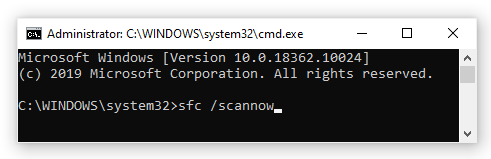
- Wait for the System File Checker to finish scanning your computer. If it finds any errors, you’ll be able to fix them automatically through the SFC command itself, which may also fix errors related to the Windows Shell Experience Host.
Method 4: Limit the CPU usage of ShellExperienceHost.exe
The Task Manager offers an option to limit the CPU usage of processes. You can apply this to the Windows Shell Experience Host (ShellExperienceHost.exe) process and potentially get rid of its large memory consumption.
-
Right-click on any empty space in your taskbar and choose Task Manager.

-
Switch over to the Details tab.

-
Locate the ShellExperienceHost.exe process. Right-click on it and choose Set Affinity.

-
Set your desired processor affinity, then click OK.
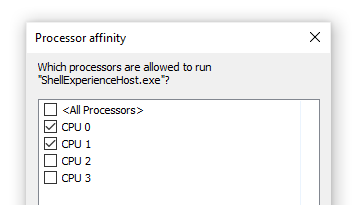
- Close the Settings app and wait a few minutes to check if the CPU usage jumps up again. If the Windows Shell Experience Host uses a consistently low amount of memory, you’ve successfully fixed the issue.
Method 5: Update Windows 10 to the latest version
If none of the methods above worked for you, we recommend simply switching over to the latest version of Windows 10.
Sometimes, installing the latest Windows 10 update is the easiest and fastest way of getting rid of issues like the Windows Shell Experience Host consuming large amounts of memory. Additionally, you can get access to new features, better security, and more optimization from Microsoft.
-
Open the Settings application using the Start menu or the Windows + I keyboard shortcut.
-
Click on Update & Security.
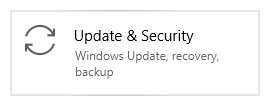
-
In the Windows Update tab, click on the Check for updates button.

- If a new update is found, click on the Install button.
- After your system updates, see if the Windows Shell Experience Host still causes issues with CPU usage.
We hope that this article was able to inform you about the Windows Shell Experience Host and help you troubleshoot issues related to it. You should notice an improvement in the performance of your device with less used RAM memory.
Are you interested in learning more about Windows 10? Learn how to fix Your Computer is Low on Memory in Windows 10.
If you’re looking for a software company you can trust for its integrity and honest business practices, look no further than SoftwareKeep. We are a Microsoft Certified Partner and a BBB Accredited Business that cares about bringing our customers a reliable, satisfying experience on the software products they need. We will be with you before, during, and after all the sales.