Whenever you open a website on any computer, your computer uses what’s called a Domain Name System (DNS). If websites are loading slowly, or not at all, on your computer, it might be because the DNS Servers you’re using are slow or unavailable.
Luckily, it’s relatively easy to change your DNS Settings to another free service provider.
What is DNS?
Every website, when it’s created and connected to the internet, is given an IP address. This is something like a building’s street address and is made up of a series of numbers.
To make their websites easier for people to remember though, website holders also give their sites' names, like SoftwareKeep. DNS servers connect these names to the website’s original IP address to open it up on your computer.
Which DNS Servers Should I Use?
When you subscribe to the internet, you’ll open an internet connection with an Internet Service Provider (ISP). Each ISP has its own DNS server connections, which is what your computer will use by default.
However, two of the best performing DNS Servers are Google’s own DNS servers and OpenDNS servers. Both are free to use and faster than the ISP-provided DNS servers.
How to Change Your Mac’s DNS Servers
Step 1: First go to the Apple menu at the bottom of your screen and open System Preferences. You can also find this by typing it into the Spotlight and hitting Enter.

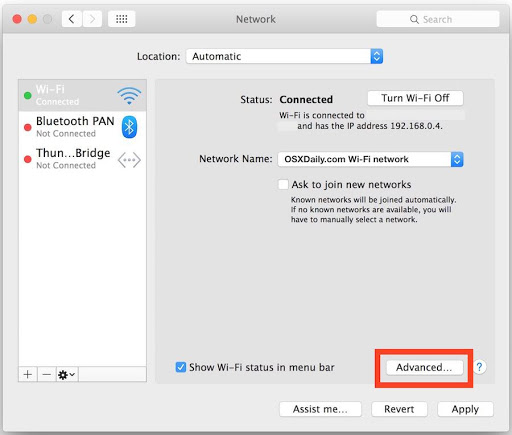
Step 2: Click Network and then select which type of network you’re using from the list on the left side (for example “Wi-Fi” or “Ethernet”). Now click the Advanced button in the lower right corner of the Network window.

Step 3: Choose the DNS tab at the top of the screen.
- To add a new DNS server: click on the [+] plus button
- To edit an existing DNS server: click twice on the DNS IP address you wish to change.
- To remove a DNS server: select a DNS server IP address and then click either the [-] minus button or hit the delete key.

Your computer will automatically access the DNS servers listed at the top. So, you’ll want to put the best performing servers first to give you the best results. In the screenshot above, (8.8.8.8 and 8.8.4.4) represent Google’s DNS servers, and (208.67.222.222 and 208.67.220.220) are for OpenDNS servers.
When you’ve finished making changes to your DNS settings, click OK, and then click Apply for the changes to take effect. You can then close System Preferences as usual and enjoy a faster DNS service experience.
If you’re looking for a software company you can trust for its integrity and honest business practices, look no further than SoftwareKeep. We will be with you before, during, and after all the sales.
That’s our 360 Degree SoftwareKeep Guarantee.
