If you try to use a product key on a new computer that’s already been activated on a different computer before, activation on the second device often won’t work. Each product key is unique and typically only for one copy of Office on one device only.
This might happen for example if you bought more than one copy of Office for your different computers but accidentally used the same key twice. To get your second copy of Office running then you’ll need to change the product key.
The simplest way is to change the product key through the file menu from any of the Microsoft Office applications, such as Word or Excel. But there are also other methods if this doesn’t work. Here are four different ways you can change your Product Key:
Method 1 (For Office 2010, 2013, 2016): From Office Application
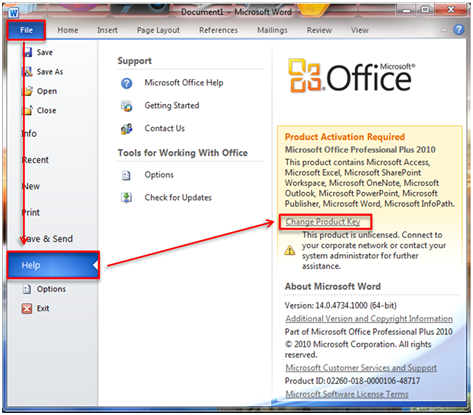
Step 1: Open any Office application, such as Word or Excel, and click on the File tab in the menu bar at the top of the application’s window
Step 2: In the dropdown menu, select Help in Office 2010, or Account in Office 2013/2016


Step 3: Click on Change Product Key. Enter your new key in the window that pops up then click Install to activate it
Method 2: From Programs and Features in your Windows Control Panel
Step 1: Depending on your version of Windows there are three common ways to open the Programs and Features section of your Windows Control Panel:
- Click on the Windows Start button in the bottom left of your screen. In Windows 7 there is an immediate shortcut to Control Panel. In Windows 8.1 and 10, the Control Panel link is under the Windows System folder. After opening the Control Panel, click Programs and then Programs and Features
- Click on the Windows Start button in the bottom left of your screen and type Programs and Features in the search box. Click on it to open
- Press Windows+R on your keyboard. This will open the Run window. In the search box, type: Appwiz.cl and press Enter
Step 2: Find your Microsoft Office application in the list of programs in the Programs and Features window
Step 3: Right-click on this and select Change
Step 4: Select Enter a Product Key and click Continue
Step 5: Enter your new product key and click Continue again to activate
Method 3: Delete the Registration Key from your Pc's Registry directory
Step 1: Press Windows+R on your keyboard. This will open the Run window. In the search box, type: Regedit and press Enter
Step 2: In the Registry directory, navigate to the following folders for your version of Office:
- Office 2010: HKEY_LOCAL_MACHINE\SOFTWARE\Microsoft\Office\14.0\Registration
- Office 2013: HKEY_LOCAL_MACHINE\SOFTWARE\Microsoft\Office\15.0\Registration
Step 3: Under Registration, there’ll be several folders with names made up of random numbers and letters. These are called GUIDs. Check the ProductName file in each of these. One of them will be for the version of Office installed on your computer.
Step 4: Once you’ve identified the correct GUID folder, find the two files named DigitalProductID and ProductID. Now delete these
Step 5: Close the Registry directory window and open any Office application. You should now get a new prompt to enter your new product key
Method 4 ( for Office 2013 & 2016): Using Command Prompt
Step 1: Open your Windows Start menu and type Command Prompt in the search box. Right-click on it and click Run as administrator
Step 2: See the list below for the correct command to use for your version of Office and Windows:
Note: You need to make sure to use the correct command for it to work. Both Office and Windows come in different versions. They can each be either 32-bit or 64-bit models. Depending on the version of Office and Windows you have, the command will vary.
- 32-bit Office 2013 on 32-bit Windows: cscript “C:\Program Files\Microsoft Office\Office15\OSPP.VBS” /inpkey:XXXXX-XXXXX-XXXXX-XXXXX-XXXXX
- 32-bit Office 2013 on 64-bit Windows: cscript “C:\Program Files (x86) \Microsoft Office\Office15\OSPP.VBS” /inpkey:XXXXX-XXXXX-XXXXX-XXXXX-XXXXX
- 64-bit Office 2013 on 64-bit Windows: cscript “C:\Program Files\Microsoft Office\Office15\OSPP.VBS”/inpkey:XXXXX-XXXXX-XXXXX-XXXXX-XXXXX
- 32-bit Office 2016 on 32-bit Windows: cscript “C:\Program Files\Microsoft Office\Office16\OSPP.VBS” /inpkey:XXXXX-XXXXX-XXXXX-XXXXX-XXXXX
- 32-bit Office 2016 on 64-bit Windows: cscript “C:\Program Files (x86) \Microsoft Office\Office16\OSPP.VBS” /inpkey:XXXXX-XXXXX-XXXXX-XXXXX-XXXXX
- 64-bit Office 2016 on 64-bit Windows: cscript “C:\Program Files\Microsoft Office\Office16\OSPP.VBS” /inpkey:XXXXX-XXXXX-XXXXX-XXXXX-XXXXX
Step 3: Replace the X’s in your chosen command from the list above with the characters of your new product key and enter the command into Command Prompt. Once you’ve run the command, you’ll get the following message: “Product key installation successful”.
If you’re looking for a software company you can trust for its integrity and honest business practices, look no further than SoftwareKeep. We are a Microsoft Certified Partner and a BBB Accredited Business that cares about bringing our customers a reliable, satisfying experience on the software products they need. We will be with you before, during, and after all the sales.