Spell check in Word is one of the features in Microsoft Word that make typing up documents an easy task. You can breeze through projects much more efficiently without worrying about your spelling and grammatical errors. This is why it’s a serious issue when the spell check feature in Word isn’t working.

We’re here to help you restore the spelling and grammatical check no matter what caused it to stop working in the first place. While the cause of the error can be different for everyone, it’s usually related to misconfigured settings or issues in Word itself.
Jump To Solution:
- How to manually check spelling and grammar in Word
- How to use the Spell Check in Word and Check Grammar in Office
- Show errors automatically while you work
- Why is Spell Check Not Working in Word?
- Problem a: How to Fix Spell check Not Working for a Specific Document
- Solution 1. Check your Language settings
- Solution 2. Check the Proofing Exception options
- Problem b: How to fix spell check not working in any Word document
- Solution 1. Verify the “Check spelling as you type” feature is on
- Solution 2. Repair Microsoft Word with the Office repair tool
- Solution 3. Rename a Windows Registry folder
- Solution 4. Verify that a Word add-in isn’t interfering with the spell checker
- Solution 5: Rename Your Word Template
Note: Please note that the methods below apply to Word 2019, Word 2016, Word 2013, Word 2010, and Word for Office 365.
How to manually check spelling and grammar in Word
- Click the "Review" tab in the ribbon at the top of the screen.
- In the ribbon, click "Spelling & Grammar."
- If there are any spelling or grammar issues, the Spelling and Grammar dialog box will appear. You'll see a list of suggestions for each potential error.
How to use the Spell Check in Word and Check Grammar in Office
Here are some tricks and tips to use spell check in Microsoft Word:
- Run the spelling and grammar checker. To start a check of the spelling and grammar in your document, just press F7.
Show errors automatically while you work
Most Office programs, including MS Word, automatically check for potential spelling and grammatical errors as you type, so you don't need to do anything to show errors while you work.
Notes:
- Automatic spelling and grammar checking is unavailable in Access, Excel, or Project. You can manually start a spell check by pressing F7.
- Automatic grammar checking is available only in Outlook, Word, and PowerPoint 2013 (or newer).
The spell check in MS Office marks potential spelling errors with a red squiggly line and potential grammatical errors with a blue squiggly line.
If spelling or grammatical errors aren't marked, automatic checking might be turned off. You may need to turn it on.
When you see a spelling or grammatical error you want assistance fixing, right-click on the underlined word or phrase and choose one of the options to fix the error.
If Office is flagging words as misspelled, but you have it spelled the way you want it, select Add to Dictionary to teach Office not to flag that word as misspelled in the future.
Why is Spell Check Not Working in Word?
Spell check might not work in Word for several reasons, here're the most common causes.
- The different language is set as default.
- The speller add-in is disabled.
- Proofing tools aren't installed.
- HKEY_CURRENT_USER\Software\Microsoft\Shared Tools\ProofingTools\1.0\Override\en-US causing the error.
If you’ve noticed that spell check only seems to stop working in one specific document, you can use one of the methods below to fix this. The problem is usually related to language or formatting settings in cases like this.
Problem a: How to Fix Spell check Not Working for a Specific Document
If the spell check is not working for a specific document, the problem could be with formatting or language settings. Follow the solutions below to solve this problem for a specific document.
Solution 1. Check your Language settings
- Open the Word document you’ve been having spell-checking issues with.
- Press the Ctrl + A keys on your keyboard (Command + A on a Mac) to select the entire document.
-
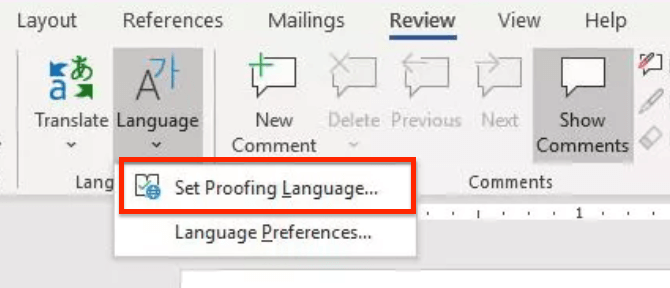
Switch to the Review tab in your Ribbon, then select the Language button and choose Set Proofing Language… from the drop-down menu.

- The Language window will open up. Here, make sure that the "Do not check spelling or grammar" box is unchecked.
- Click the OK button.
- Check if your spell checker works after applying this fix.
Solution 2. Check the Proofing Exception options
- Open the Word document you’ve been having spell-checking issues with.
- Click on File from the Ribbon, then select Options. The Word Options window should open up.
- Go to the Proofing tab in the left-side panel.
- Look for the Exceptions for: (Document name) section in the right-side panel.
-
Make sure that the Hide spelling errors in this document only and Hide grammar errors in this document only boxes are both unchecked.

- Click the OK button to save your changes.
- Check if the spell checker works.
Problem b: How to fix spell check not working in any Word document
If neither of the methods above seemed to fix your issue, you might have errors with Word. In the next section, we’ll discuss further solutions to fix the spell checker not working at all in various versions of Word.
Solution 1. Verify the “Check spelling as you type” feature is on
- From the menu click File tab > Options. This will open up the Word Options in a new window.
- Next, select Proofing.
-
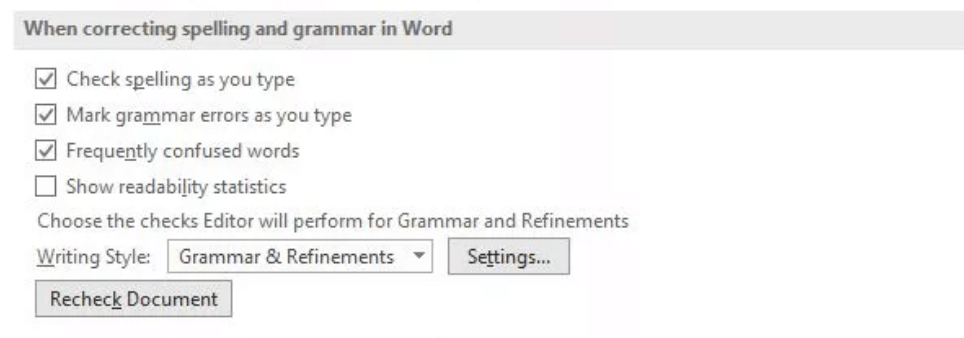
Make sure to select both the Check spelling as you type and the Mark grammar errors as you type options under the When correcting spelling and grammar in Word section.

- Click on the Recheck Document button to test if Word’s spell check works after turning these features on.
- Click the OK button to save your changes.
Solution 2. Repair Microsoft Word with the Office repair tool
These instructions apply only to Windows 10 operating systems. If you need instructions for other versions of Windows, please navigate to the Repair an Office application page on Microsoft’s website and select your operating system.
- Open the Settings window by using the Windows + S keyboard shortcut.
- Click on the Apps and Features button.
- Scroll down and select the version of Microsoft Word you want to repair.
- Click on the Modify button.
- Depending on your installation, follow the steps below:
- MSI-based: In the Change your installation section, select Repair then click Continue.
- Click-to-Run: In the How would you like to repair your Office Programs window, select Online Repair. Next, choose Repair.
- Follow any on-screen instructions to repair Word, then check if the spell checker works.
Solution 3. Rename a Windows Registry folder
- Completely exit out of Word.
- Press the Windows + R keys on your keyboard to open the Run utility.
- Type in “regedit” without the quotation marks and click the OK button. This will launch up the Registry Editor.
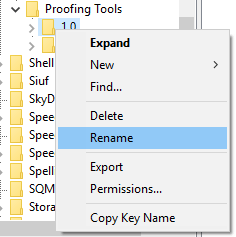
- Navigate to the following key using the panel on the left-hand side: HKEY_CURRENT_USER\Software\Microsoft\Shared Tools\Proofing Tools
-
Select the folder named 1.0 then right-click on it and choose Rename.

- Rename the folder to 1PRV.0 and click the OK button.
- Close the Registry Editor and re-launch Microsoft Word to check if your spell check works.
Solution 4. Verify that a Word add-in isn’t interfering with the spell checker
- Completely exit out of Word.
- Hold down the Ctrl key and double-click on the icon you use to launch Word. This will attempt starting Word in Safe mode.
-
When prompted, click Yes to allow Word to run in Safe mode.
- Open up any document you’ve been having problems with and press the F7 key to perform a spell check.
- If the spell check works, you most likely have an add-in that interferes with the default spell checker in Word. Make sure to find and disable this add-in to be able to use the spell checker without having to launch in Safe mode.
Solution 5: Rename Your Word Template
If all the above solutions don't work for you, then we recommend renaming your word template "normal.dotm." Follow the procedure below.
- Press Windows key + R. This will open the Run utility dialog box
- Copy and Paste this text "%appdata%\Microsoft\Templates" on the dialog box without the quotes.
- Click Ok
Proceed and rename the normal.dotm to something like Fixednormal.dotm.
You May Also Like
> How to Check Your Spelling and Grammar in Word
> MS Word Features: 20 Secret Functions Revealed!
> How to Print Black and White on Word (With Images)
> How to Edit Your Word Documents Faster