The Volume Mixer is an important feature of the Windows operating system that allows users to control the volume levels of different audio sources. However, users have reported encountering a common error in Windows 11 where the Volume Mixer fails to open. This can be a frustrating experience as users are unable to adjust the audio levels on their systems.
In this article, we'll discuss the reasons behind the Volume Mixer not opening error on Windows 11 systems, and provide steps to resolve the issue.
Table of Contents
- Causes of the Volume Mixer Not Opening Error
- Troubleshooting the Volume Mixer in Windows 11
- 1. Use the Audio Troubleshooter
- 2. Update Your Audio Drivers
- 3. Disable Exclusive Mode
- 4. Uninstall Outdated Realtek Drivers
- 5. Update Windows 11
- 6. Run the System File Checker
- 7. Run the DISM Scan
- Conclusion
Causes of the Volume Mixer Not Opening Error
There can be several reasons why the Volume Mixer fails to open on Windows 11. Some of the common causes include:
- Audio Services are not Running: Windows has several audio services that need to be running for the Volume Mixer to function properly. If these services are not running, the Volume Mixer will not open.
- Outdated or Corrupted Audio Drivers: Audio drivers are essential for the proper functioning of audio devices. If these drivers are outdated or corrupted, the Volume Mixer may fail to open.
- Incorrect System Settings: Incorrect system settings can also cause the Volume Mixer to fail. For example, if the audio settings are set to 'No audio output device is installed', the Volume Mixer will not open.
- Malware or Virus: Malware or viruses can cause a variety of issues on a Windows system, including the Volume Mixer not opening.
Troubleshooting the Volume Mixer in Windows 11
There are several methods to resolve the Volume Mixer not opening error. Here are some steps that you can follow:
1. Use the Audio Troubleshooter
Before attempting to manually resolve the volume mixer issue on Windows 11, it's important to consider the possibility of an automatic solution. Microsoft has recognized this problem and provided automatic fixes through the Audio Troubleshooter. To take advantage of these solutions, simply run the Audio Troubleshooter and follow the recommended steps.
- Open the Settings app on your Windows device. You can do this by clicking on the Start menu and selecting the gear icon, or using the Windows + I keyboard shortcut.
-
Click on "System." In the right-hand menu, select "Troubleshoot."
-
Click on "Other troubleshooters."

-
Scroll down and click the Run button next to the "Playing Audio" troubleshooter.

- The troubleshooter will begin scanning your system for any issues with audio-related features, such as the Volume Mixer. Follow any on-screen instructions to resolve any issues found.
- Once the troubleshooter is finished, restart your device to ensure that any changes made take effect.
Note: The above steps should work for Windows 11, but the steps may vary slightly if you use an older version of Windows.
2. Update Your Audio Drivers
If the automatic solution from the Audio Troubleshooter does not resolve the volume mixer issue, the next step is to ensure that your audio driver is up to date. Normally, Windows Update takes care of this for you. However, if the driver becomes outdated or incompatible with your Windows 11 operating system, it can lead to problems.
In this case, some users have reported success by using the Device Manager to force an update to the driver.
-
Press the Windows + R keys on your keyboard at the same time to bring up the Run utility. Type in “devmgmt.msc” without quotation marks, then hit the OK button. This is going to launch the Device Manager in a separate window.

-
Expand the "Sound, Video, and Game Controllers" section and right-click on your high-definition audio driver. Select "Update driver" from the menu.

-
Choose either "Search automatically for updated driver software" or "Browse my computer for driver software." Depending on your selection, Windows will either search online for a suitable driver or you can manually browse your computer for the driver.

- Follow the instructions on your screen to install the driver. Once that's done, restart your computer and then check if the Volume Mixer problem is still present.
3. Disable Exclusive Mode
In some cases, the volume mixer issue occurs because the program is designed to transmit audio streams such as DTS or Dolby over HDMI or SPDIF, which are not modifiable since the audio has already been encoded. This can result in the inability to use the volume mixer interface.
The solution to this problem is to turn off Exclusive Mode for the current playback device. This has been reported by multiple users to effectively resolve the issue.
-
Press the Windows + R keys on your keyboard at the same time to bring up the Run utility. Type in “mmsys.cpl” without quotation marks, then hit the OK button.

-
Find your default device listed in the Playback tab, indicated by a green checkmark. Right-click on it, and then select Properties from the context menu.

-
Switch to the Advanced tab, and then uncheck the “Allow applications to take exclusive control of this device” option.
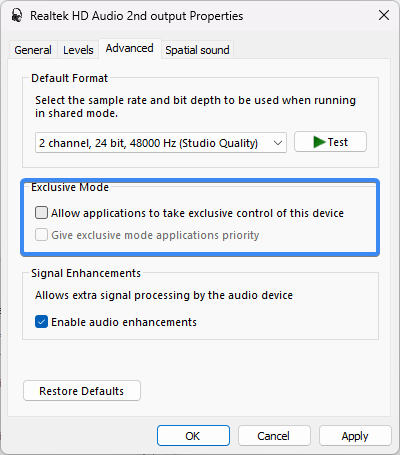
- Click on the Apply button and restart your computer. When your system boots back up, try to open the Volume Mixer again.
4. Uninstall Outdated Realtek Drivers
Another common factor that may be affecting the volume mixer in Windows 11 is using a dedicated audio drive that was transferred from a previous operating system, such as Windows 10 or Windows 8.1, rather than performing a clean install of Windows 11.
This can result in compatibility issues with the specialized driver not fully supporting the latest operating system. To resolve this problem, it's necessary to remove the specialized driver and switch to a generic audio driver instead.
-
Press the Windows + R keys on your keyboard at the same time to bring up the Run utility. Type in “devmgmt.msc” without quotation marks, then hit the OK button. This is going to launch the Device Manager in a separate window.

-
Expand the "Sound, Video, and Game Controllers" section and right-click on your outdated Realtek audio driver. Select "Uninstall driver" from the menu.

- Reboot your system after uninstalling the audio driver. Windows 11 will automatically recognize the absence of the driver on the next start-up and install a default driver to take its place.
5. Update Windows 11
Verify that you are using the latest build of Windows 11. This problem was originally caused by a problematic Windows Update for the Windows 11 development build but has since been resolved through several hotfixes released by Microsoft.
- Click the Windows icon in the bottom-left corner of the screen to open the Start menu, then select Settings. You can also use the keyboard shortcut Windows + I.
-
Switch to the Windows Update tab using the menu on the left, and then click on the Check for updates button. Windows will automatically detect if there’s a new update compatible with your device.

- If a new update is available, allow Windows to install it, and then follow the instructions to restart your computer.
6. Run the System File Checker
The System File Checker (SFC) is a built-in utility in Windows that scans and verifies the integrity of all protected system files on a computer and replaces any corrupted or missing files. SFC can help resolve various system issues by fixing corrupted system files that may be causing the problem.
- Open the search bar in your taskbar by clicking on the magnifying glass icon. Press Windows + S on your keyboard as a shortcut.
-
Type Command Prompt in the search box. When you see it in the results, right-click on it and choose Run as Administrator.

- When prompted by the User Account Control (UAC), click Yes to allow the app to launch with administrative permissions.
-
Type in the following command and press Enter to execute it: sfc /scannow

- Wait for the System File Checker to finish scanning your computer. In the case of a discrepancy, the utility will restore system files and fix all errors related to them.
7. Run the DISM Scan
The DISM (Deployment Image Servicing and Management) scan is a built-in utility in Windows that can help to repair and maintain a Windows installation, including system files and components. The DISM scan can be used to check for and fix any corruptions in the Windows image, including system files and drivers.
-
Open the search bar in your taskbar (or press Windows + S) and then type in Command Prompt. When you see it in the results, right-click on it and choose Run as Administrator.
- When the User Account Control (UAC) prompt appears, click Yes to grant the app administrative privileges.
-
Type in the following command and press Enter to execute it: DISM.exe /Online /Cleanup-image /Restorehealth

- Once you have run the command, allow the process to complete. After it has finished, close the Command Prompt and restart your device to check if the Volume Mixer is working.
Conclusion
The Volume Mixer not opening error can be a frustrating experience for users, but it can be easily resolved by following the steps outlined in this article. If the issue persists, it is recommended to seek assistance from a professional technician. With these solutions, you should be able to restore the functionality of the Volume Mixer and enjoy seamless audio experiences on your Windows 11 system.
One More Thing
We’re glad you’ve read this article. :) Thank you for reading.
If you have a second, please share this article on your socials; someone else may benefit too.
Subscribe to our newsletter and be the first to read our future articles, reviews, and blog post right from your inbox. We also offer deals, promotions, and updates on our products and share them via email. You won’t miss one.