Mac users often struggle with freeing up disk space on the hard drive. Whether you want to install a new application, back your iPhone up, or simply want your Mac device to perform better, you need to make sure you have enough available space. Locating and getting rid of large, unnecessary files is one of the best ways to get this task accomplished.
If you don’t know how to find duplicate files, large files, and hidden files on your Mac, you’ve come to the right place. This article goes in-depth about how you can efficiently free up space by deleting these unneeded types of files off your Mac.
Jump to:
- How to See Hidden Files on Mac
- 1. Show Hidden Files on Mac via Terminal
- 2. Use Third-Party Apps to Find Hidden Files
- How to Locate Large Files on Mac
- 1. Find Large Files on Your Mac Manually
- 2. Use Third-Party Apps to Find Large Files
- How to Find Duplicate Files on Mac
- 1. Find Duplicate Files Manually
- 2. Use Third-Party Apps to Find Duplicate Files
How to See Hidden Files on Mac
Some files on your Mac computer are hidden by default, which makes locating them impossible unless you have the right settings. There are two ways to ensure that these hidden files become visible on your device, allowing you to delete any unneeded content stored locally.
1. Show Hidden Files on Mac via Terminal
You can manually turn on the visibility of hidden files on a Mac by using the Terminal application. You may be required to have access to an administrator account in order to perform this method.
- Press the ⌘ Command + Space keys on your keyboard and type in Terminal.
-
Open the application by clicking on it from the search results.

-
Type or copy and paste the following line into the Terminal window, then press Enter to execute the command:
defaults write com.apple.Finder AppleShowAllFiles true -
Restart the Finder by typing or copying and pasting the following command into the Terminal and pressing the Enter key:
killall Finder

Your hidden files should become visible after performing these steps. However, if you want to avoid having to use an application like the Terminal, feel free to move onto the next section!
2. Use Third-Party Apps to Find Hidden Files
The Funter application allows you to quickly change the visibility of hidden files on your Mac. This app is free to download and use, making it extremely accessible. With the click of a button, you can turn the visibility of hidden files on and off, avoiding the hassle of typing in the right commands.
- Navigate to the Funter download page and install the application onto your Mac.
- Launch the app after it’s been successfully installed.
-
Click on the Funter icon in your toolbar to open the menu. Here, simply toggle the Show Hidden Files option until the switch turns green.
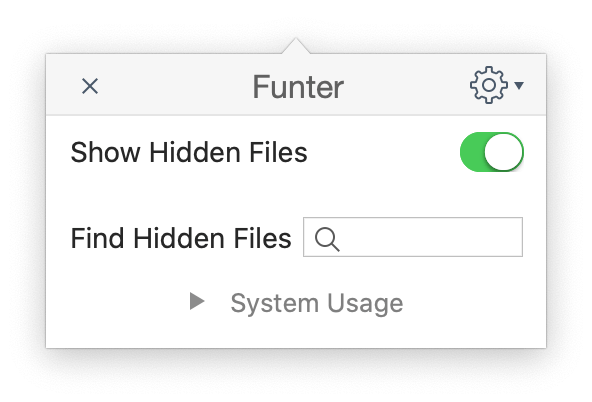
- To turn off the visibility of hidden files, just click the same toggle again so it turns grey.
How to Locate Large Files on Mac
After turning on your hidden files, you can move on to locating the biggest files on your Mac even if they weren’t visible before. There are two ways to get this done, one manual and one automated.
1. Find Large Files on Your Mac Manually
Luckily, Apple has thought of a way to help users locate their largest files with ease when using a macOS system. For those who prefer to take matters into their own hands, there’s an easy way to manually find large files. The instructions below are written for macOS Sierra or higher.
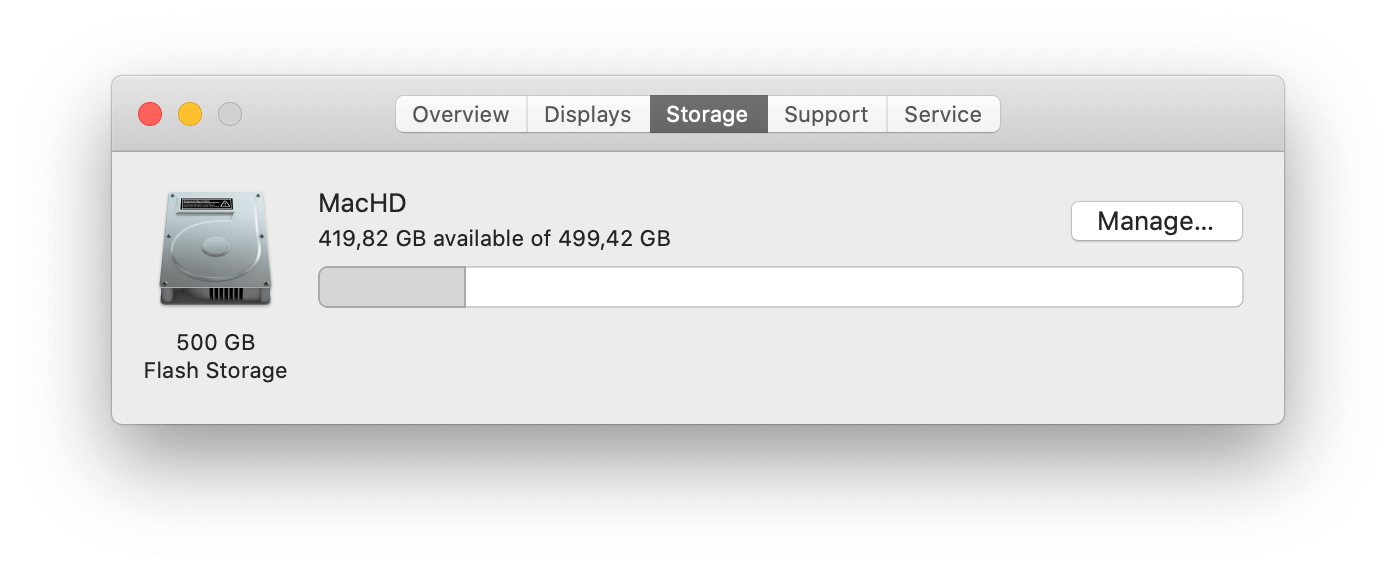
- Click on the Apple icon in the top-left of your screen, then choose About This Mac.
-
Go to the Storage tab and click on the Manage button.
-
Click on the Review Files button in the Reduce Clutter category. This will open up a new window where you can see a detailed breakdown of your largest files that are most likely not crucial parts of applications.

- To delete large files, simply select them on this screen and choose the Delete button. You can select multiple files by pressing down the ⌘ command key.
2. Use Third-Party Apps to Find Large Files
For users who require a more detailed solution to finding and deleting large files, we highly recommend using the free OmniDiskSweeper software.
- Navigate to The Omni Group download page, and install the version of OmniDiskSweeper compatible with your macOS version.
-
Launch the application after successfully installing it to find the largest files on your Mac computer.

How to Find Duplicate Files on Mac
On average, a Mac user accommodates between 5 to 70 gigabytes of duplicate files in a year. This may take a huge toll on your storage space while serving no benefits other than having potential backups of an important file.
Tip: If you’re storing duplicate files locally on your Mac, we recommend moving to a cloud-based backup solution. You can look into websites like Dropbox or Google Drive to get started with this process.
We’ll show you two ways to find and delete duplicate files on Mac operating systems.
1. Find Duplicate Files Manually
The process of deleting duplicate files manually is quite tedious and time-consuming, however, it’s possible and safe. This method works if you don’t trust third-party apps, or just believe you don’t have many duplicate files. Taking a tour around your computer and deleting whatever you feel like you’ve already seen or no longer have any need for is a reliable solution to free up space.
Here are some tips to use when manually looking for duplicate files to delete:
- Make sure to check your Desktop and Downloads folders. These are default locations for the Mac system to store files in, meaning that duplicates are more than likely to show up in these locations.
- Delete duplicate mail attachments by opening the email application and selecting Message > Remove Attachments.
- A great way to manually find duplicate files is by using the Finder. Type an asterisk (*) in the search field, then set it to search This Mac. You can see your files being listed here, allowing you to organize them and find duplicates faster.
When you find a duplicate file, simply select it and drag it into your Bin. Next, all you have to do is right-click on the Bin icon and select Empty Bin. Voila, you’ve freed up some space on your harddisk!
2. Use Third-Party Apps to Find Duplicate Files
If going through your files one by one doesn’t seem very appealing to you, don’t worry. Third-party applications make the process of finding and deleting duplicate files easy on a Mac. We’ll be focusing on an application called Gemini, the duplicate file finder.
This is how you can automatically find and delete duplicate files with the help of Gemini:
- Download and install the application for free by utilizing the trial option on the Setapps website.
- Launch the software and start a scan. This process might take a long time depending on how many files are stored on your computer — be patient and don’t close the application!
- When the scan is complete, you can select which duplicate files you want to delete or keep.
-
Click on the Remove button to free up space by deleting the selected files.
Conclusion
We hope this article was able to help you learn to find large, duplicate, and hidden files on the macOS system. If you need further assistance regarding technical questions, don’t be afraid to reach out to our support team. We’re always ready to help you out!
If you’re looking to read more articles related to modern technology, consider subscribing to our newsletter. We regularly publish tutorials, news articles, and guides to help you in your day-to-day tech life.