This article will teach you everything you need to know about the CRITICAL_PROCESS_DIED error code, including how to fix it. We'll also show you how to prevent future BSOD errors from causing damage to your system.

Do you know what the CRITICAL_PROCESS_DIED blue screen error is? If not, don't worry. Many people are not familiar with this term. This blue screen error is one of the most common on Windows machines but can be very frustrating to deal with.
A CRITICAL_PROCESS_DIED blue screen error is a type of BSOD (Blue Screen of Death) error on Windows machines. This type of error usually signifies a serious problem with your computer and causes your system to crash. It can happen for many reasons, but it's easy to resolve if you know what to do.
Let's dive in and find out how to fix the CRITICAL_PROCESS_DIED blue screen error.
Table of Contents
- What is a blue screen/BSOD error?
- What causes the "CRITICAL_PROCESS_DIED" error?
- Solved: CRITICAL_PROCESS_DIED Blue Screen on Windows
- How to Fix the "Critical Process Died" Stop Code
- Method 1. Boot your computer in Safe Mode
- Method 2. Perform a clean boot
- Method 3. Update your drivers
- Method 4. Uninstall newly installed software
- Method 5. Run the System File Checker (sfc) scan
- Method 6. Run the DISM command
- Method 7. Use System Restore
- Final thoughts
What is a blue screen/BSOD error?
A "blue screen" error (also called BSOD) occurs when your system encounters a severe error. It's a typical problem where your machine receives a STOP code and is forced to reboot.
Most blue screen faults are caused by system-related difficulties that cause Windows to return a STOP code, which leads to a system crash. This occurs without notice, meaning your work may be lost and files damaged. Always make sure you often save and create system backups!
Each blue screen error will emit what's called a stop code. You can use it to find out the cause of the error or look up possible solutions online. It also helps IT professionals identify the issue and troubleshoot your device efficiently.
Luckily, you don't need to spend hundreds of dollars on repairs. Just follow our solutions below to fix the CRITICAL_PROCESS_DIED error! We'll guide you through each step to ensure your computer is restored.
What causes the "CRITICAL_PROCESS_DIED" error?
Blue screen errors can occur in a variety of situations. Knowing the cause of your error can help you directly and efficiently troubleshoot the issue. Here are some of the most common causes for the CRITICAL_PROCESS_DIED error code reported on Windows 10 and 11 devices:
- Issues with a system component. When a process required to run the Windows operating system unexpectedly ceases, this error might occur. It can also result from corrupt system files, which can be restored with Windows troubleshooting tools.
- Hardware problems. If your RAM or hard drive has issues, this error may occur in response to faulty equipment. In this case, you may need to replace your memory sticks or get a new hard drive.
- Faulty or incompatible drivers. Some users have reported that specific drivers may cause this problem on a Windows PC. Make sure your drivers are always up to date and come from an official source!
- Too many applications are running. If you're running too many applications at once, whether actively or in the background, Windows might face the CRITICAL_PROCESS_DIED error. This happens if your system cannot read or write memory due to the huge workload.
- New Windows update. This error can occur when a recent Windows update, such as a Cumulative Upgrade or a security update, has unintended consequences on some PCs.
The solutions for fixing this error are listed below.
Solved: CRITICAL_PROCESS_DIED Blue Screen on Windows
How to Fix the "Critical Process Died" Stop Code
- Run the Hardware and Device Troubleshooting Tool.
- Run the Deployment Imaging and Servicing Management Tool.
- Run the System File Checker.
- Run an Antivirus Scan.
- Update Your Drivers.
- Uninstall Recent Windows Updates.
- Perform a Clean Boot.
- Restore Your System.
Let's dive in:
Method 1. Boot your computer in Safe Mode
It may be essential to enter Safe Mode to complete some of the solutions listed below. You can also begin troubleshooting by determining whether the problem occurs in Safe Mode rather than standard boot mode.
- Reboot your computer and hold the F8 key on your keyboard while the boot screen is visible to enter the Windows Recovery Environment (WinRE). You may also need to hold down the Fn (function) key on specific devices.
- Tip: If you can't boot into WinRE using the keyboard shortcut, keep turning your computer on and off until it automatically starts in the repair environment. You need to turn the computer on and off about three times on average.
-
Navigate through to See advanced repair options > Troubleshoot > Advanced options > Startup Settings > Restart.
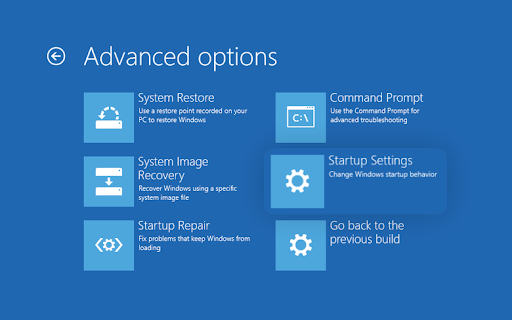
- You'll now see a selection of several restart choices. By pressing F5 on your keyboard, you'll enable Safe Mode with Networking. Wait for your system to restart and see if it successfully boots.
If you're able to boot Windows 10 in Safe Mode without the blue screen error appearing, you can troubleshoot further! For example, scanning your computer for malware with the Windows Defender is a great first step.
Method 2. Perform a clean boot
Start your system in clean boot mode to guarantee that your computer operates without third-party services. Before booting, this will disable any apps and services from third parties, which reduces the possibility of conflicts. See whether you still get the CRITICAL_PROCESS_DIED blue screen problem in this clean boot state.
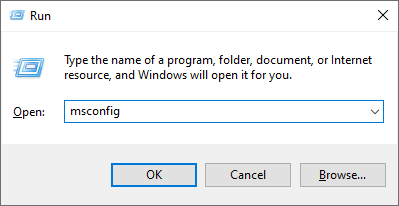
- Boot your computer into Safe Mode using the steps in Method 1. After your system boots, press the Windows + R keys on your keyboard to bring up the Run utility in a new window.
-
Type in "msconfig" without the quotation marks and press the Enter key on your keyboard. This will launch the System Configuration window.
-
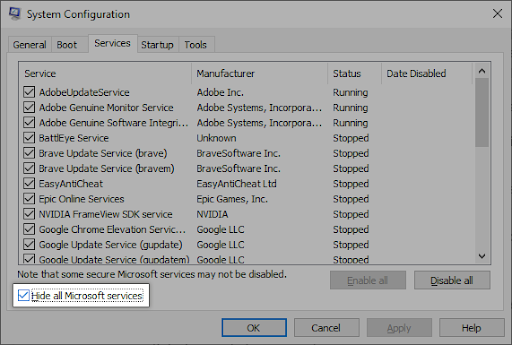
Switch over to the Services tab. Make sure that you check the Hide all Microsoft services box. This is going to ensure that you only see third-party services.
-
After hiding all system services, click the Disable all button to disable every third-party service on your device.
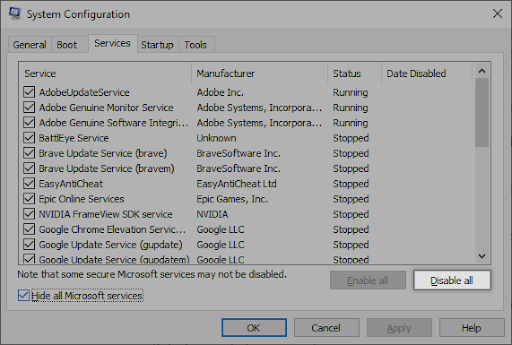
- Click the Apply button and restart your computer. When you boot next, your computer will only initiate essential Microsoft services.
- Restart your computer. You'll be in a clean boot state with only official Microsoft services. Check if the Windows Driver Foundation is still using up CPU resources in this state.
If you notice that the BSOD at hand doesn't happen when you boot in a clean state, a third-party service or app is causing the issue. You need to identify it and replace the associated driver, App or disable the service altogether.
Method 3. Update your drivers
It's possible that your computer's hardware drivers are outdated, or that a rogue/malfunctioning device driver is causing the CRITICAL_PROCESS_DIED stop code. Use the steps below to check for outdated device drivers or update all of them at once.
Update drivers using Windows Update
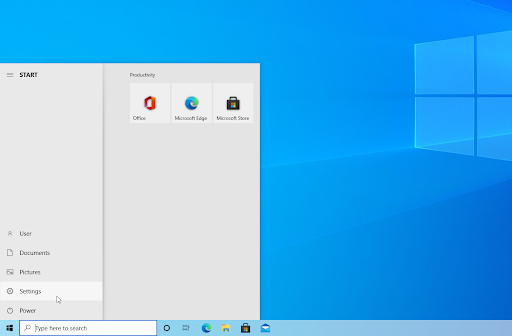
-
Click on the Windows icon in the bottom left of your screen to bring up the Start menu. Choose Settings, or use the Windows + I shortcut.
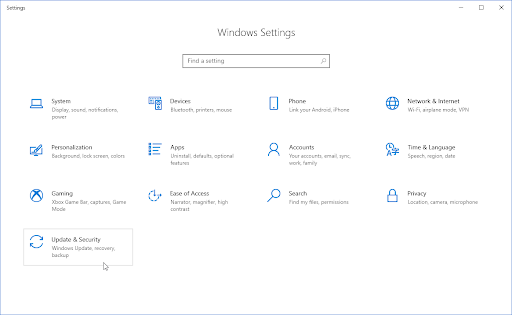
-
Click on the Update & Security tile. This is where you can find most of your Windows Update settings.
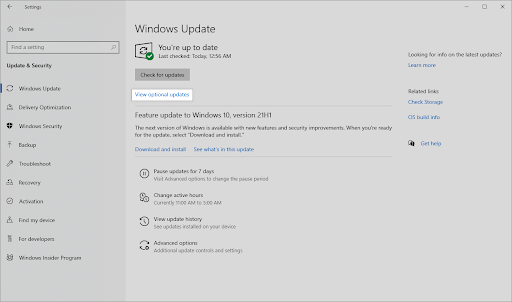
-
Go to the Windows Update section, and click on the View optional updates link if available.
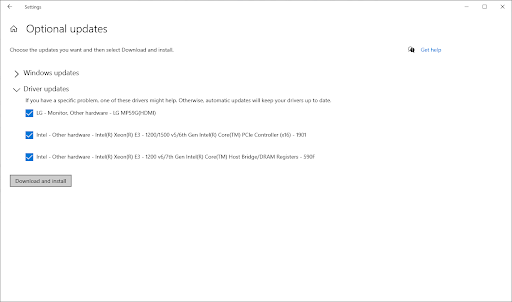
-
Expand the Driver updates section, and review what drivers currently need an update. Place a checkmark next to them and click the Download and install button to update the drivers.
- Allow Windows to update your drivers, and then reboot your computer.
Update drivers using the Device Manager
-
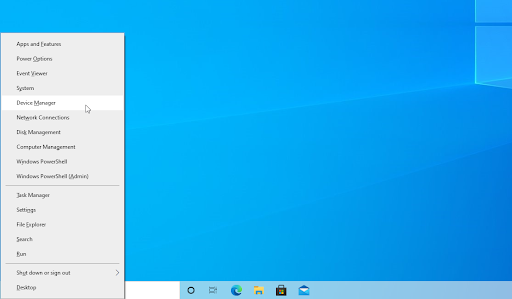
Press the Windows + X keys on your keyboard and click on the Device Manager option from the WinX menu.
-
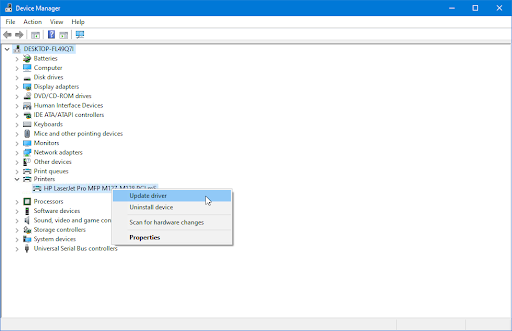
Right-click on the driver you want to update. For example, if a printer driver causes the problem, you need to extend the Printers section. Choose Update Driver from the context menu.
-
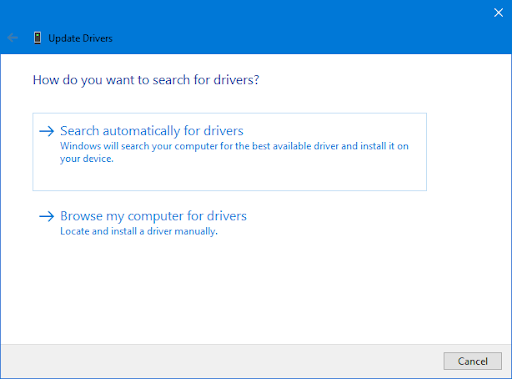
Select Search automatically for drivers from the options. This will allow Windows 10 to connect to the internet and locate the latest drivers for your device. You may be prompted to select a driver if multiple updates are found.
- Wait for the driver installation to complete and restart your computer to apply the changes. You'll immediately be able to tell if updating your drivers has helped in resolving the blue screen error.
Method 4. Uninstall newly installed software
If you recently installed new applications or enabled new services, try to uninstall them and see if the CRITICAL_PROCESS_DIED error happens again.
- Click on the Windows icon in the bottom left of your screen to bring up the Start menu. Choose Settings, or alternatively use the Windows + I shortcut.
-
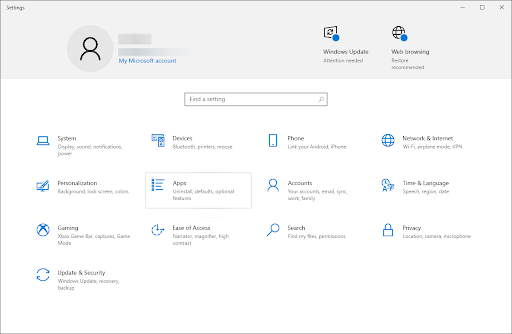
Click on the Apps tile.
-
Switch to the Apps & features section from the left-side panel. You should see a list of applications currently installed on your computer that are detectable by Windows.

-
Set the sorting to Install date. This will sort the list by date of installation, allowing you to see which programs were installed most recently on your computer.

-
Select the application you want to uninstall by clicking on it once. Now, you can click on the Uninstall button.
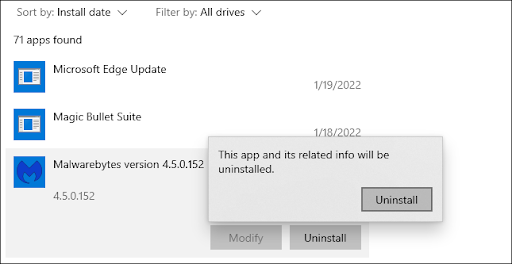
- Click the Uninstall button again to confirm your choice and open the helper wizard. This will open up in a new window. Please note that you can only uninstall one App at a time.
- Allow the uninstaller to modify your device if requested by the UAC (User Account Control). The developer will offer you on-screen instructions to remove the application.
Method 5. Run the System File Checker (sfc) scan
Corrupted systems files can cause massive problems with your operating system, including blue screen errors. The System File Checker (SFC for short) is a built-in tool to help troubleshoot in Windows. It can detect and repair corrupt system files, which may resolve the CRITICAL_PROCESS_DIED error code.
- Reboot your computer and hold the F8 key on your keyboard while the boot screen is visible to enter the Windows Recovery Environment (WinRE). You may also need to hold down the Fn (function) key on certain devices.
- Tip: If you can't boot into WinRE using the keyboard shortcut, keep turning your computer on and off until it automatically starts in the repair environment. You the computer on and off about three-time on average.
-
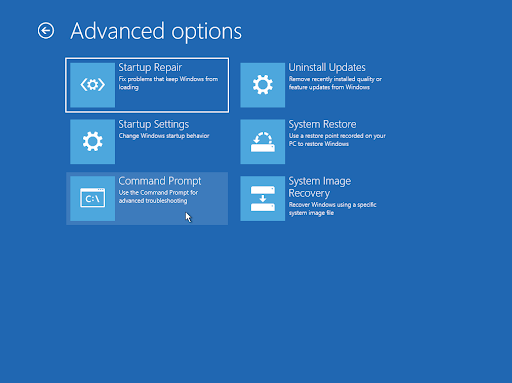
Navigate t on average Troubleshoot > Advanced options > Command Prompt from the Choose an option screen.
-
Type in the following Command and press Enter to execute it: sfc /scannow
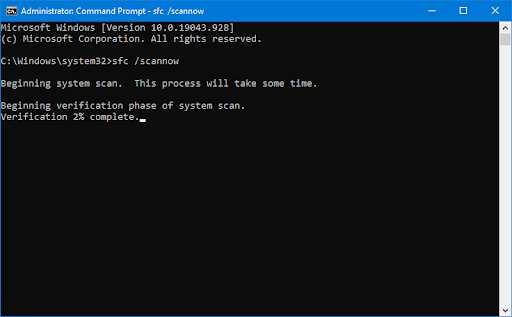
- Wait for the System File Checker to finish scanning your computer. In the case of a discrepancy, the utility will restore system files and fix all errors.
When the scan is complete, restart your computer and see if you still encounter the blue screen error. If the issue doesn't happen again, you've successfully solved it with the System File Checker's help!
Method 6. Run the DISM command
As we mentioned, corrupted systems files can cause massive problems with your operating system, and they're the leading cause of the CRITICAL_PROCESS_DIED error. You can identify and repair faulty system files through the SFC scan, but you can also use the DISM tool to target other areas of your device that may store corrupt files.
The DISM tool also allows you to identify and fix corruption issues with your system by simply running commands in the Command Prompt application. It checks for corruption system-wide and automatically attempts to restore damaged or missing files.
- Reboot your computer and hold the F8 key on your keyboard while the boot screen is visible to enter the Windows Recovery Environment (WinRE). You may also need to hold down the Fn (function) key on certain devices.
- Tip: If you can't boot into WinRE using the keyboard shortcut, keep turning your computer on and off until it automatically starts in the repair environment. Youn the computer on and off about three-time on average.
- Navigate t on average Troubleshoot > Advanced options > Command Prompt from the Choose an option screen.
-
Next, you need to execute a command to fix any issues found on your system. Simply type in the following line and press Enter: DISM.exe /Online /Cleanup-image /Restorehealth.
After you execute the command, wait for the process to finish. Upon completion, close the Command Prompt window and restart your device to see if the CRITICAL_PROCESS_DIED error code happens again when you try to boot into your system.
Method 7. Use System Restore
Before the blue screen issue, your system could have saved a restore point, or you may have created one manually. You'll be able to restore your system to that state in such an instance. This might solve the problem because it's similar to going back in time before a system mistake occurred.
- Open the search bar in your taskbar by clicking on the magnifying glass icon. You can also bring it up with the Windows + S keyboard shortcut.
- Type in System Restore and click on Recovery from the search results. This should be on the top, in the Best match category.
- This will take you to the Control Panel. Here, click on the Open System Restore link that can be seen in the Advanced recovery tools section.
- Follow the on-screen instructions to restore a past point in time. You can select a restore point yourself, or use the recommended one if Windows 10 shows the option. Don't forget to check what files and applications will be affected!
- After choosing the options you're happy with, click on the Finish button and wait for Windows to restore your computer. You'll be able to tell whether or not this worked after your computer restarts with the loaded restore point.
Final thoughts
We hope this article helped resolve the CRITICAL_PROCESS_DIED error on your computer. If you still have questions or need assistance, be sure to leave a comment and we will do our best to help. Additionally, check back soon for more tech articles, troubleshooting guides, and news!
If there are any questions left unanswered or problems not addressed, please feel free to reach out — our team of experts would love to help! In the meantime, keep up with all things tech by checking back for more articles about troubleshooting and following us on social media.