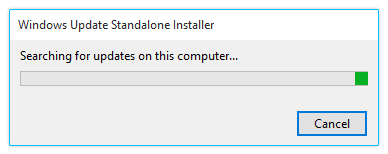
Many Windows users prefer using the Windows Update Standalone Installer to take care of updating their system. It isn't completely offline, however, it provides a reliable way to update your system to its newest version. However, users are reporting an issue with the Windows Update Standalone Installer, where it gets stuck on the "Searching for updates on this computer..." stage.
This means that you're virtually unable to update your device through the Windows Update Standalone Installer, as it spends multiple hours looking for an update, or entirely gets stuck at this stage. It's easy to see why this situation needs to be fixed as soon as possible.
In our article, you can find several ways to restore the Windows Update Standalone Installer on Windows 7, Windows 8, and the newest Windows 10 as well.
Jump to Solutions:
- How to check if your Windows Update Standalone Installer is stuck
- Method 1: Troubleshoot the Windows Installer service
- Method 2: Disable automatic updates on Windows 7/Windows 8
- Method 3: Run the new Windows Update Troubleshooter on Windows 10
- Method 4: Download and apply the most recent Servicing Stack Update (SSU)
- Method 5: Use the DISM command
- Method 6: Fix system file corruption with the System File Checker
How to check if your Windows Update Standalone Installer is stuck
Before we start troubleshooting, it’s important to confirm that the Windows Update Standalone Installer is actually stuck. Without this, the methods below will most likely not help your issue.
Doing this is rather simple, all you have to do is follow a few simple steps.
-
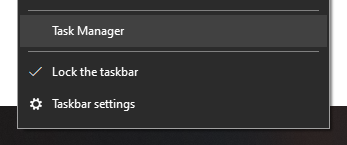
Right-click on any empty space in your taskbar and select the Task Manager. You can also use the Ctrl + Shift + Esc keyboard shortcut for even faster access.
-
If your Task Manager launches in compact mode, make sure to click the “More Details” button in the bottom-left.

-
Switch over to the “Services” tab.

-
Locate the “Wuaserv” service, then right-click on it and choose “Go to Details” or “Go to Process” depending on your operating system.

-
Your Task Manager should automatically switch over to the “Processes” tab, highlighting one of the many running “svchost.exe” processes. Spend some time observing this process. If it constantly uses a high amount of CPU and memory, you can confirm that your Windows Update Standalone Installer is stuck.

- Close the Task Manager.
Now, you should progress accordingly to the results of the little investigation above.
If the “svchost.exe” process seems to be working just fine, then the Windows Update Standalone Installer is most likely not actually stuck. This may be a known glitch, which can simply be fixed by restarting your device and using the installer again.
On the other hand, if the “svchost.exe” process is constantly using high amounts of CPU and Memory, make sure to read our methods below to fix this error.
Method 1: Troubleshoot the Windows Installer service
The first thing you can attempt to do is restart the Windows Installer service itself. While it isn’t directly related to the Windows Update Standalone Installer, it may help to restore the update process.
-
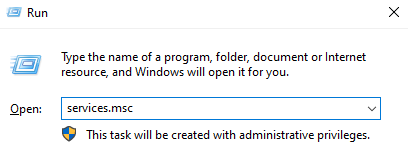
Press the Windows + R keys on your keyboard to bring up the Run utility. Here, type in “services.msc” and press the OK button to open Services.
-
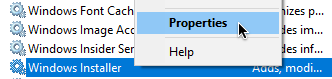
Scroll down and locate the “Windows Installer” service. Right-click on it and choose “Properties”.
-
Click the “Stop” button, then wait at least half a minute. This will give your system time to properly disable the service.

-
Click the “Start” button. This is going to restart the service. (If “Stop” was already greyed out, simply click “Start.”)

-
Make sure to set the “Startup type” to “Automatic” then click OK.

- Restart your computer and check if the error still occurs.
Method 2: Disable automatic updates on Windows 7/Windows 8
For those running earlier versions of Windows such as Windows 7 and Windows 8, it might help to disable automatic updates before running the Windows Update Standalone Installer. Here’s what you need to do.
-
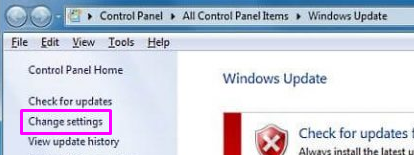
Click on the Start menu and type “Control Panel” in the search box.

-
Open the Control Panel application from the search results.

-
Make sure to change your view mode to either “Small icons” or “Large icons”. This ensures that you see all Control Panel items.

- Click on the “Windows Update” menu.
-
Click on the “Change settings” link seen in the left side panel.
-
Look for the drop-down menu under the “Important updates” section. Click on the menu once and select “Never check for updates (not recommended).”
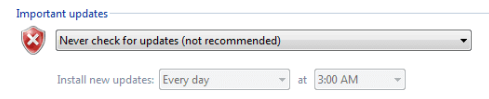
- Click the OK button to apply these changes, then restart your computer. You may try to run the Windows Update Standalone Installer again to see if it gets stuck on the same stage.
Method 3: Run the new Windows Update Troubleshooter on Windows 10
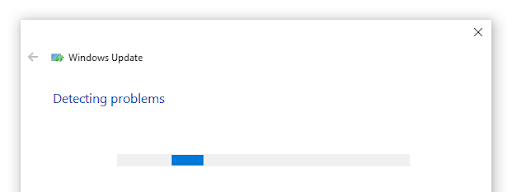
Something many users love about Windows 10 is the fact that it comes with plenty of troubleshooters that help you automatically identify and resolve issues. Although the Windows Update Troubleshooter isn’t readily available on your device, it’s safe and easy to download.
- Click here to download the official Windows Update Troubleshooter.
-
Run the “wu10.diagcab” file you just downloaded by clicking on it once.

-
Click the Next button to start the troubleshooter.

-
Wait for the troubleshooter to identify issues. If any errors are found, follow the on-screen instructions to resolve them.
- Close the Windows Update Troubleshooter and restart your computer. You may try to run the Windows Update Standalone Installer again to see if it gets stuck on the same stage.
Method 4: Download and apply the most recent Servicing Stack Update (SSU)
It’s worth a try to download and install the most recent Servicing Stack Update (SSU) for your operating system. You can do it by following the next steps in this guide.
-
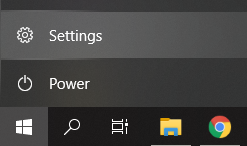
Click on the Windows icon in your taskbar and choose “Settings”. You can also use the Windows + I keyboard shortcut for a faster route.
-
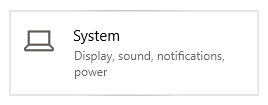
Click on the “System” tile.
-
Scroll down in the left side panel and click on the “About” tab.

-
Check your “System type” version under “Device specifications.” You should either see 64-bit or 32-bit.

-
Go to the SSU download website and use the search bar to look for “Servicing Stack Update.”

- Download and install the latest SSU that matches your computer version and system type. Afterward, try to run the Windows Update Standalone Installer again to see if it gets stuck on the same stage.
Method 5: Use the DISM command
DISM is a command used to repair an image of Windows. By running it, you may be able to restore the problem that caused the Windows Update Standalone Installer to get stuck.
-
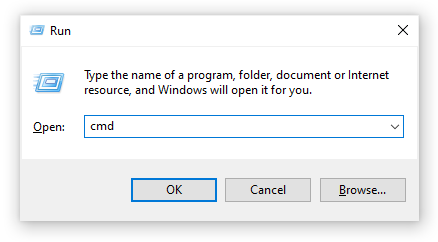
Press the Windows + R keys on your keyboard to launch the Run utility. Type in “cmd” and press Ctrl + Shift + Enter. This is going to open the Command Prompt with administrative permissions.
- Type in the following command and press Enter: dism.exe /Online /Cleanup-image /Restorehealth
- Wait for the DISM command to finish running, then try to run the Windows Update Standalone Installer again to see if it gets stuck on the same stage.
Method 6: Fix system file corruption with the System File Checker
The System File Checker is a tool available in Windows 10 by default. It’s also called an “SFC scan,” and it’s your quickest way to automatically fix corrupted system files and other issues.
Here’s how to run it.
-
Press the Windows + R keys on your keyboard to launch the Run utility. Type in “cmd” and press Ctrl + Shift + Enter. This is going to open the Command Prompt with administrative permissions.
- If prompted, make sure to allow the Command Prompt to make changes on your device. This means that you might need an administrator account.
-
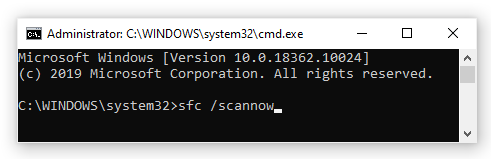
Type in the following command and press Enter: sfc /scannow
- Wait for the System File Checker to finish scanning your computer. If it finds any errors, you’ll be able to fix them automatically through the SFC command itself, which may also fix related errors.
We hope that this article was able to help you resolve the issue with the Windows Update Standalone Installer getting stuck on the “Searching for updates” stage.
Are you interested in learning more about Windows? You can browse our dedicated Help Center section for related articles. Click here to learn more about Windows Update Agent.
If you’re looking for a software company you can trust for its integrity and honest business practices, look no further than SoftwareKeep. We are a Microsoft Certified Partner and a BBB Accredited Business that cares about bringing our customers a reliable, satisfying experience on the software products they need. We will be with you before, during, and after all the sales.