
Not all of us find much use in Microsoft’s Visual Studio. If you aren’t someone developing applications, you must be confused as to why Visual Studio is even installed on your device.
You can remove Visual Studio from your computer in many ways depending on the kind of removal you desire. Sometimes it’s beneficial to delete all leftover files of software, but you might be satisfied with a standard uninstallation as well.

Visual Studio is available on both Windows and Mac operating systems, meaning that the uninstallation process is different. Follow our guides below to learn how to uninstall Microsoft Visual Studio on Windows 10 and Mac.
What is Visual Studio?
Microsoft’s Visual Studio is a tool allowing programmers and developers to create applications for different platforms. By using Visual Studio, you can develop anything from desktop and mobile apps to games, web pages or services. Of course, this is only useful for people interested in developing such things.

For a regular home user, Visual Studio isn’t something you’re required to keep on your computer. However, if you have a shared PC, make sure to ask everyone whether or not they use Visual Studio before you remove it.
How to uninstall Visual Studio on Windows 10
There are different methods you can use to uninstall visual studio, however, the most common ones are;
How to Uninstall Visual Studio using Control Panel
The most standard way of removing Visual Studio from your Windows 10 PC is by using the installer itself.
This process is automated and allows anyone to quickly uninstall the software. However, it’s possible that it’ll leave some junk behind from Visual Studio’s files.
-
Use the Search bar in your taskbar and look up then launch Control Panel. This will open up the classic Control Panel instead of going to the Settings app.

-
Change the View mode to Large icons.

- Click on Programs and Features.
- Find Visual Studio from the list. You can click on Name to have the list organized into alphabetical order.
-
Right-click on Visual Studio and choose the Uninstall option.

Uninstall using Visual Studio Installer
Installing Visual Studio isn’t the only thing you can do with the included Visual Studio Installer. This application can be used to remove the software quickly without having to know anything about computers.
As an added bonus, even if you need to reinstall Visual Studio in the future, you can always use the Visual Studio Installer to do that.
- Locate the Visual Studio Installer:
- On Windows 10, you can open up the Windows menu by clicking on the Windows icon on your taskbar.
-
Your apps are grouped by alphabetical order. Scroll down until you see the letter V and find the Visual Studio Installer.

- Alternatively, you can use your File Explorer to navigate to the following location: C:\Program Files (x86)\Microsoft Visual Studio\Installer\vs_installer.exe.
- Open the installer. In some cases, you might be prompted to update before you can proceed.
- In the installer, find the version of Visual Studio that you want to uninstall.
-
Click on More, then choose Uninstall.

-
Click the OK button to start the uninstall process.

- Wait for the uninstaller tool to remove Visual Studio from your computer.
How to Delete Visual Studio Files Manually
If you want to make sure you get every last bit of Visual Studio uninstalled from your PC, you can always try to delete its files manually.
Follow the steps below to learn which files should be removed in order to get rid of Visual Studio from your computer:
-
Open the File Explorer from your taskbar.

- Click on This PC, then open Harddrive (C:).
-
Check if you have Hidden items showing by clicking on the View tab. If the box next to Hidden items is empty, click on it to place a checkmark.

-
Open the ProgramData folder.

- Find and open the Microsoft folder.
- Delete the VisualStudio folder.
-
Go back to the open Hard Drive (C:) folder and open Program Files (x86).

- Locate the Microsoft Visual Studio folder and delete it as well.
You can also delete folders generated by Visual Studio such as:
- Microsoft ASP.NET Core
- Microsoft OneDrive
- Microsoft SDKs
- Microsoft Web Tools
- Microsoft.NET
- The Visual Studio folder inside MSBuild
How to Uninstall Visual Studio and all Other Related Files
Uninstalling Visual Studio the standard way will most likely leave some files behind because some applications might depend on them to run properly.
Namely, the uninstaller might leave items such as the Microsoft .NET Framework, Microsoft Visual C++ Redistributables, and Microsoft SQL Server on your computer.
To remove any and all Visual Studio files, follow these steps:
-
Download the Visual Studio Uninstaller tool from GitHub.

- Extract the files of TotalUninsaller.zip somewhere on your computer. We recommend using either WinRAR or 7zip to get the job done.
-
Right-click on Setup.ForcedUninstall.exe and choose Run as administrator.

-
If prompted, click Yes to allow the uninstaller to modify files on your PC.
- A Command Prompt will open up. You can read more about the tool and also change your mind if you’d rather try a different method.
-
To proceed with the uninstallation, type in Y and press enter.
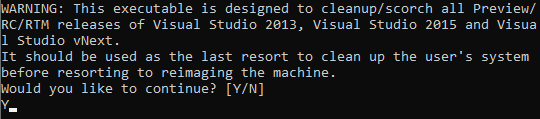
- Wait for the uninstallation to finish. Once the Command Prompt closes, you’re done removing Visual Studio and its components from your computer.
How to Uninstall Visual Studio On Mac
There are two options for those who want to uninstall Visual Studio from a Mac operating system. This is significantly less than what the Windows equivalent offers, but you still get to choose between manually deleting files or automating the process.
How to Uninstall Visual Studio for Mac Manually.
When manually uninstalling Visual Studio, it’s important that you remove additional files and services installed by it as well. Without doing so, other programs on your Mac might experience issues that require troubleshooting.
Follow these steps to manually remove Visual Studio from your Mac:
- If open, quit the Visual Studio application.
-
Open your Finder and click on Applications.

-
Find the Visual Studio.app file then right-click on it and choose Move to Trash.

Next, we will be removing Visual Studio’s services:
- In the Finder’s menu bar, click Go, then Go to Folder.
- Type in ~/Library and hit Go.
- Remove all of the following folders:
- ~/Library/Caches/VisualStudio
- ~/Library/Caches/com.microsoft.visual-studio
- ~/Library/Preferences/VisualStudio
- ~/Library/Logs/VisualStudio
- ~/Library/Logs/VisualStudioInstaller
- Empty your Trashcan.
You can repeat this process for any Visual Studio related software such as ASP.NET Core or Xamarin.
Use App Cleaner & Uninstaller
steps
-
Download Nektony’s App Cleaner & Uninstaller. You can use the free version, or purchase full access.

- Install the application then launch it.
-
Go to the Applications tab and select Visual Studio.

-
From the right-side panel, choose every component you want to delete and click on the Remove button. You can also use the Uninstall button under Visual Studio’s file size to delete everything without exceptions.
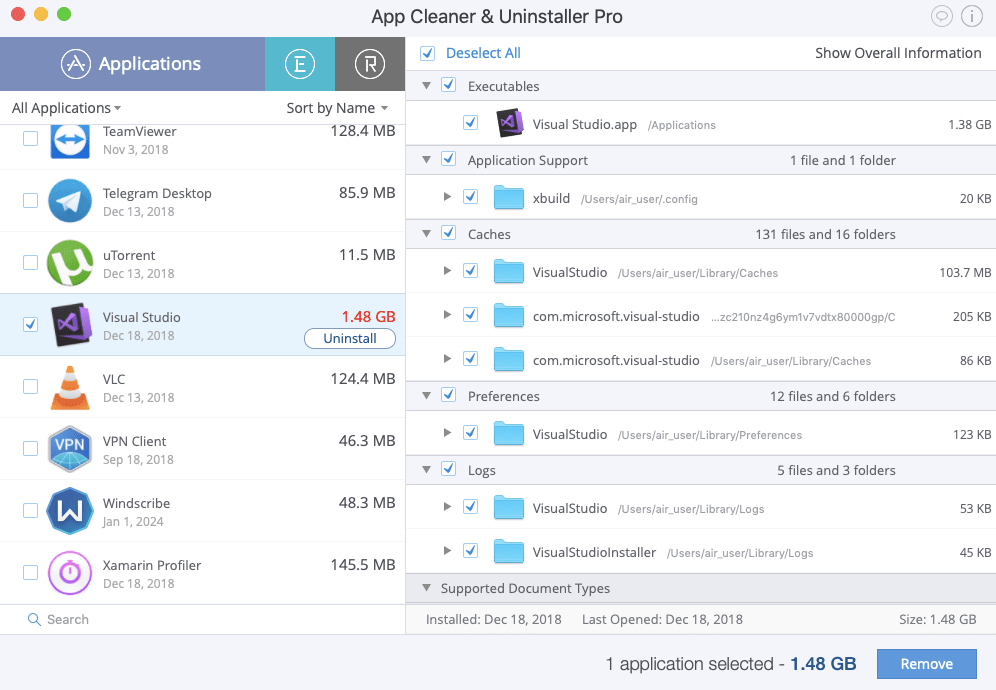
- Repeat the process for any additional apps such as Xamarin.
Hopefully one of our methods worked for you in removing Visual Studio from your Windows or Mac operating system.
If you’re looking for a software company you can trust for its integrity and honest business practices, look no further than SoftwareKeep. We are a Microsoft Certified Partner and a BBB Accredited Business that cares about bringing our customers a reliable, satisfying experience on the software products they need. We will be with you before, during, and after all the sales.
That’s our 360 Degree SoftwareKeep Guarantee. So, what are you waiting for? Call us Today on +1 877 315 1713 or email sales@softwarekeep.com. As well, you can reach us via Live Chat.