When seeking productivity at work, Outlook is your go-to program. Here's a quick Outlook 2019 for Mac to help you stay on top of your communication review.
Stay on top of your projects with the new update for Microsoft Outlook for Mac. The email organizer is your go-to program when seeking productivity at the workplace. Chat with your prospects via the integrated Skype application and use the functions that let you attach documents from different cloud storage providers without leaving Outlook 2019 for Mac.
The 2019 version comes with all tools, functions, and features found in preceding versions, together with a few updates. When upgrading to the 2019 version of Outlook for Mac from the 2016 version, you notice advancements like the mentioned feature, delivery receipts, email templates, and much more.
Outlook 2019 for Mac Features
Here, learn about the new updates, functions, and features Microsoft has included in Outlook for Mac 2019.
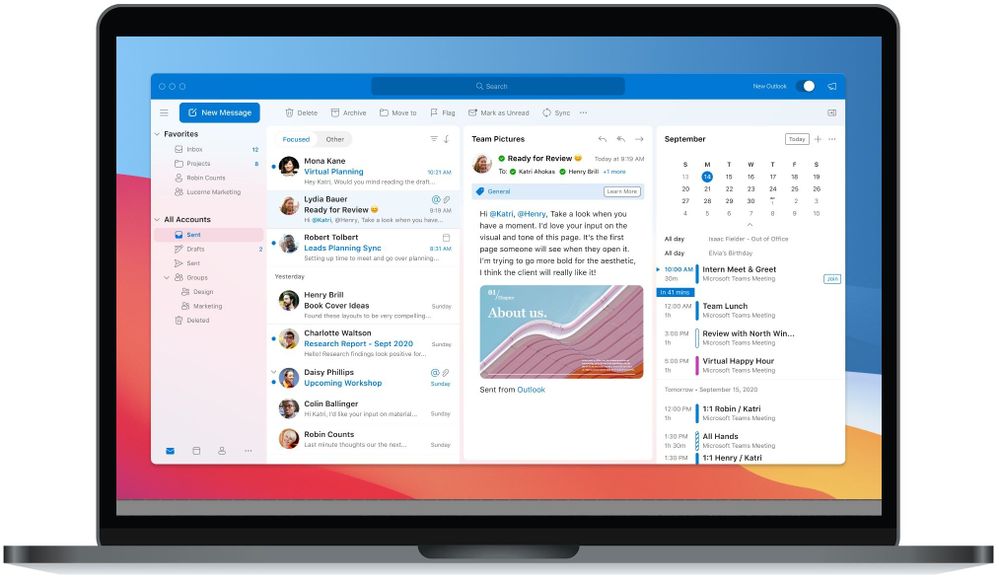
1. Focus on The Messages That Matter Most with Focused Inbox
The mailbox is a command center for the majority. You want to keep track of completed tasks, projects at hand, and upcoming assignments. The new Focused Inbox feature helps separate important emails from less important ones. This feature helps you concentrate on what matters most.
The box appears on the Focused tab for emails that need your attention, while the rest sits under Other tab. Outlook lets you switch between the tabs in your inbox should you need to have a read. Also, you receive email notifications for both tabs – Focused and Other.
How Do You Turn Focused Inbox On?
- Open Microsoft Outlook for Mac 2019.
- Navigate to the Organize tab on the ribbon > click on Focused Inbox.

The duo – Focused and Other tabs move on the upper section of your mailbox. Notifications appear whenever you receive an email, whether in the Focused or Another tab. Switch between the tabs when you want to read emails.
If need be, adjust your settings to show the count of unread emails, badge count or show notifications for emails flowing in only the focused tab. To access these settings on Outlook 2019 for Mac, navigate to Preferences > then Notifications and Sounds > and Badge count.
How to Change the Organization of Your Messages?
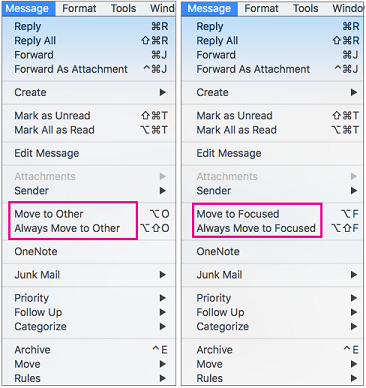
- While on your inbox’s interface, navigate to the Focused tab, and choose the message to move.
- Move only the chosen message by selecting Message > then Move to Other. If you want to all emails from the specific sender to flow to the Other tab, choose Message > then Always Move to Other.
- Move only the chosen message by selecting Message > then Move to Focused. If you want to all emails from the specific sender to be delivered to the Focused tab, choose Message > then Always Move to Other.
How Do You Turn Focused Inbox Off?
- Navigate to the Organize tab and click on Focused Inbox.
- Both tabs – Focused and Other will vanish from the upper section of your inbox.

Please note: Keep your Outlook 2019 program updated to use all these functions. To check for updates, navigate to the Help tab > then click Check for Updates.
2. Grab Attention with the @mentions Feature
Millions of emails are exchanged every second worldwide! That said, chances of having your email noticed fast are minimal. Outlook introduced the handy @mentions feature to grab someone’s attention within the email message or even an invitation.
Using the innovative attention-grabbing feature is very easy. In the email message, type @ symbol followed by the name of the person whose attention you want. Doing this highlights the person’s name or invitation information and adds them to the receiver’s box (To line). Your target should notice the @ mark in their Inbox next to the message.
How to Use The @mentions?
- Type @ in the email’s body plus the first three or four letters of your target’s name – first or last.
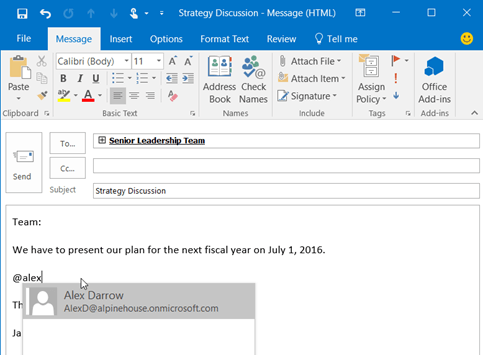
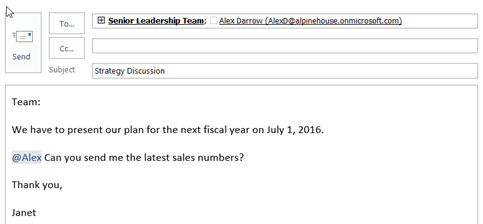
- Within the body of your message, suggestions of names pop up and you choose the person you are looking to mention. Upon click on the specific name, the person’s full name is inserted.

- Outlook 2019 for Mac lets you delete part of the mention. This means all other names other than the contacts first name are cleared. Also, Outlook adds the contact to the invitation or the To box of the email.
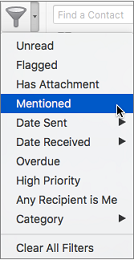
How to Find Messages That Mention You?
Microsoft Outlook for Mac 2019 comes with a message filtering tool that lets you categorize messages that mention you in one folder. This means you will not miss mentions even if you receive tons of emails.
- Navigate to the ribbon and click the Home tab.
- Select Filter Email to reveal a drop-down menu > select Mentioned.
Please note: For you or your recipients to see the mentions in Outlook, you must have Exchange Server 2019 in use.
4. Better Visual Updates, Better Impact
Pump up the style in your documents using the latest visual updates in Outlook 2019 for Mac. Imagine the visual impact your presentations ooze when you add styles like icons, pictures or Scalable Vector Graphics (SVGs) with filters. Outlook lets you insert different graphics in the email message; thus, your email becomes more engaging.
How to Insert Inline Graphics in Outlook Messages?
An online graphic is one that is inserted in the email message instead of attaching it as a file. This means you can modify how texts wrap around the images; thus, enhancing the impact of your email.
Before you can insert your images, remember to compress them to match the size supported by Outlook 2019. Follow the steps below after reducing the images to the required size.
- Compose a New Email. Ensure your message is in HTML format.
- Select the Format Text tab in your email > then HTML.
- Select the Insert tab on the ribbon and place your cursor in your email message where you want to insert the SVG file.
- On the Illustrations tab, click Pictures. Locate your SVG and click on it to add to your email body.
How to Customize Your SVG Files?
You have lots of customization options available in Outlook 2019 for Mac. Customization tools are located under the Graphical Format tab.
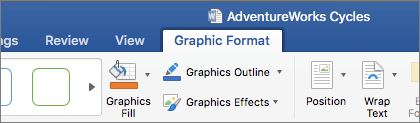
Some of the tools you can use to enhance the visual appearance of your email include:
- Change Graphic: The tool enables you to replace the existing image with a different one.
- Graphics Styles: Yet another tool containing awesome styles like color fill.
- The Graphics Effects tool gives your SVG files some oomph. Unique styles coming with this tool include glows, 3-dimension effects and drop shadows.
- Use Graphics Outline if you need the line around your Scalable Vector Graphic modified.
- There is a Wrap Text tool that helps determine how your texts flow around your image.
- Move-in front or behind of your image other files using the Send Backward or Bring Forward tools.
- It is easier to move your icon or image sideways or in the middle using the Align tool.
- Flipping your inline image vertically or horizontally is possible with the Rotate tool.
5. Creating and Collaborating with Groups Got Easier
Not only does Outlook 2019 for Mac allows you to create groups, but also invite, add and remove group participants. Create an invite link and share it via email to persons you wish to invite to join your group.
Note that you need to have an Office 365 subscription for you to create or joking groups.
How to Create A Group in Outlook?
- On your Mac, open Microsoft Outlook 2019.
- On the ribbon, choose File > New > then Group. Should the Group feature miss in your menu, kindly, contact your organization for help.
- Fill the details of your group as follows:
- Group name. Come up with a unique name and that which resonates with the group’s purpose. Also, a suggested email address is offered upon typing the group’s name. If the group name you think of is in use already, you will get a “Not available” alert. Once a group name is chosen, it cannot be altered.
- Description. Write a brief description of what the group is about. Your group’s description is also part of the welcoming message new members see when joining. Hit next when ready.
- Classification. Classification options hang on your organizations set up.
- Privacy concerns: By default, a new group is private upon creation. One has to get approved before they can see the activities of your group.
- Choosing the Public option creates a group whose content is viewable viewed by anybody in your organization.
- Private mode. For private groups, only members of the groups can view activities.
- There is an option to send events and conversations of the group to inboxes of all members. Activate this function by selecting Send all group conversations and events to members' inboxes. They can change this setting later box. Members can opt-out of the preferences for their individual inboxes.
- Click Create to add members.
How to Add and Remove Members in Outlook Groups?
Adding numbers
- Open MS Outlook 2019 for mac.
- Navigate to the group card of the group.
- Select Members.
- Add new members by entering their names or email addresses. You can add guests – persons who aren’t from within your organization.
- Select Add Members
Removing members
- On your Outlook for Mac 2019, open the group card of the group.
- Select Members.
- Click X symbol against the name of the member you want to remove. Remember that this function is accessible only to group owners.
- Click Remove.
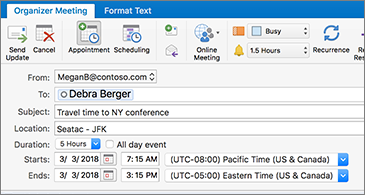
6. Keep Time zones In Check When Travelling
The new Outlook update – 2019 version, caters for persons who are always on the move. This means missing important meetings when you cross different time zones is a long-gone problem.
Select the Organizer Meeting tab to create events that begin and end in different time zones. Don’t worry about figuring out the numbers, as Outlook 2019 for Mac does the conversions.
7. Smarter Email Experiences with Summary Cards
Outlook for Mac 2019 never disappoints when it comes to organizations. While email experiences are spot on, travel details are added to your calendar with similar summary cards when Outlook detects flight reservations.
These summary cards show all the details about your travel event. Details include locations, time, date, the confirmation number, and many more. See more travel details on the original booking email with one click on the summary card.

8. Smarter Email Experiences with Summary Cards
Deleting, archiving or even flagging emails is now easier with the new customizable swiping gestures in Outlook 2019 for Mac. Swiping gesture features are compatible with a magic mouse or the Mac multi-touch trackpad.
How Do You Customize Swiping Gestures?
Turning on Swipe Gestures;
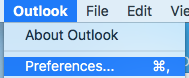
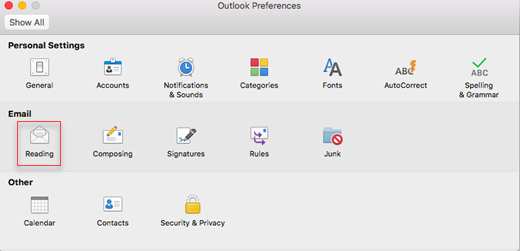
- On Outlook, Choose Preferences.
- Select Reading. Navigate to Swipe Gestures and customize the Swipe left on the message list to: and Swipe right on the message list to options. Custom alternatives are Flag, Archive, Delete, and Mark as Read.
Turning Off Swipe Gestures;
- On Outlook, select Preferences.
- Select Reading.
- Navigate to Swipe Gestures.
- Click on the box next to Swipe left on the message list to > then None.
- Click on the box next to Swipe right on the message list to > then None.
- Advancements in Read and Delivery Receipts
9. Advancements in Read and Delivery Receipts
Outlook 2019 for Mac lets you request either delivery or read receipt when you send an email. The delivery receipt is a notification that your document or message has reached the receiver, but they are yet to see or open it. And, the read receipt asserts that the recipient opened your message.
How to Request A Read Receipt?
- Write your email message in Outlook 2019 for Mac.
- Choose options > then Request Receipts > lastly Request a Read Receipt.
- Click Send and your email should be on its way to the recipient.
How to Request A Delivery Notification?
- Write your email in Outlook for Mac 2019.
- Choose Options > then Request Receipts > and lastly Request a Delivery Receipt. Click send.
Conclusion
Outlook 2019 for Mac remains top of email management programs. Not many email management software can offer features close to what MS Outlook encompasses. The program comes with handy phishing and spam prevention tools to keep intrusive emails at bay. You want flawless integration with your calendar events and to-do lists.
You want to find your meeting schedules well organized with a single click. You want Outlook 2019 for Mac. The fast search tools and virtual folders are unique features you cannot find in your typical email delivery service.
While Outlook comes with lots of goodies for everyday usage, there exist one or two compelling issues. Some Mac users find navigating through the many options a tad confusing, especially when they want to send a simple email. When compared to many other email offerings in the market, Outlook for Mac 2019 is highly-priced;
Mac users who live around computing will find MS Outlook 2019 a must-have program.
Have you enjoyed reading the review :)
Please share it on your socials for someone else to benefit too.