
Are you tired of the tedious process of entering data in Excel spreadsheets, cell by cell? Imagine a simpler way to input information, one record at a time, without the need for constant scrolling.
In this tutorial, we'll show you how to create a user-friendly data entry form in Excel. By activating the built-in input form and adding a special button to your worksheet, you'll streamline your data input process and save valuable time. Say goodbye to the traditional cell-by-cell method and say hello to a more efficient and organized way of managing your data.
Table of Contents
- Streamline Data Entry with Excel's Form Feature
- How to add the Form tool to Excel
- How to make data entry form in Excel
- How to add a new record
- How to search for records
- FAQs
- Final Thoughts
Streamline Data Entry with Excel's Form Feature
Excel provides a convenient data entry form that simplifies and enhances the input process, especially in large worksheets. Instead of manually typing data into individual cells, which can lead to errors and confusion, the data entry form offers a more organized and user-friendly approach.
Here's how the traditional method of populating Excel tables typically works: users input data directly into cells, often having to scroll back and forth between columns and rows. This back-and-forth movement increases the chances of making mistakes and entering information in the wrong cells.
To streamline this process, Excel offers a solution by displaying a single row of information in a dialog box. This form allows users to add new records accurately, edit existing ones, and update information conveniently. By using the data entry form, you can focus on one record at a time, ensuring accurate and efficient data entry.
Furthermore, Excel's data entry form can be enhanced with Data Validation. This feature allows you to define specific criteria for data entry, ensuring that only valid entries meeting those criteria are accepted. This helps maintain data integrity and prevents incorrect or inconsistent information from being entered.
It's important to note that data entry forms are supported in various versions of Excel, including Excel 365, Excel 2019, Excel 2016, Excel 2010, and Excel 2007. However, they are not available in Excel Online (Excel for the web).
How to add the Form tool to Excel
To add the Form tool to Excel, follow these steps:
- By default, the Form tool is hidden in Excel, so you need to make it visible. There are two options to add it: to the ribbon or the Quick Access Toolbar (QAT).
-
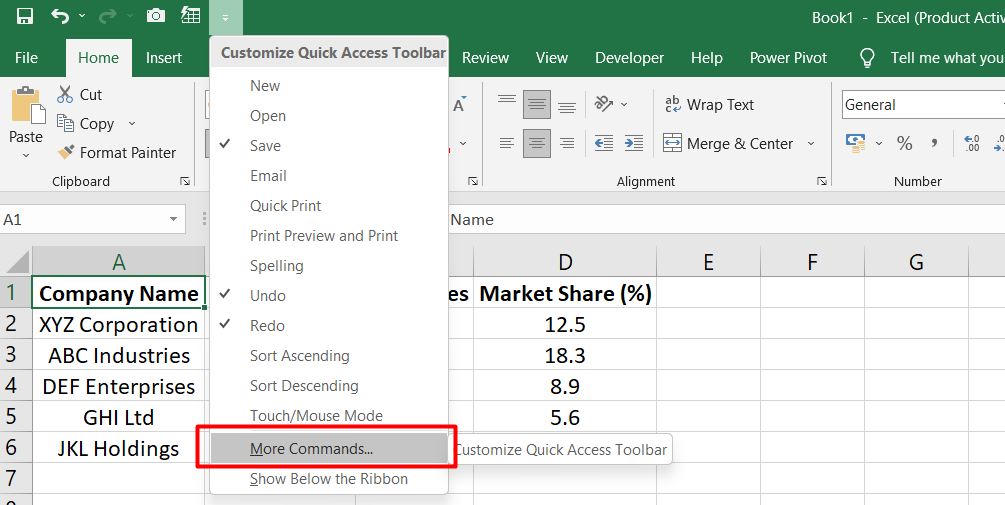
To add the Form tool to the Quick Access Toolbar (QAT), click the small arrow at the far-right of the QAT. Then, select "More Commands" from the pop-up menu.
-
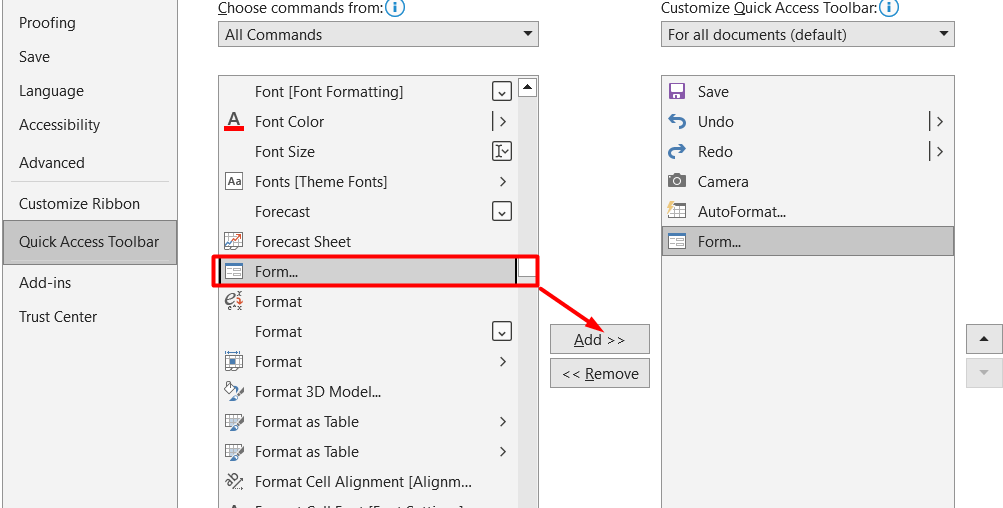
In the Excel Options dialog box, choose either "All Commands" or "Commands Not in the Ribbon" from the "Choose commands from" dropdown menu.

- Scroll through the list of commands on the left until you find "Form..." and select it.
-
Click the "Add" button in the middle to move the Form tool to the list of QAT commands on the right.
- Click "OK" to save the changes and close the dialog box.
Once you've completed these steps, the Form icon will appear in your Quick Access Toolbar, making it accessible in all your Excel workbooks.
With the Form tool now available, creating a data entry form for any table (new or existing) is as simple as clicking the Form button.
Alternatively, you can also add the Form tool to the ribbon using a similar process.
How to make data entry form in Excel
To create a data entry form in Excel, follow these steps:
- Start by entering your column headings in the top row of your worksheet. If you already have existing data, you can skip this step.
-
Select any cell within your dataset and press Ctrl + T on your keyboard. This will select all the data and convert it into a table.
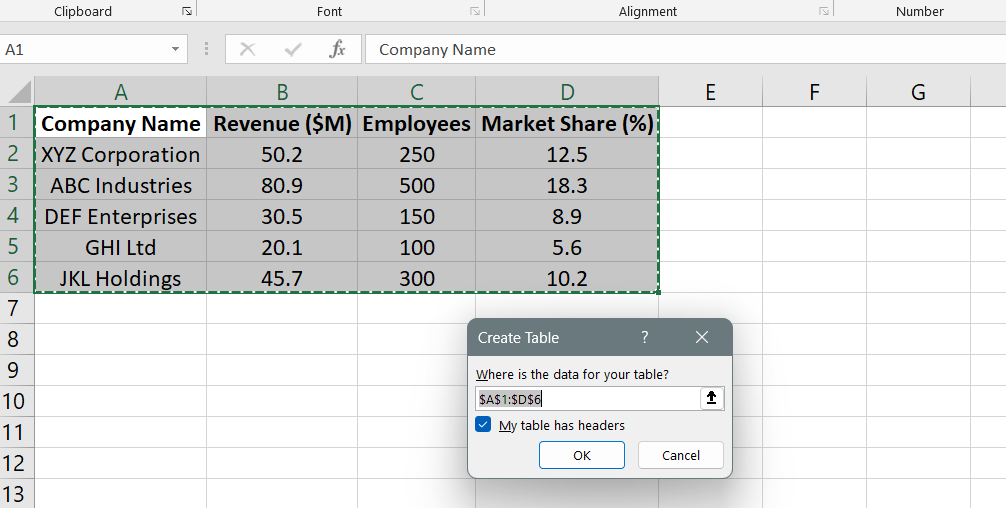
- With the cursor placed anywhere within the table, click the "Form" button. This will automatically generate a data entry form for your table.
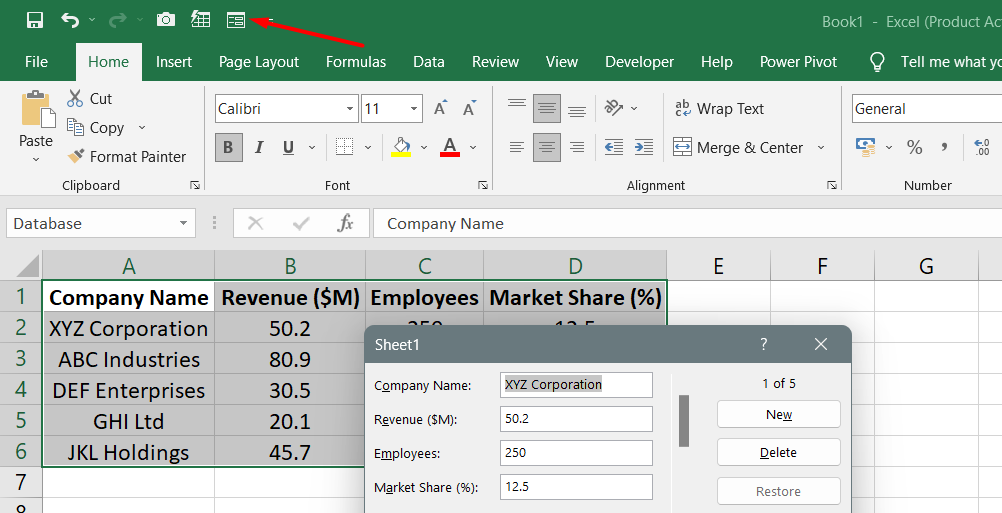
The Excel data entry form will appear, featuring fields corresponding to your column headings. The form provides several buttons and key navigation options:
- New: Clicking this button allows you to add a new record to your table.
- Delete: This button deletes the current record.
- Restore: If you have made changes to a record but wish to revert to the original values, click this button.
- Find Prev and Find Next: These buttons let you navigate between records based on specific criteria.
- Criteria: By clicking this button, you can specify criteria for finding specific records.
- Close: To exit the data entry form, click this button.
In addition to the buttons, you can use certain key combinations for navigation:
- Tab: Move to the next field.
- Shift + Tab: Move to the previous field.
- Enter: Save the current record and start a new one.
By utilizing the Excel data entry form, you can easily and efficiently input data into your table, ensuring accuracy and improving productivity.
How to add a new record
To add a new record to your table using the data entry form in Excel, follow these steps:
- Select any cell within your table.
-
Click the Form button, either located on the Quick Access Toolbar or on the ribbon.
- In the data entry form that appears, click the New button.
- Enter the information for the new record in the respective fields of the form.
- Once you have entered the data, press the Enter key or click the New button again. This action will add the record to the table and provide a blank form for entering the next record.
Additionally, you can use shortcuts within the data entry form to quickly enter specific information. For example:
- To insert today's date, press Ctrl + ; (semicolon).
- To enter the current time, press Ctrl + Shift + ; (semicolon).
These shortcuts can help expedite the process of entering data accurately into the form.
How to search for records
To search for records using the data entry form in Excel, you have a few options:
- Find Prev and Find Next buttons: These buttons allow you to navigate through the records one by one, either in a forward or backward direction. You can easily locate specific records by clicking on these buttons.
- Vertical scroll bar: You can also use the vertical scroll bar on the right side of the form to scroll through the records quickly. Dragging the scroll bar up or down allows you to view different records.
- Criteria button: If you want to find records that meet specific conditions, click on the Criteria button. This enables you to search for records based on specific criteria you define.
For example, if you want to locate all projects assigned to the Design department, enter "Design" in the Department field and press Find Next. The form will then display the first record matching the criteria.
Wildcard characters can be used to broaden your search. For instance, to find projects that contain the word "skill" anywhere in the project name, enter "skill" in the Project field.
When dealing with numbers and dates, logical operators like greater than (>), less than (<), equal to (=), and not equal to (<>), can be helpful. For example, to view records where the start date is prior to March 1, 2021, use "<1-Mar-2021" or "<3/1/2021" as the criteria.
It's important to note that criteria on a data form are not case-sensitive. Therefore, searching for "Design" in the Department field will also find records with "DESIGN" or "design".
FAQs
How do I create a user entry form?
To create a user entry form in Excel, you can utilize the built-in form feature by enabling it through the Excel Options menu.
How do I create an access form for entering data?
To create an Access form for entering data, you can use the Form Wizard in Microsoft Access to guide you through the process of creating a form based on a table or query.
How can I make a form?
You can make a form in various Microsoft applications like Excel, Access, or Word by utilizing their respective form creation features, such as Excel's built-in form or Access's Form Wizard.
How do I create a form in Microsoft?
To create a form in Microsoft applications like Excel, Access, or Word, you can access the form creation features available within each application, such as the built-in form feature in Excel or the Form Wizard in Access.
What is the difference between Excel and Access?
Excel is primarily used for spreadsheet-related tasks, such as data analysis and calculations, while Access is a database management system used for creating and managing databases, including storing, retrieving, and manipulating large amounts of data efficiently.
Final Thoughts
Creating a data entry form in Excel can greatly simplify and streamline your data input process. By using the built-in form feature, you can focus on individual records without the need to navigate through cells and rows.
The form provides a user-friendly interface where you can easily add, edit, and update data. Additionally, you can leverage Data Validation to ensure accurate and consistent entries.
One more thing
If you have a second, please share this article on your socials; someone else may benefit too.
Subscribe to our newsletter and be the first to read our future articles, reviews, and blog post right in your email inbox. We also offer deals, promotions, and updates on our products and share them via email. You won’t miss one.
Related articles
» Create Reports in Excel: A Guide for Effective Data Analysis
» Step-by-Step Tutorial: How to Create Drop Down List in Excel
» How to Create a Pie Chart Excel: Step-by-Step Guide
» Excel Data Management Functions - Organize and Analyze Data Efficiently