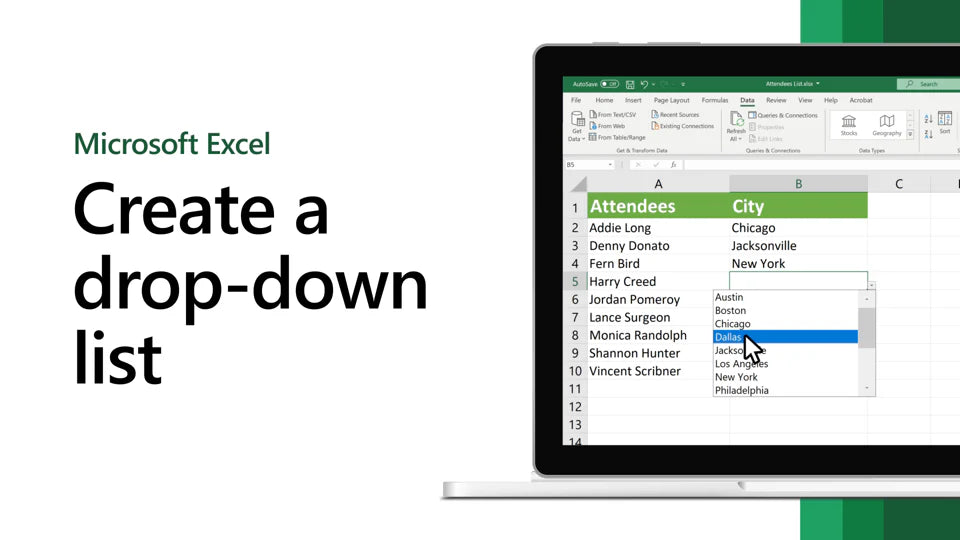
Are you struggling with manual data entry in Excel and looking for a solution to streamline your process? One effective way is to create drop down list in Excel.
In this tutorial, we will guide you through the step-by-step process of how to create drop down list in Excel and how to customize them according to your needs.
If you're ready to optimize your data entry process in Excel, follow along with this tutorial to learn how to create drop down list in Excel.
Table of Contents
- Understanding the benefits of drop down lists in Excel
- Steps to create a simple drop down list in Excel
- How to edit and delete a drop down list in Excel
- Adding a drop down list with multiple selections in Excel
- Using data validation to create drop down lists in Excel
- Customizing the appearance of drop down lists in Excel
- FAQs
- Final Thoughts
- Select the cells that you want to contain the lists.
- On the ribbon, click DATA > Data Validation.
- In the dialog, set Allow to List.
- Click in Source, type the text or numbers (separated by commas, for a comma-delimited list) that you want in your drop-down list, and click OK.
Understanding the benefits of drop down lists in Excel
Do you ever feel tired of typing the same things over and over again in Excel? Well, there's an easy solution that can help you save time and make fewer mistakes! It's called a drop-down list, and it's a handy tool you can use to limit the choices someone can make when they enter data in a cell.
Here's how it works:
When someone clicks on a cell, a down-arrow appears, and they can choose from a list of options that you create.
For example:
Let's say you're creating a budget spreadsheet and you want to categorize your expenses as "Food", "Housing", "Transportation", or "Entertainment". By using a drop-down list, you can ensure that people only enter one of these options and avoid typos or mistakes.
Using drop-down lists can make your Excel worksheet more efficient and organized. Here are some benefits:
- Saves time by reducing the need for typing
- Limits choices to pre-defined options, reducing the chance of errors
- Helps keep your data consistent and organized
- Can be customized to fit your needs, such as adding multiple selections or dependent lists
By taking advantage of the benefits of drop-down lists in Excel, you can make your data entry process quicker and more accurate.
Steps to create a simple drop down list in Excel
Here's how to create a drop-down list:
- Select the cells that you want to contain the list. You can select one cell or multiple cells at once.
-
Go to the "Data" tab on the ribbon at the top of the screen and click on "Data Validation".
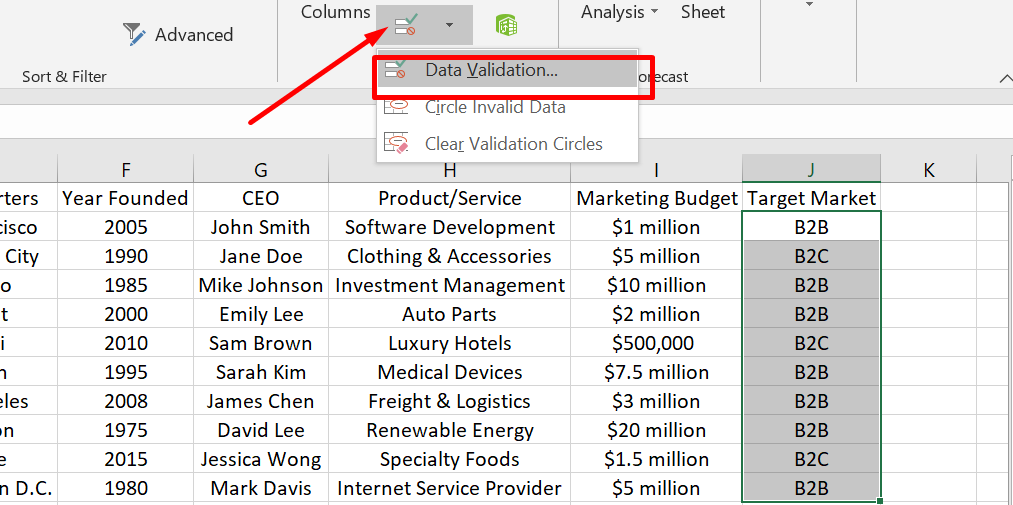
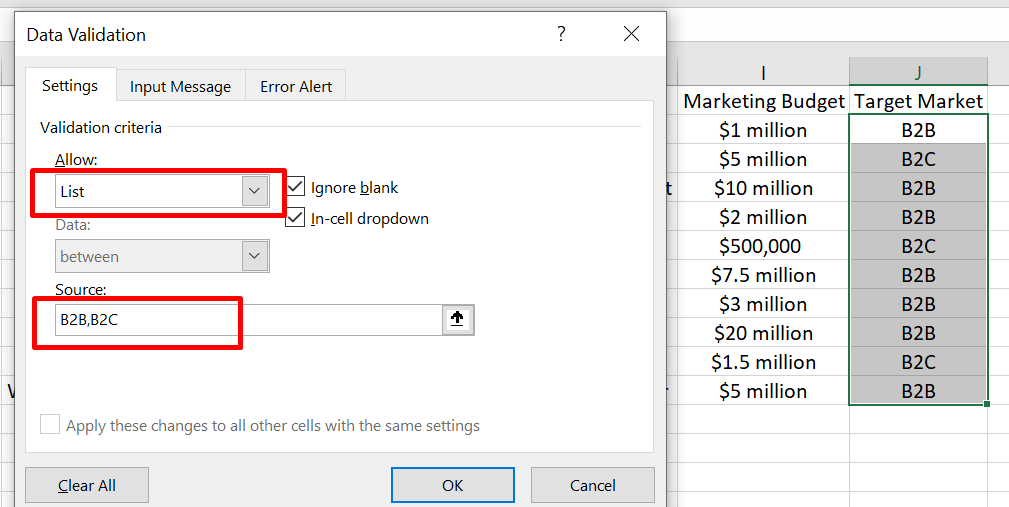
- In the "Settings" tab of the "Data Validation" dialog box, select "List" in the "Allow" box.
-
In the "Source" box, type the options you want to include in the list, separated by commas. For example, if you want to create a list of fruit options, you might type "B2B, B2C".
-
Click "OK" to create your drop-down list.
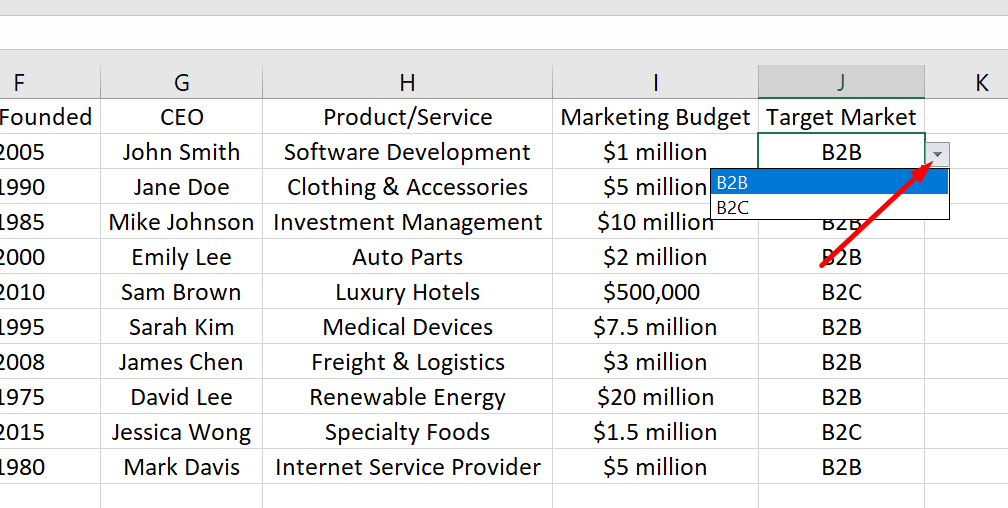
Now, when someone clicks on a cell in the selected range, a down-arrow will appear, and they can select an option from the drop-down list you created. By using drop-down lists, you can help reduce errors and make data entry quicker and more efficient.
How to edit and delete a drop down list in Excel
Here's how to remove a drop-down list:
- Select the cell that contains the drop-down list you want to remove. If you have multiple cells with drop-down lists that you want to delete, you can select them all at once by holding down the "Ctrl" key and clicking on each cell.
- Go to the "Data" tab on the ribbon at the top of the screen and click on "Data Validation".
- In the "Data Validation" dialog box, go to the "Settings" tab.
-
Click on the "Clear All" button at the bottom of the dialog box.

- Click "OK" to remove the drop-down list.
That's it! The drop-down list is now removed from the selected cell(s). Removing a drop-down list is just as easy as creating one. You can keep your worksheet organized and up-to-date by removing unnecessary drop-down lists.
Adding a drop down list with multiple selections in Excel
If you want to make a drop-down list with multiple selections in Excel, it's easy to do! This is helpful if you want to select multiple options from a list.
Here are the steps to create a drop-down list with multiple selections:
- Select the cells where you want to add the drop-down list.
- Click on the "Data" tab on the ribbon at the top of the screen.
- Click on the "Data Validation" button in the "Data Tools" group.
- In the "Data Validation" dialog box, click on the "Settings" tab.
- In the "Allow" box, select "List".
- In the "Source" box, type the options you want to include in the drop-down list, separated by commas. For example: "B2B,B2C".
-
Check the box next to "In-cell dropdown" to show the drop-down arrow in the cell.
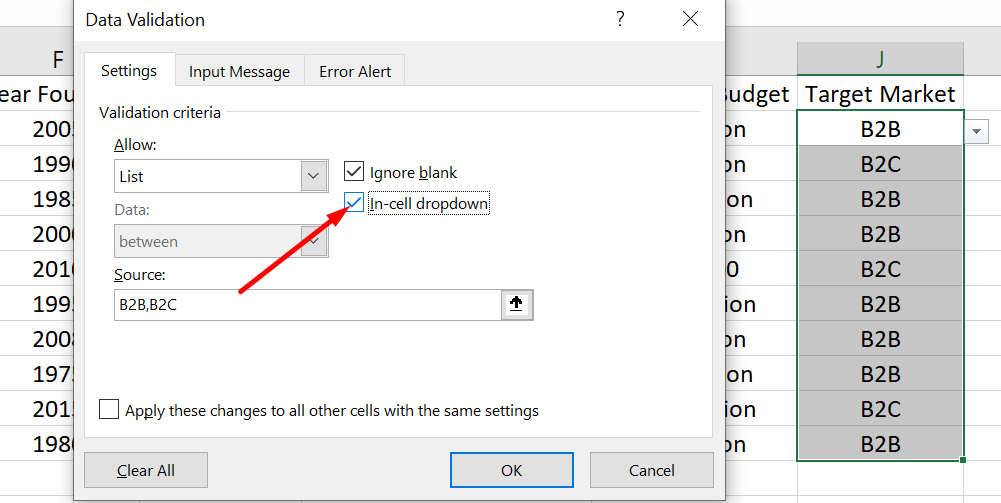
- Click "OK" to close the dialog box and create the drop-down list.
Now you can click the drop-down arrow in the cell and select multiple options from the list by holding down the "Ctrl" key while clicking on each option you want to select.
Using data validation to create drop down lists in Excel
Sometimes, you may want to protect your worksheet to keep the data safe. However, you might also want to insert a drop-down list into the protected worksheet. Don't worry, it's still possible to do so!
Here are the steps to insert a drop-down list in a protected worksheet:
- Create a drop-down list by following the instructions in our previous article.
- Select the cells that you want to contain the drop-down list.
-
Right-click the selected cells and choose "Format Cells."
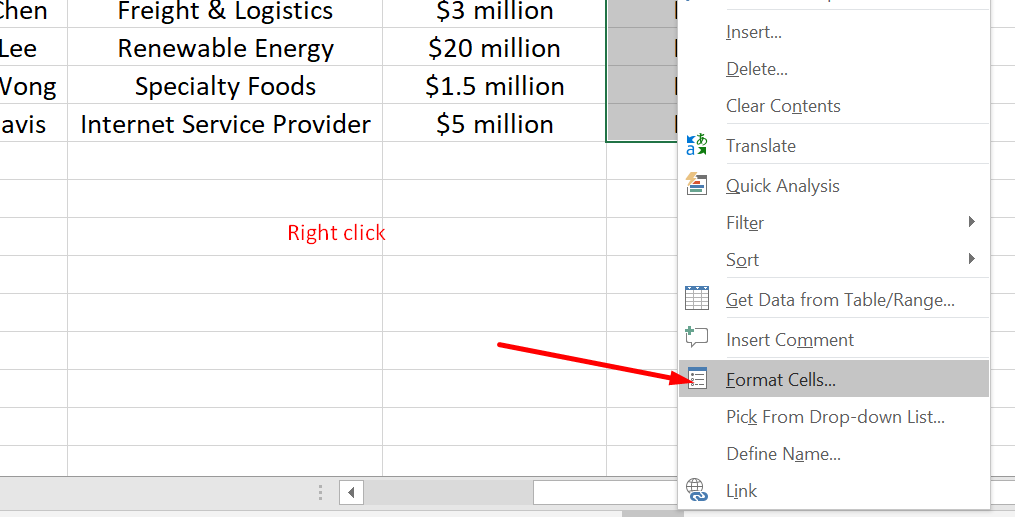
- In the "Format Cells" dialog box, click on the "Protection" tab.
-
Uncheck the box next to "Locked" to unlock the selected cells.
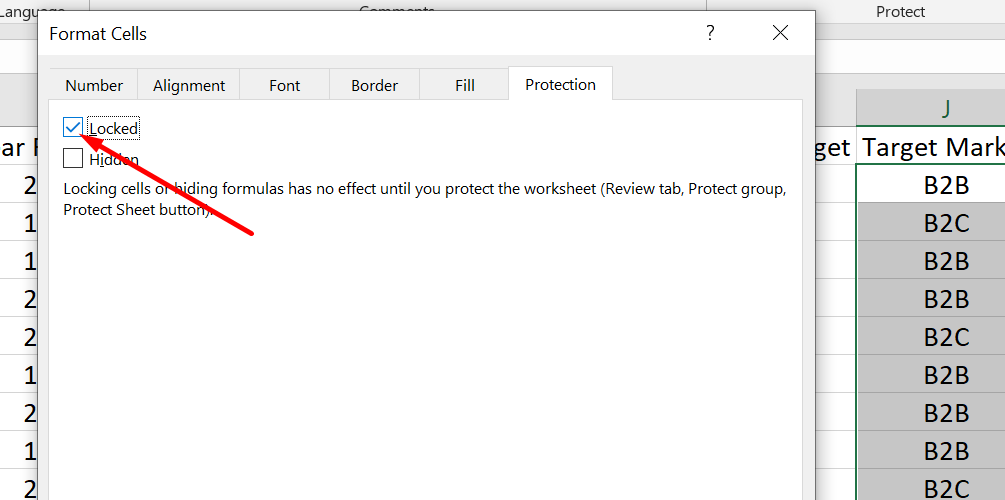
- Click "OK" to close the dialog box.
- Protect the worksheet by clicking on the "Review" tab on the ribbon.
- Click on "Protect Sheet" in the "Changes" group.
-
In the "Protect Sheet" dialog box, check the box next to "Allow all users of this worksheet to: Select locked cells.
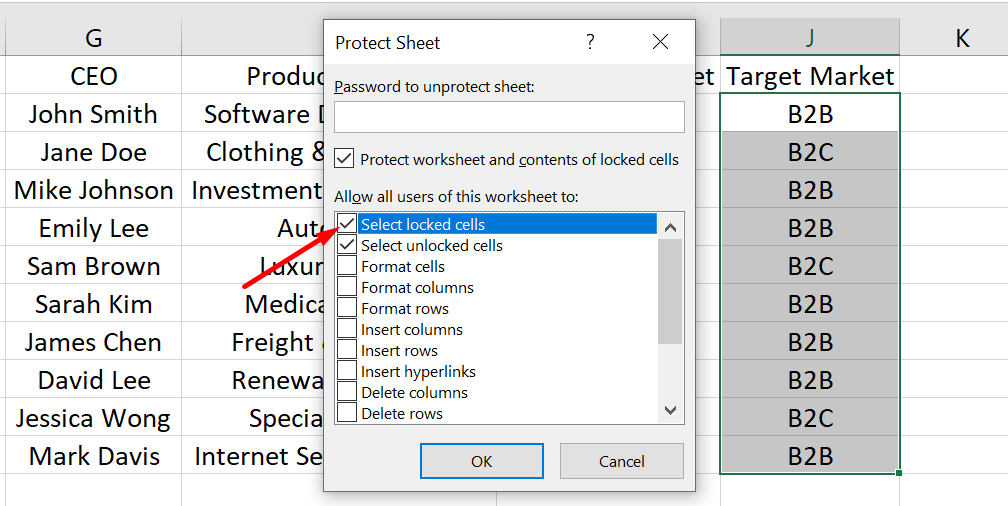
- Click "OK" to close the dialog box and protect the worksheet.
Now you can use the drop-down list in the protected worksheet. When someone selects a cell with the drop-down list, the down-arrow appears, and they can click it and make a selection.
Customizing the appearance of drop down lists in Excel
Customizing the appearance of drop-down lists in Excel is an easy way to make them more visually appealing and easier to use. One way to do this is by adding color to the drop-down options. Here are the steps to create a drop-down list with color in Excel:
- Select the cell where you want to create the drop-down list.
- Click on the "Data Validation" button in the "Data" tab of the ribbon.
- In the "Data Validation" dialog box, select "List" as the "Allow" option.
- In the "Source" field, type or select the options for the drop-down list, separated by commas.
- Click on the "OK" button to close the dialog box.
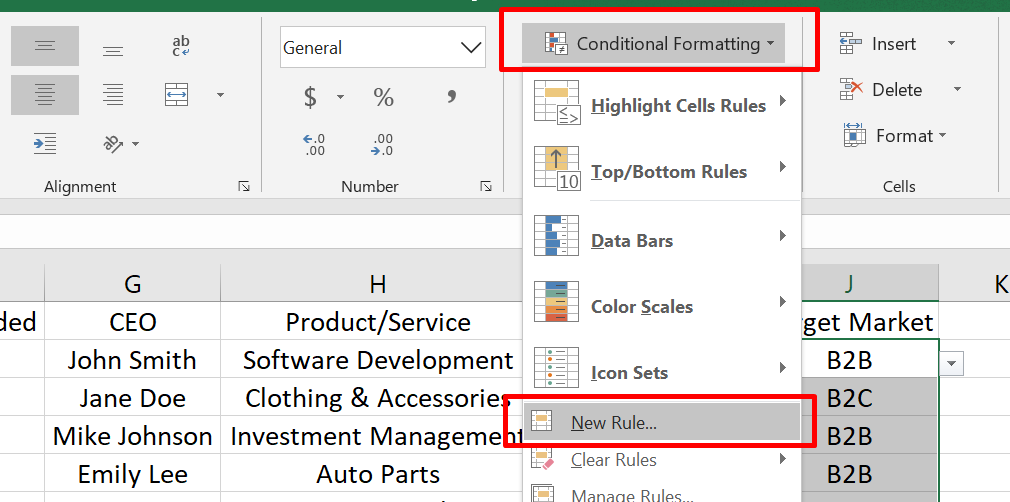
- With the cell still selected, go to the "Home" tab of the ribbon and click on the "Conditional Formatting" button.
-
From the dropdown menu, select "New Rule".
- In the "New Formatting Rule" dialog box, select "Format only cells that contain".
- In the "Format only cells with" field, select "List" from the dropdown menu.
- Choose the desired format and color for the drop-down options.
- Click on the "OK" button to close the dialog box.
With these simple steps, you can create a drop-down list in Excel with customized appearance that makes it easier to use and more visually appealing.
FAQS
How do I create a drop-down list in Excel?
To create a drop-down list in Excel, select the cells where you want the drop-downs, go to the "Data" tab, click on "Data Validation," choose "List" as the validation criteria, and enter the items for the drop-down in the "Source" box.
Can I use values from another sheet as the source for my drop-down list?
Yes, you can use values from another sheet as the source for your drop-down list by referencing the range of cells on that sheet. Simply enter the range in the "Source" box using the sheet name and cell references (e.g., 'Sheet2'!A1:A5).
Can I allow users to enter their own values in addition to the drop-down options?
Yes, you can allow users to enter their own values in a drop-down list by selecting the "In-cell dropdown" checkbox in the "Data Validation" window. This will let them choose from the drop-down or enter their own value.
How do I remove a drop-down list from a cell in Excel?
To remove a drop-down list from a cell in Excel, select the cell(s) with the drop-down, go to the "Data" tab, click on "Data Validation," choose "Data Validation" again from the dropdown menu, and then click on the "Clear All" button.
Can I create dependent drop-down lists in Excel?
Yes, you can create dependent drop-down lists in Excel, where the options in one drop-down change based on the selection in another. This can be achieved by using named ranges or the "INDIRECT" function to define the source for each dependent list based on the selected value in the preceding drop-down.
Final Thoughts
In conclusion, creating a drop-down list in Excel can greatly improve the efficiency and accuracy of your data entry. With just a few simple steps, you can provide a user-friendly way for people to enter data into your worksheet.
Whether you need to limit choices or streamline data entry, a drop-down list can help. Protecting your worksheet can also ensure that your drop-down list remains secure and functional.
With the ability to add multiple selections and remove drop-down lists, Excel provides a versatile tool for organizing your data. Try creating a drop-down list in your next Excel worksheet and see the benefits for yourself.
One more thing
If you have a second, please share this article on your socials; someone else may benefit too.
Subscribe to our newsletter and be the first to read our future articles, reviews, and blog post right in your email inbox. We also offer deals, promotions, and updates on our products and share them via email. You won’t miss one.
Related articles
»How to insert page break in Excel worksheet
»Expense Record & Tracking Sheet Templates for Excel
»How to Calculate CAGR in Excel