If you’ve got a copy of Microsoft Office 2016 for Mac has some bugs, or you want to install an updated version, you may want to remove the original Office program from your Mac to do a fresh install after.
With some programs, you can simply drag the program from your Mac’s Applications folder to the Trash can and it’s done. The office, however, has a number of other subfolders saved on your hard disk to make all its different functions work properly.
Uninstalling Office 2016 on a Mac
To completely uninstall Office from your Mac, you’ll also need to remove these. Follow the below steps to completely remove Office 2016 for Mac from your computer:
Step 1: Quit all active Office 2016 for Mac applications
There are two main ways to quit an active Office for Mac application:
- Select the application name next to the Apple icon in the toolbar at the top of your screen, and then click Quit <application name> in the dropdown menu (e.g. if Word for Mac is active, click Word next to the Apple icon from the menu system, and then click Quit Word)
- If the program icon appears in the Dock, press the CONTROL key on your keyboard, click the icon, and then select Quit.
If the application is stuck and “not responding” for any reason, you may need to force it to quit.
- Click the Apple icon at the top left of the screen directly, and choose Force Quit. Select the application you want to close, and then click the Force Quit button.
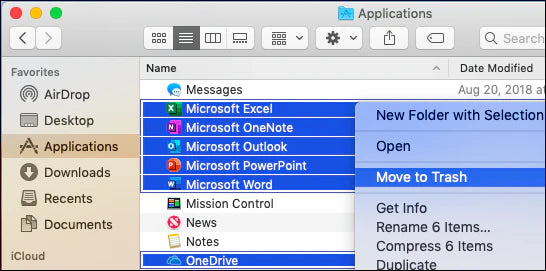
Step 2: Remove Office 2016 for Mac applications
- Open Finder and click Applications.
- Select all your Office 2016 for Mac applications. Hold the COMMAND key + click on each app to select multiple items at once/
- Press ctrl+click (or right-click) the selected apps and click Move to Trash
Step 3: Remove supporting files
MS Office 2016 for Mac supporting files are found in your Macintosh HD Library and User Library folders. For a complete uninstallation, you’ll also need to remove these.
A – Remove files from the Macintosh HD Library folder
- Open Finder, and click on Go the tab in the menu bar at the top of your screen. Select Computer.
- Open Macintosh HD and then Library. In the Library folder, there are three subfolders we need to remove Office supporting files from. These subfolders are called: LaunchDaemons, PrivilegedHelperTools, and Preferences.
- Open the LaunchDaemons folder and look for these files:
- com.microsoft.office.licensingV2.helper.plist
- com.microsoft.autoupdate.helper.plist
Press ctrl+click (or right-click) these files and then click Move to Trash. If they’re not present, then skip to the next step
4. Next, go back to the Library and open the PrivilegedHelperTools folder. Look for these files:
- com.microsoft.office.licensingV2.helper
- com.microsoft.autoupdate.helper
Press ctrl+click (or right-click) these files and then click Move to Trash. If they’re not present, then skip to the next step.
5. Go back to Library one more time and open the Preferences folder. Look for this file:
- com.microsoft.office.licensingV2.plist (if present)
Press ctrl+click (or right-click) this file and then click Move to Trash. If it’s not present then skip to the next step
B – Remove files from your user Library folder
- In most Macs, the User Library folder is hidden by default. To remove files from your user Library folder then you’ll first need to unhide it:
- In Finder’s Go menu at the top of your screen, select Home
- Next click on the View menu in Finder (also at the top of the screen) and select Show View Options
- In the View Options dialog box, click on Show Library Folder
2. The Library folder should now be showing. Open it up. In your User Library folder, there are two subfolders we need to remove Office supporting files from. These subfolders are called: Containers and Group Containers.
3. Open the Containers folder and look for these files:
- com.microsoft.errorreporting
- com.microsoft.Excel
- com.microsoft.netlib.shipassertprocess
- com.microsoft.Office365ServiceV2
- com.microsoft.Outlook
- com.microsoft.Powerpoint
- com.microsoft.RMS-XPCService
- com.microsoft.Word
- com.microsoft.onenote.mac
Press ctrl+click (or right-click) these files and then click Move to Trash. If they’re not present, then skip to the next step.
4. Next, go back to the Library and open the Group Containers folder. Look for these files:
- UBF8T346G9.ms
- UBF8T346G9.Office
- UBF8T346G9.OfficeOsfWebHost
WARNING: Outlook data will be removed if you move these folders to Trash. You should back up these folders before you delete them.
Once you’ve backed these files up, press ctrl+click (or right-click) on them and then click Move to Trash. If they’re not present, then skip to the next step
Step 3: Remove Keychain Entries
- In Finder, open your Applications folder and find the Utility subfolder. Inside this, find the Keychain Access app and open it up.
- You’ll find a long list of all the passwords and keys saved on your Mac here. Look for the following password entries for your Office 2016 for Mac:
- Microsoft Office Identities Cache 2
- Microsoft Office Identities Settings 2
Press ctrl+click (or right-click) these entries and then click Delete to remove them. If they’re not present, then skip to the next step
3. In the search bar at the top of the Keychain Access window, search for all occurrences of ADAL. Remove all these entries also if present.
Step 4: Remove Office 2016 for Mac icons from the Dock
If you added Office icons to the Dock they may turn into question marks after you uninstall Office 2016 for Mac. To remove these icons, ctrl + click (or right-click) the icons select Options and click Remove from Dock.
Repeat this for each Office 2016 for Mac icon in the Dock.
Step 5: Restart your computer
When you’ve removed all the files listed in this section, empty the Trash and restart your computer.
Presto! Your Office 2016 for Mac has now been completely uninstalled and your Mac is ready for a fresh installation of your Microsoft Office product.
If you’re looking for a software company you can trust for its integrity and honest business practices, look no further than SoftwareKeep. We will be with you before, during, and after all the sales.
That’s our 360 Degree SoftwareKeep Guarantee. So, what are you waiting for?