Although Windows 7 is an older operating system, it continues to hold up to modern technology standards. Many users still swear by this system; however, it isn’t perfect either.

User reports indicate that there’s an issue with Windows 7, in which a microphone or headset mic doesn’t work. This can be extremely frustrating during calls, video conferences, or even during entertaining activities such as video gaming or singing.
Tip: If you know anyone who’s experiencing similar issues with Windows 7, make sure to recommend our articles! We look forward to helping all people regardless of their experience with Windows troubleshooting.
If you’re dealing with issues related to your microphone in Windows 7, look no further. Our article aims to bring you the most straightforward solutions, allowing you to troubleshoot without obstacles. Let’s not waste any more time and get right into the business.
Common causes for the microphone to stop working on Windows 7 systems
There are multiple possible causes for your microphone not to work with your Windows 7 system. Below are some of the most common causes we were able to identify using user reports from various sources.
- There’s an issue with your microphone itself. The very first thing that comes to mind is a hardware issue. It’s possible that your device itself is faulty or has been damaged.
- Something is wrong with your port. Similarly to hardware issues with the microphone itself, it’s possible that something happened to the audio port you’re using. If this is the case, you can simply test different ports or look for a replacement.
- Your audio drivers are damaged or outdated. Drivers are crucial in every system. If your audio drivers aren’t kept in good condition, issues are bound to arise.
- The microphone device is disabled. You or someone else could’ve disabled the microphone, or an application tampered with your settings. It’s easily possible that you can’t use your mic simply because it’s been disabled.
- Your microphone is muted. It’s not always obvious when your microphone is set to be muted. This can cause frustration, making it seem like a more serious issue.
- The application you’re using doesn’t recognize your microphone. Some applications such as Skype or Discord may need further configuration to be able to use your microphone.
After identifying some of the possible causes of this error, we should start troubleshooting. Below are 6 methods you can use to fix when your microphone isn’t working on a Windows 7 system.
First watch Fixed! Microphone Not Working Windows 11 - Best 10 Methods
How to Fix Microphone Is Not Working on Windows 7
Method 1: Manually check for hardware issues
What you should do first is to verify whether or not you have a hardware issue. We’ve compiled some useful steps you can take to ensure that there’s no damage to any physical component involved in this error.
- Plug your microphone out from its port and wait 30 seconds before plugging it again. Ensure that you’re plugging the microphone into the right port — most microphone ports have a pink ring around them.
- Use the same microphone on a different device. Testing whether or not your microphone works on a different computer can help you identify if you have a software error. If it doesn’t work on a different computer either, you’re most likely dealing with a faulty mic.
-
Test if Windows 7 can pick up any audio from your microphone. If your microphone doesn’t work on certain applications, you might have to dive into the application settings.
Here’s a short guide on how to test microphone audio on Windows 7: - Open the Start menu and open the Control panel from the right-side menu.
- Make sure that your view mode is set to “Category.”
- Click on “Hardware and Sound” then select “Manage audio devices” under the Sound category.
- Switch over to the “Recording” tab and speak into your microphone. If you see the green bars next to your microphone rise and fall, then Windows 7 is able to pick up audio from it.
Method 2: Make sure that your microphone isn't muted

Some users have noticed that they weren’t able to use their microphone as it was muted in the system itself. This is easy to check and change.
- Open the Start menu and open the Control panel from the right-side menu.
- Make sure that your view mode is set to “Category.”
- Click on “Hardware and Sound” then select “Manage audio devices” under the Sound category.
- Switch over to the “Recording” tab. Double-click on the problematic microphone to open its properties in another window.
- Switch to the “Levels” tab.
- Drag the “Microphone” slider to the far right until it displays “100.” Also make sure to set the “Microphone Boost” above average, such as “+24.0dB.”
Method 3: Set your microphone as the default

Setting your microphone as the default microphone can easily get rid of any issues related to it not working. The process is simple.
- Open the Start menu and open the Control panel from the right-side menu.
- Make sure that your view mode is set to “Category.”
- Click on “Hardware and Sound” then select “Manage audio devices” under the Sound category.
- Switch over to the “Recording” tab.
- Select your microphone and click on the “Set Default” button.
- The next steps are optional but recommended to ensure your microphone is recognized by all apps. Double-click on your mic and switch to the “Advanced” tab.
- Make sure that the “Allow applications to take exclusive control of this device” option is checked. Click Apply to finalize your changes.
Method 4: Run the Recording Audio troubleshooter
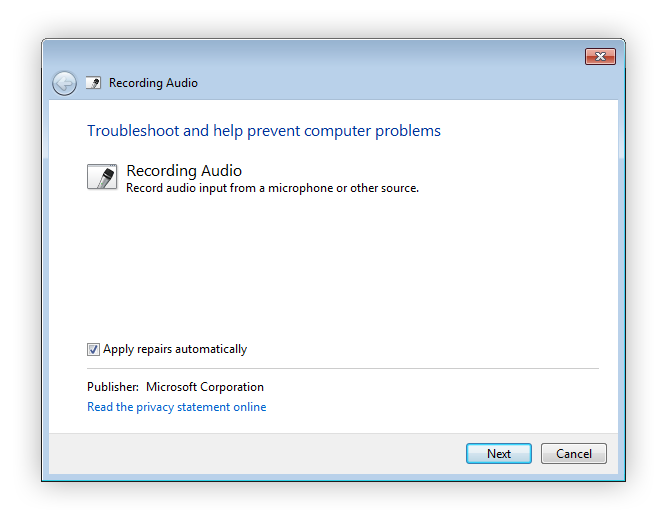
Windows 7 comes with a variety of troubleshooters to help you fix most system issues within a few minutes. This is how you can run the Recording Audio troubleshooter, directly related to your microphone.
- Open the Start menu and type the word “troubleshoot” into the search bar. Select “Troubleshooting” from the list of results.
- Select the “Troubleshoot audio recording” link under the Hardware and Sound header.
- Click on the “Advanced” link located in the bottom-left of the troubleshooter window, then make sure that “Apply repairs automatically” is checked.
- Click the Next button and wait for the troubleshooter to detect issues.
- If the Recording Audio troubleshooter is able to find any issues, it’s automatically going to apply a fix.
Method 5: Restart the Windows Audio Service

It’s possible that the audio service has been disabled by accident or by an application. A restart of the service can ensure great results.
- Press Windows + R keys on your keyboard to open the Run utility. Here, type in “services.msc” and click the OK button.
- Scroll down until you see “Windows Audio,” then right-click on it and choose “Restart” from the context menu.
- After the audio service has restarted, right-click on it and choose “Properties.”
- Make sure that the startup type is set to “Automatic.” You can change it by opening the drop-down menu and click on the Apply button.
Method 6: Update your audio drivers

Drivers make everything work on your device. Make sure to update your audio drivers are updated to ensure they don’t cause any conflict with your updated system.
- Press Windows + R keys on your keyboard to open the Run utility. Here, type in “devmgmt.msc” and click the OK button.
- Expand the “Sound, video and game controllers” category.
- Right-click on the listed audio device, then select “Update Driver Software.”
- Choose “Search automatically for updated driver software.”
- Wait for Windows 7 to find and download an updated driver. If none are found, you can try to manually search for a driver on the internet using the audio device name.
We hope that this article was able to help you resolve issues with your microphone on Windows 7. Enjoy recording your voice and communicating with others via your computer!
Are you interested in learning more about Windows? You can browse our dedicate Help Center section for related articles including how to fix Audio out of Sync in Windows 10.
If you’re looking for a software company you can trust for its integrity and honest business practices, look no further than SoftwareKeep. We are a Microsoft Certified Partner and a BBB Accredited Business that cares about bringing our customers a reliable, satisfying experience on the software products they need. We will be with you before, during, and after all the sales.