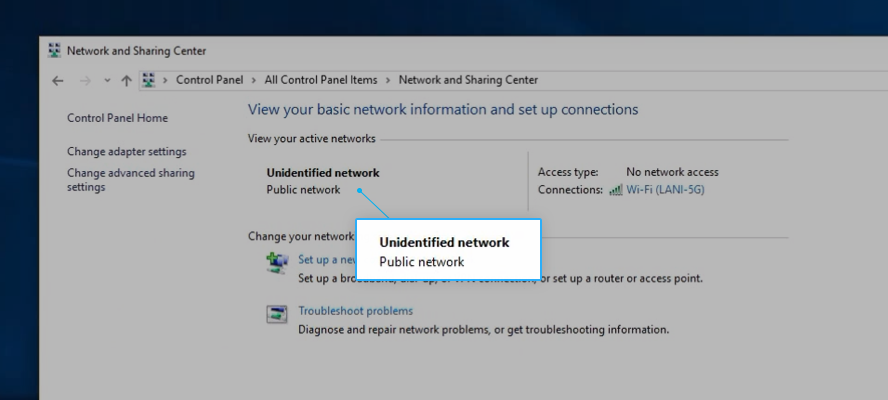
Unidentified network error is a common issue faced by Windows 11/10 users, which restricts their access to the internet. It occurs when the computer is unable to identify the network it's connected to and thus assigns it as unidentified or public network. This error can be frustrating, especially when you need to access the internet urgently. Fortunately, there are some simple solutions to fix this issue.
In this article, we'll discuss how to fix an unidentified network error and get your device back online.
Jump To
- Check Your Hardware
- Restart Your Computer and Router
- Turn Off Airplane Mode
- Update Your Network Adapter Driver
- Release and Renew Your IP Address
- Use the “Diagnose This Connection” Tool
- Change Your DNS Server
- Disable Fast Startup
- Run the Network Troubleshooter
What Causes the Unidentified Network Problem in Windows 11/10?
Like most errors on Windows, the "Unidentified network" issue has multiple causes. Common causes for the "Unidentified network" problem on Windows computers includes the following:
- Incorrect IP configuration settings or network settings
- Misconfigured network adapter
- Outdated or corrupted network adapter driver
- Faulty Ethernet cable or hardware
- IPv6 incompatibility with network adapter
- Firewall or antivirus software blocking the network connection
These factors can cause the "Unidentified network" error on Windows, which prevents users from accessing the internet even if they have a working connection.
Fixed: Windows 11/10 Showing "Unidentified Network" in Network Connections
There are several methods you can try to resolve the "Unidentified network" error on Windows 11/10. We’ve listed several solutions below that should help you identify and fix the issue.
1. Check Your Hardware
Before jumping into software solutions, it's important to ensure that the network cables and hardware are functioning correctly. A loose or damaged cable can lead to the unidentified network error. Therefore, make sure that all cables are firmly connected to your router, modem, or switch. Additionally, check if the network adapter is properly installed on your computer.
We also recommend connecting a different device on your network to see if the same problem occurs. If you are using a wireless connection, switch to an Ethernet cable and check if the issue is resolved. This will help you diagnose the issue further and determine if the problem is with your computer, hardware, or the router.
2. Restart Your Computer and Router
Restarting your computer and router can help clear up any temporary network glitches that may be causing the issue. This is a simple troubleshooting step that can often resolve the problem without any additional intervention.
- Click on the "Start" button located at the bottom left corner of your screen, or simply press the Windows button on your keyboard.
- Click on the "Power" icon located in the bottom left corner of the start menu. A menu will appear with options. Click on "Restart" to initiate the restart process.
Wait for the computer to shut down and then start up again. Next, move on to restarting your router/modem using these steps:
- Locate the "Power" button on your router and press it to turn the device off.
- Waiting anywhere between three to five minutes to allow your router and network to properly shut down. You can also unplug the device to ensure it's not connected anymore.
- Plug your device back in, and turn your router back on with the "Power" button.
After rebooting your system and restarting your router, see if the unidentified network issue persists.
3. Turn Off Airplane Mode
Turning off Airplane Mode is another basic solution to try if you are experiencing the "Unidentified network" error on your Windows computer. This setting can interfere with your network connection and prevent you from accessing the internet.
Taskbar
- Look for the icons on the right side of the taskbar. You should see icons for the Network, volume, and battery.
- Click on the "Network" icon. It should look like a series of vertical bars. This will open a menu that shows your available networks and options.
- Click on the "Airplane mode" option to toggle it to say "Off."
Settings
- Open the Start menu, which is the button in the bottom left corner of the screen that looks like the Windows logo. Click on the gear icon to open the "Settings" menu. You can also use the Windows + I keyboard shortcut.
-
Click on the "Network & internet" option. Look for the “Airplane mode” option, which should be near the top of the list.
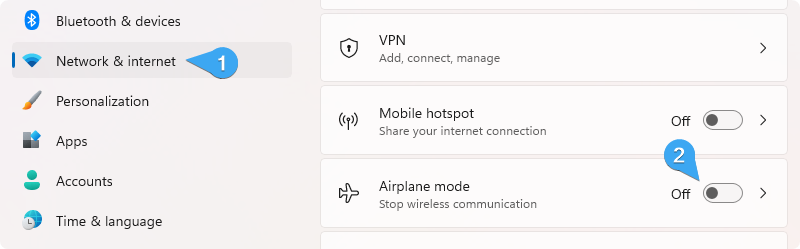
- Use the toggle switch to turn Airplane mode off.
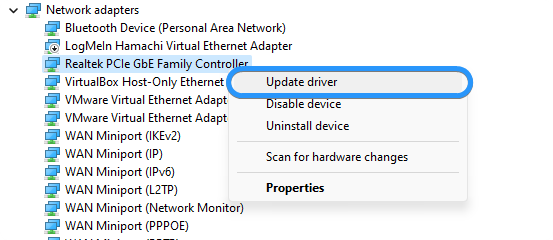
4. Update Your Network Adapter Driver
Updating your network adapter driver is an important step to take if your hardware is outdated or incompatible with your operating system. This can help ensure that your computer can communicate effectively with your network hardware.
- Press the Windows + X keys on your keyboard and select "Device Manager" from the list of options.
-
Expand the "Network adapters" section, right-click your camera device, and select "Update driver" from the context menu.
- Select "Search automatically for updated driver software” and wait for Windows to find the latest available drivers for your device.
- If Windows finds an updated driver for your device online, it will install it automatically. If your device already has the latest driver, Windows will notify you that there are no updates available.
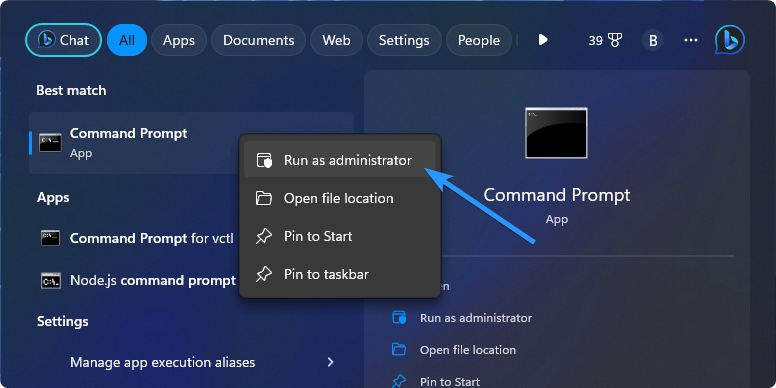
5. Release and Renew Your IP Address
Releasing and renewing your IP address can help clear up any conflicts or errors with your network settings. This can be done through the command prompt and can be an effective way to resolve the "Unidentified network" issue.
- Open the search bar in your taskbar by clicking on the magnifying glass icon. You can also bring it up with the Windows + S keyboard shortcut.
-
To launch Command Prompt with administrative permissions, search for it in the search box, right-click on it when you see it in the results, and select "Run as Administrator." When the User Account Control (UAC) prompt appears, click "Yes."
-
Input the commands below in the following order, pressing the Enter key on your keyboard after each line:
- ipconfig /release
- ipconfig /renew
-
ipconfig /flushdns
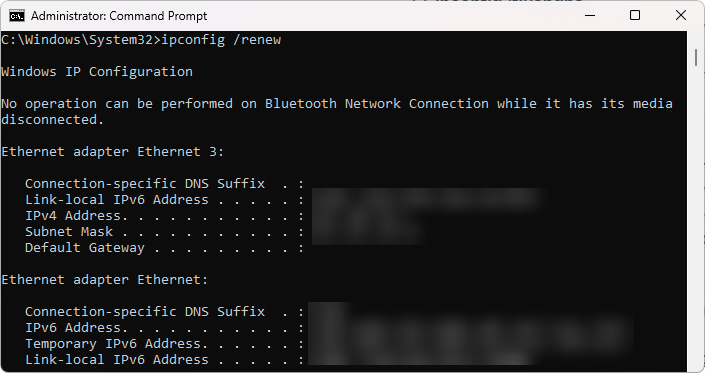
Wait for the command to finish and then restart your computer. Check to see if the "Unidentified network" issue is still present after doing this. If your problem isn't solved, move on to the next solution after attempting to reconnect to the network.
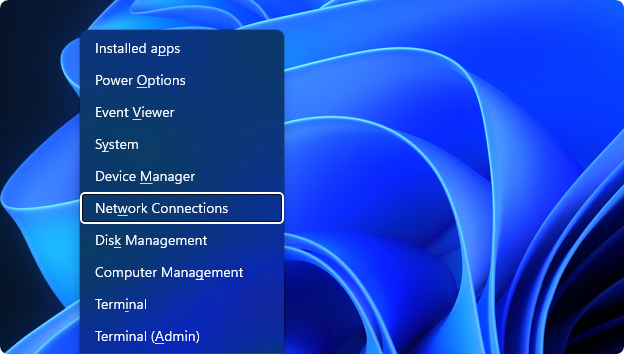
6. Use the “Diagnose This Connection” Tool
Using the 'Diagnose This Connection' tool in Windows can help identify and fix issues with your network connection. This built-in tool can walk you through the troubleshooting process and provide solutions to common problems.
-
Press the Windows + X keys on your keyboard and select "Network Connections" from the list of options.
- On Windows 10, click the "Change adapter options" button. If you're using Windows 11, navigate to "Advanced settings" and select "More network adapter options."
-
Select the internet connection that's giving you trouble, and then click on the "Diagnose this connection" button. Wait for Windows to finish running the diagnostic tests.
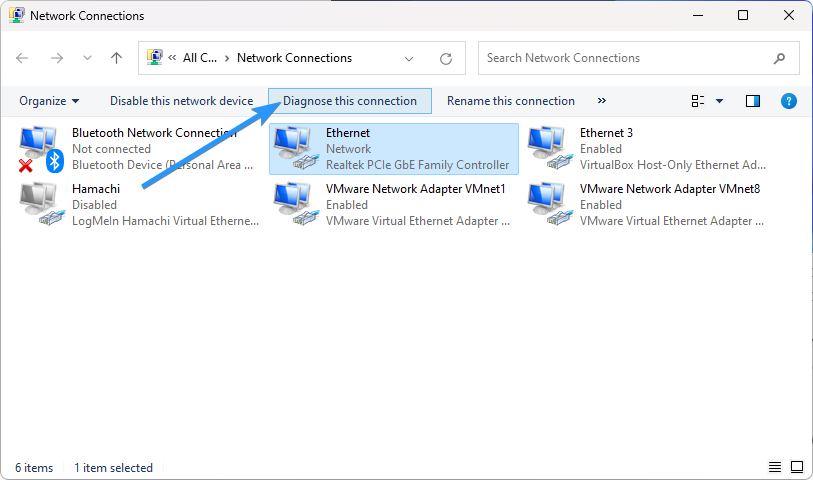
If any of the tests fail, follow the instructions provided by Windows to help resolve your connection issues.
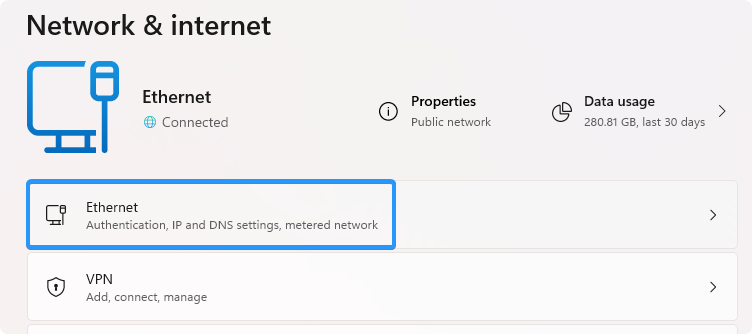
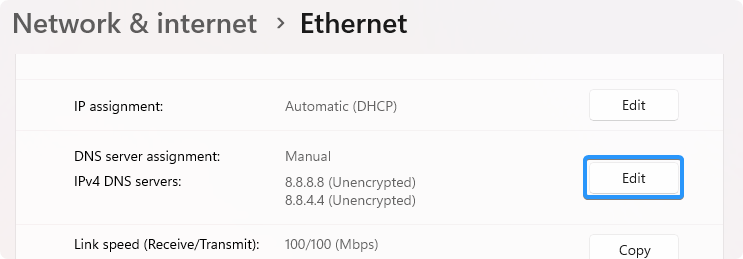
7. Change Your DNS Server
Changing your DNS server can help improve your network performance and resolve the "Unidentified network" error. This involves modifying your network settings to use a different DNS server than the default provided by your ISP.
-
Press the Windows + X keys on your keyboard, and then click “Network Connections” from the context menu.

-
First, you need to select your current internet connection. For example, you’ll see something like “Wi-Fi” or “Ethernet” depending on whether you’re using a wired or wireless connection.
-
Find the DNS server settings, and click on the “Edit” button. This will bring up a new window.
-
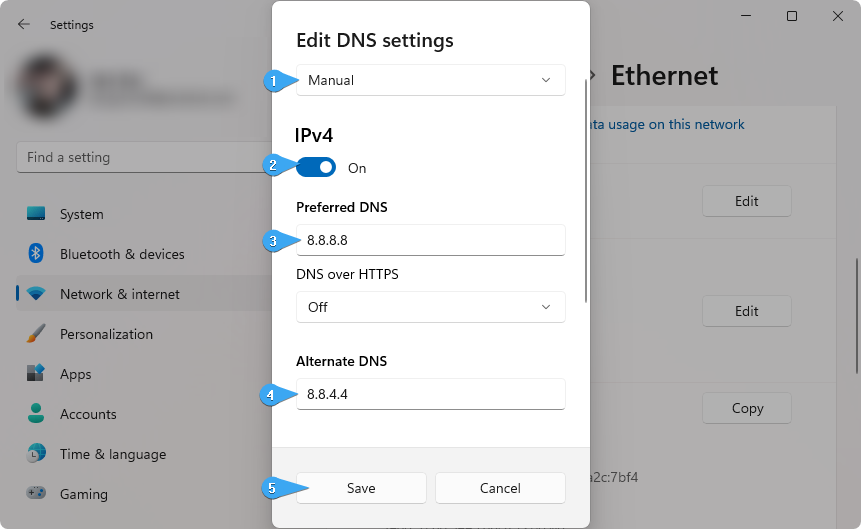
Select “Manual” from the first drop-down menu. Doing so will allow you to make changes to your DNS settings.
-
Next, toggle the “IPv4” option to the “On” position. You have some choices for what DNS server you want to use:
- To use Google’s DNS server, type “8.8.8.8” as the Preferred DNS server and “8.8.4.4” as the Alternate DNS server.
- Alternatively, type “1.1.1.1” into the first row, then “1.0.0.1” into the second row. This will change your DNS to the popular Cloudflare DNS server.
- You can also use OpenDNS if you type “208.67.222.123” and “208.67.220.123” into their respective fields.
- Click the “Save” button and see if this resolved the issue.
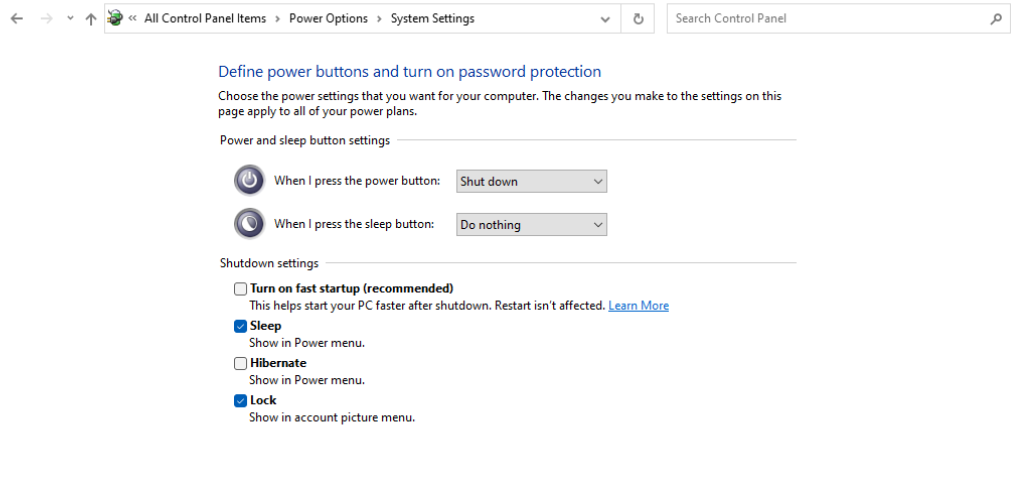
8. Disable Fast Startup
Disabling Fast Startup can help prevent conflicts with your network hardware that may be causing the "Unidentified network" error. This setting can sometimes cause issues with network adapters and should be disabled to improve network performance.
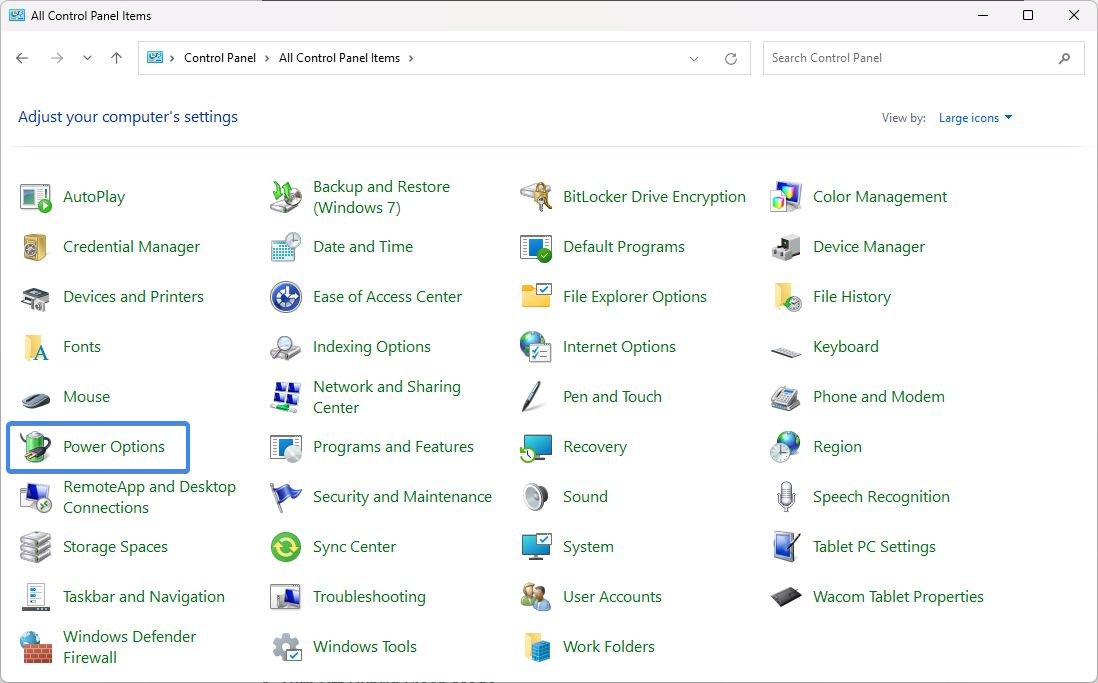
- Click on the Start menu in your taskbar, and then search for the Control Panel. Launch the application from the search results.
-
Click on “Power Options.“ If you can’t see this, make sure to switch the view mode to either Large icons or Small icons.
-
Click on the “Choose what the power buttons do“ link in the left-side pane. You’ll be redirected to a new page.
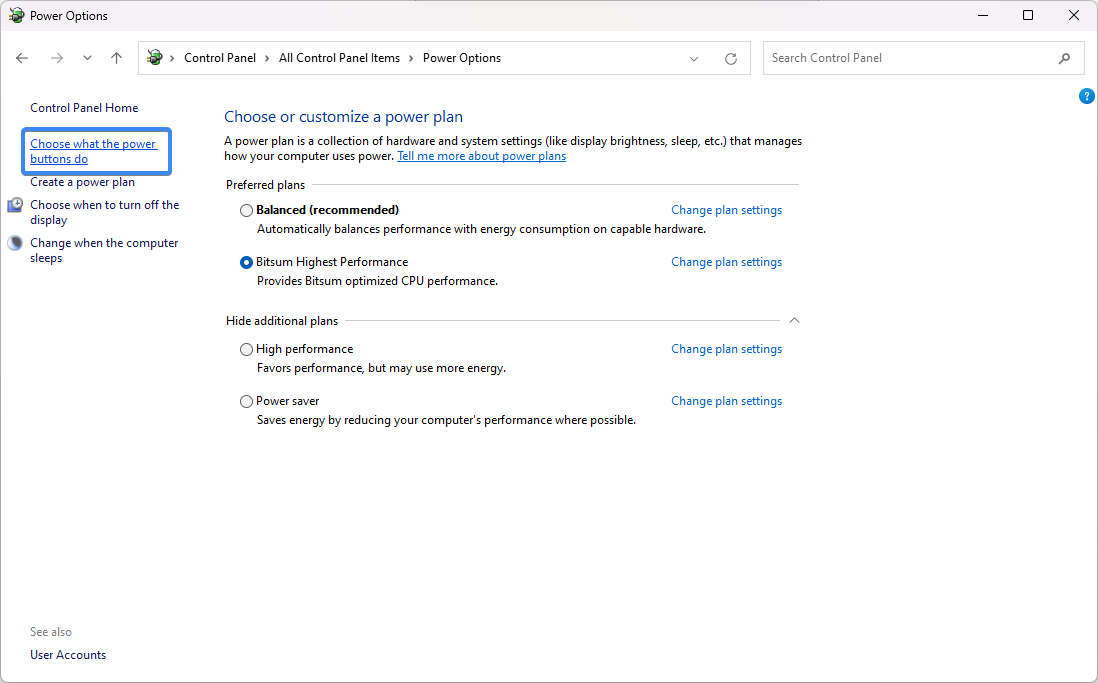
- Before you can make changes, you need to click on the “Change settings that are currently unavailable“ link. This will unlock your options.
-
Make sure to uncheck the “Turn on fast startup (recommended)“ option. Make sure to click the “Save changes“ button to apply the changes before restarting your computer.
9. Run the Network Troubleshooter
Running the Network Troubleshooter is a simple and effective way to diagnose and fix common network issues. This built-in tool can identify problems with your network settings and recommend solutions to get you back online.
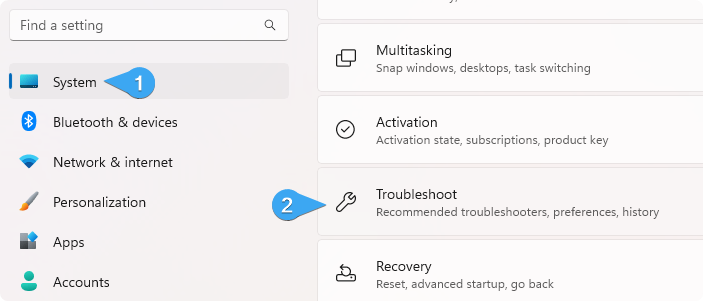
- Click on the Start menu, and click on the gear icon to open the Settings menu. Alternatively, use the Windows + I shortcut.
-
Click on the “System” option. On the right side of the screen, click on the “Troubleshoot” option.
-
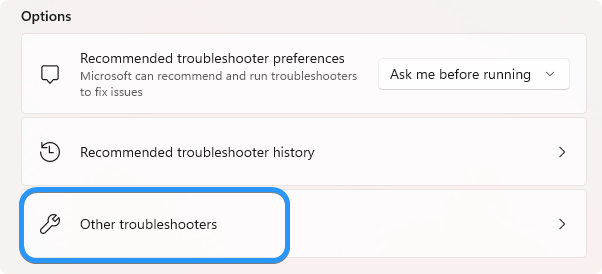
Under “Options,” click on the “Other troubleshooters” option.
-
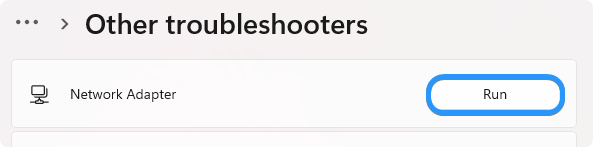
Look for the “Network Adapters” or “Internet Connections” options and click on the “Run” button next to it.
- The network adapter troubleshooter will start immediately and begin scanning your system for any possible issues with your network adapters.
The troubleshooter will then work to identify and fix any issues it finds with your network adapter. This process may take a few minutes, but once it's complete, you should be able to connect to the internet with your computer.
One More Thing
We’re glad you’ve read this article. :) Thank you for reading.
If you have a second, please share this article on your socials; someone else may benefit too.
Subscribe to our newsletter and be the first to read our future articles, reviews, and blog post right from your inbox. We also offer deals, promotions, and updates on our products and share them via email. You won’t miss one.
Related Articles
» 10 Working Solutions to the “Windows Can’t Connect to This Network” Error
» How to Fix High Network Usage and Memory Leak Caused by svchost.exe (netsvcs)
» Fixed: Windows Could Not Automatically Detect This Network’s Proxy Settings_