If you're a Windows 10 or 11 users, you may have encountered issues with your system's automatic update feature.
One solution to this problem is to delete or rename the Software Distribution folder, which stores files related to Windows updates.
In this step-by-step guide, we'll show you how to delete or rename the Software Distribution folder in Windows 10/11.
So, let's get started and learn how to delete or rename the Software Distribution folder in Windows 10/11.
Table of Contents
- What is the Software Distribution folder
- Why do Windows update issues occur
- How does deleting or renaming the Software Distribution folder help with Windows update issues
- Steps to delete the Software Distribution folder in Windows 10/11
- Steps to rename the Software Distribution folder in Windows 10/11
- How to prevent Windows update issues in the future
- FAQs
- Final Thoughts
What is the Software Distribution folder
The Software Distribution folder is a special folder in Windows that helps your computer to receive important updates. When your computer gets a new update from Microsoft, the update files are downloaded and saved to the Software Distribution folder.
These files are then used to install the updates on your computer.
The Software Distribution folder is important because it helps your computer stay up-to-date and secure. Updates often include:
- Important bug fixes
- Security patches
- New features that can improve your computer's performance
It is in the Windows directory, a special folder on your computer that holds important system files. You can find the Software Distribution folder by going to the Windows directory on your computer.
Sometimes, however, the files in the Software Distribution folder can become corrupted, which can cause problems with Windows updates. Deleting or renaming the folder may be necessary to fix the problem.
Deleting or renaming the Software Distribution folder is a safe and effective method for resolving Windows update issues. It can help ensure your computer receives the updates to stay secure and run smoothly.
Why do Windows update issues occur
Sometimes, when you try to update your Windows operating system, you may encounter issues that prevent the update from completing.
Different things can cause these issues, but here are some of the most common reasons why Windows update issues occur:
- Corrupted or missing system files: System files are important for your computer to function properly. If these files become corrupted or are deleted, it can cause problems with Windows Update and prevent them from working correctly.
- Connectivity issues: Windows Update requires a stable and fast internet connection to download and install updates. If your internet connection is slow or unstable, it can cause issues with Windows Update.
- Outdated drivers: Drivers are software programs that help your computer communicate with hardware devices. Outdated or corrupted drivers can cause issues with Windows Update.
- Insufficient storage space: Windows updates require a certain amount of storage space to download and install. If your computer lacks free space, it can cause issues with Windows Update.
- Third-party software conflicts: Some third-party software programs can cause issues with Windows Update. Ensuring that any installed software is compatible with your operating system is important.
How does deleting or renaming the Software Distribution folder help with Windows update issues
If you are having Windows Update issues, one solution you can try is to delete or rename the Software Distribution folder. This folder contains files used by Windows Update; if they become corrupted, it can cause problems with the update process.
Renaming the Software Distribution folder is a safe and effective method for resolving Windows update issues. When you rename the folder, it creates a new Software Distribution folder, which can fix any issues that corrupted files in the original folder may have caused.
To rename the Software Distribution folder, you can follow these steps:
- Open the Command Prompt as an administrator.
-
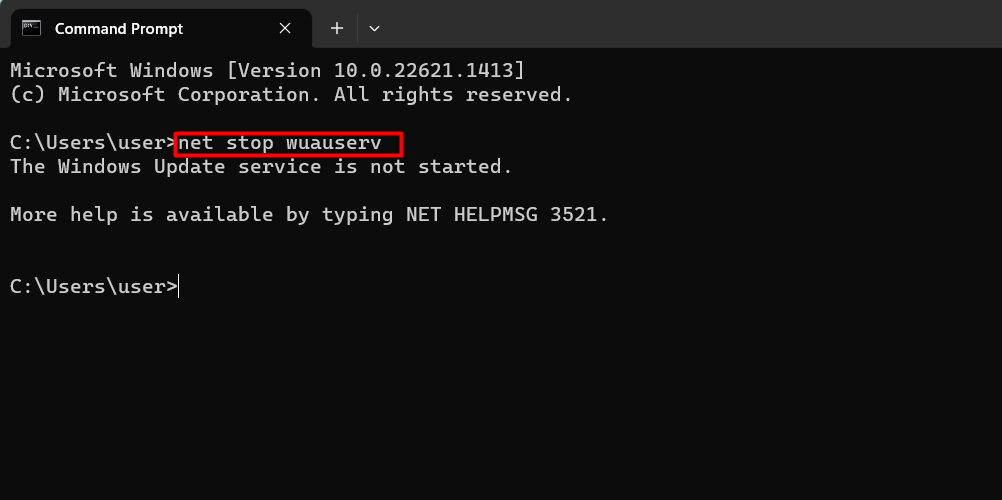
Type the command "net stop wuauserv" and press Enter. This stops the Windows Update service.
-
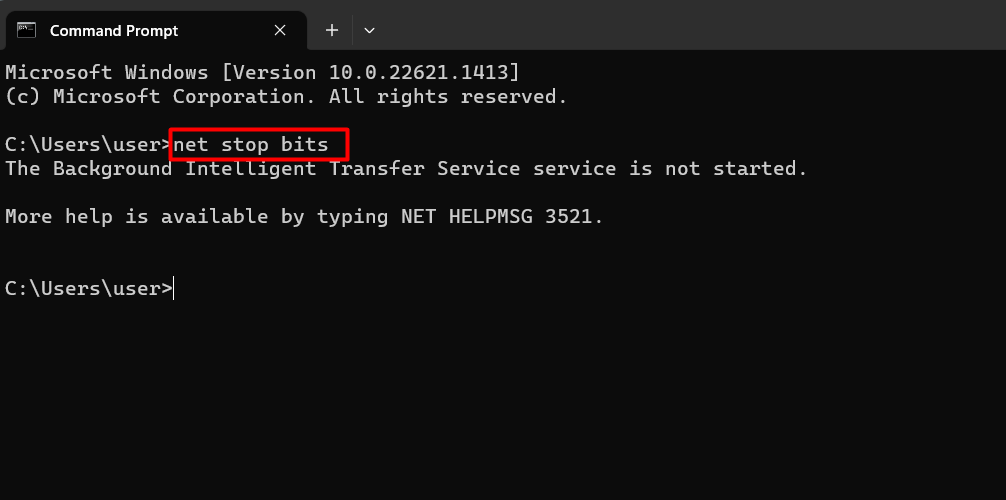
Type the command "net stop bits" and press Enter. This stops the Background Intelligent Transfer Service.
-
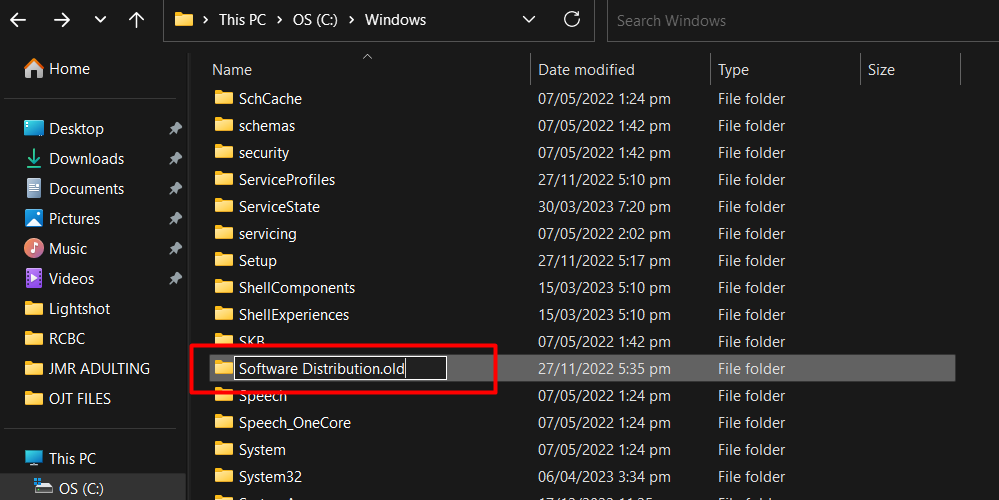
Go to the Windows directory on your computer and find the Software Distribution folder.
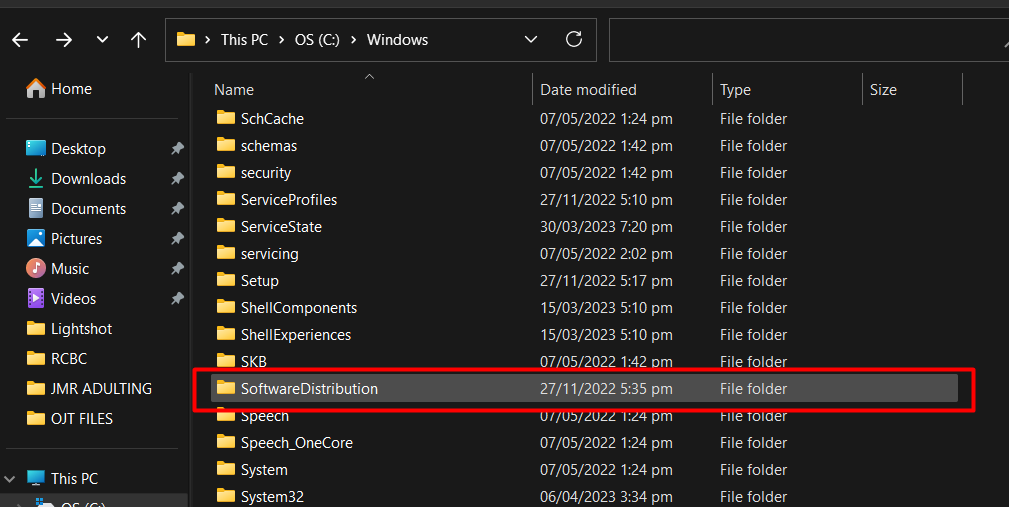
- Right-click on the folder and select "Rename."
-
Change the name of the folder to "Software Distribution.old" and press Enter.
- Close the Command Prompt and restart your computer.
After renaming the Software Distribution folder, you can try running Windows Update again to see if the issue has been resolved.
Steps to delete the Software Distribution folder in Windows 10/11
If you're having issues with Windows Update, you may need to delete the Software Distribution folder. This folder contains files used by Windows Update; if they become corrupted, it can cause problems with the update process.
Here's how you can delete the Software Distribution folder in Windows 10 or 11:
- Restart your computer and enter Safe Mode. This special mode allows you to perform maintenance tasks without interference from other programs.
- Open File Explorer by clicking the folder icon in your taskbar or pressing the Windows key + E.
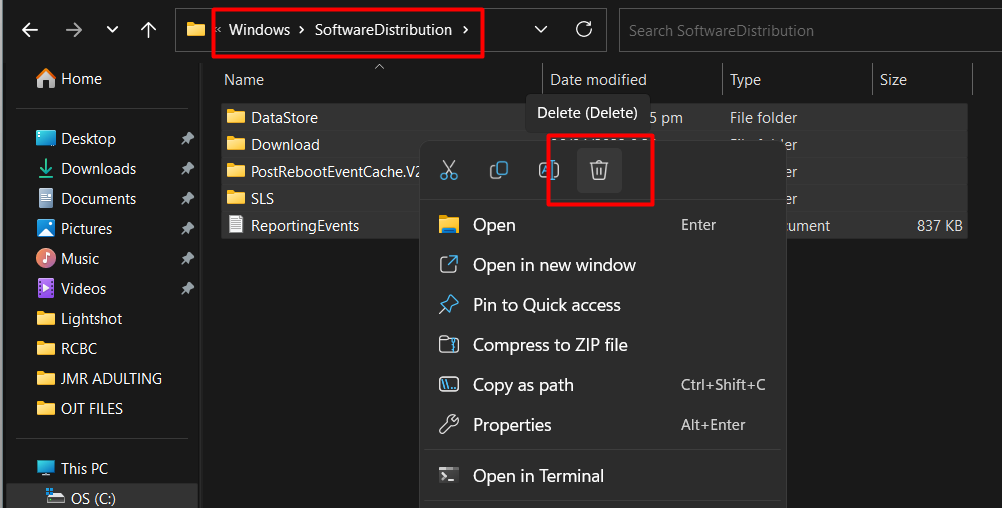
- Navigate to the C:\Windows\SoftwareDistribution folder. You can do this by clicking on This PC, selecting Local Disk (C:), then Windows, and finally SoftwareDistribution.
- Once you've opened the folder, press Ctrl + A to select all the files and folders.
-
Press the Delete key on your keyboard. You'll be prompted to confirm the deletion, so ensure you delete the correct files.
- Close File Explorer and restart your computer normally.
After you've deleted the Software Distribution folder, Windows will recreate it the next time you try to update your computer. This should fix any issues you were experiencing with Windows Update.
Steps to rename the Software Distribution folder in Windows 10/11
If you're having issues with Windows Update, you may need to rename the Software Distribution folder. This folder contains files used by Windows Update; if they become corrupted, it can cause problems with the update process.
Here's how you can rename the Software Distribution folder in Windows 10 or 11:
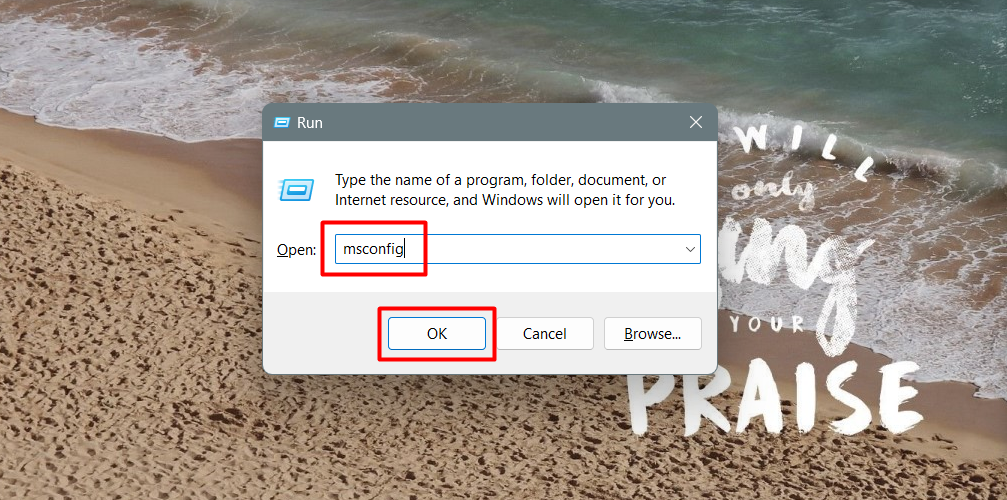
- Press the Windows key + R to open the Run dialog box.
-
Type "msconfig" (without the quotes) in the box and hit Enter.
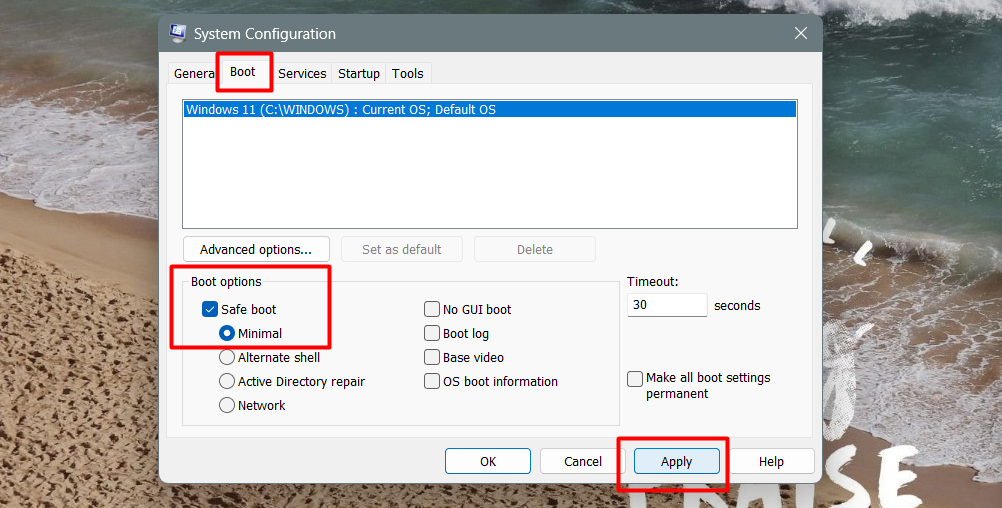
- In the System Configuration window that appears, click on the "Boot" tab.
- Check the "Safe boot" box and select "Minimal" from the options below.
-
Click on "Apply" and then "OK."
Restart your computer. Your computer will now start in Safe Mode.
- Open the Command Prompt by pressing the Windows key + X and selecting "Command Prompt (Admin)" from the menu that appears.
-
In the Command Prompt window, type "ren C:\Windows\SoftwareDistribution SoftwareDistribution.old" (without the quotes) and hit Enter.
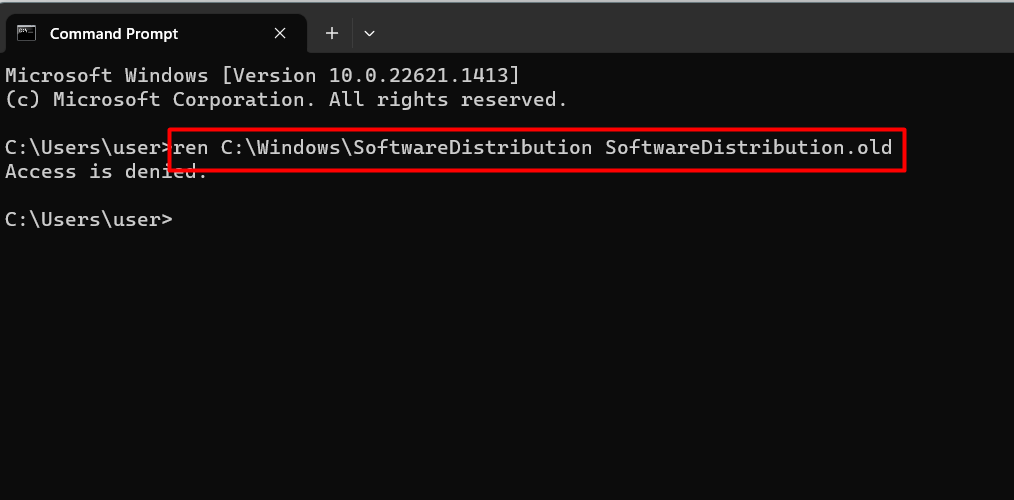
- Close the Command Prompt window and restart your computer normally.
After you've renamed the Software Distribution folder, Windows will create a new one when you try to update your computer. This should fix any issues you were experiencing with Windows Update.
How to prevent Windows update issues in the future
Windows updates are important for keeping your computer running smoothly and securely. However, if you've experienced issues with Windows updates in the past, you may be wondering how to prevent them from happening again in the future.
Here are some steps you can take to prevent Windows update issues:
-
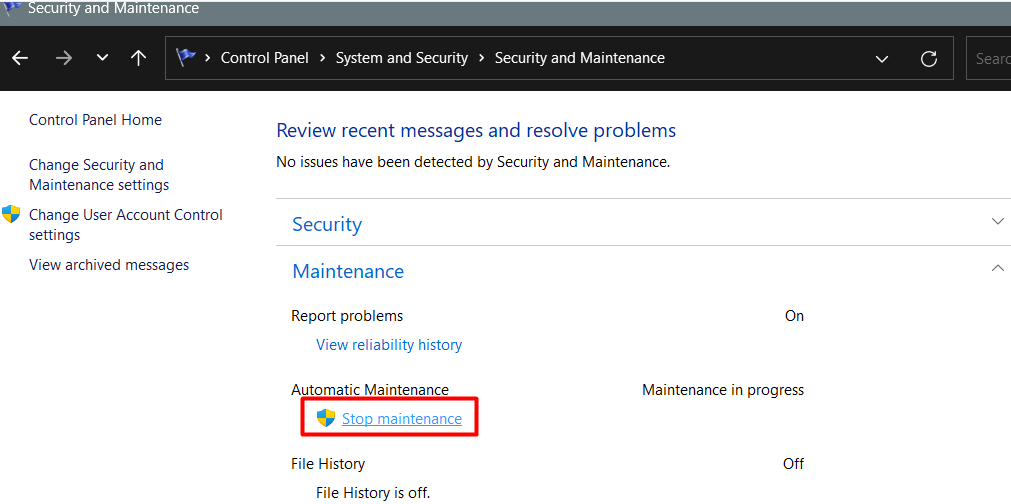
Go to Control Panel > System and Security > Security and Maintenance > Maintenance > Stop Maintenance. This will prevent your computer from performing maintenance tasks that could interfere with updates.
-
Turn off automatic updates to cancel any updates in progress and prevent future updates.
To do this:
- Go to Settings
- Update & Security
- Windows Update
- Advanced Options
- Choose how updates are delivered
- Toggle off "Updates from more than one place."
- Set "Automatically download updates" to "Off."
- On Windows 10 Pro, you can use the Group Policy Editor to disable automatic updates.
- Press Windows key + R, type "gpedit.msc" and hit Enter.
- In the Local Group Policy Editor, navigate to Computer Configuration > Administrative Templates > Windows Components > Windows Update.
- Double-click on "Configure Automatic Updates" and select "Disabled."
By taking these steps, you can prevent future Windows update issues and ensure your computer stays up-to-date and secure.
FAQs
How do I rename a Software Distribution folder in Windows 11?
To rename the Software Distribution folder in Windows 11, you need to stop the Windows Update service, navigate to the folder location (C:\Windows\SoftwareDistribution), right-click on it, select "Rename," and enter the desired name.
How do I rename a Windows Software Distribution folder?
To rename the Windows Software Distribution folder, you should stop the Windows Update service, go to the folder location (C:\Windows\SoftwareDistribution), right-click on it, choose "Rename," and provide a new name for the folder.
Can I delete Windows Software Distribution folder?
Yes, you can delete the Windows Software Distribution folder, but it is recommended to stop the Windows Update service before deleting it to avoid potential issues.
What happens if we delete Software Distribution folder?
If you delete the Software Distribution folder, it will be recreated automatically by Windows when you restart the Windows Update service, and it will clear the update history and temporary files associated with Windows Updates.
Is it safe to delete SoftwareDistribution old?
Yes, it is generally safe to delete the "SoftwareDistribution.old" folder, which is created when you perform a Windows update, as it contains previous versions of the Software Distribution folder, and deleting it will free up disk space.
Final Thoughts
In conclusion, renaming or deleting the Software Distribution folder can help resolve Windows update issues. Windows use this folder to store updated files temporarily, and problems can occur if these files become corrupted or outdated.
Renaming or deleting the folder can allow Windows to rebuild it from scratch and potentially fix any issues. However, following the steps correctly and using caution when deleting files from your system is important.
Additionally, future update issues can be prevented by disabling automatic updates or stopping maintenance tasks in the Windows settings. Managing Windows updates can be frustrating, but it can be made easier with the right knowledge and tools.
One more thing
If you have a second, please share this article on your socials; someone else may benefit too.
Subscribe to our newsletter and be the first to read our future articles, reviews, and blog post right in your email inbox. We also offer deals, promotions, and updates on our products and share them via email. You won’t miss one.
Keep Learning
» Why Does Windows 11 Need TPM 2.0? What is TPM?
» How to Fix ‘Hardware Problems Were Detected’ Error on Windows Memory Diagnostic
» Fixed: Windows Could Not Automatically Detect This Network’s Proxy Settings
