Automatic Startup Repair is a powerful tool in Windows 10 that can help you troubleshoot and fix certain problems on your computer. It is designed to automatically detect and repair issues that prevent your computer from starting up properly, such as missing or corrupt system files or damaged boot configurations.
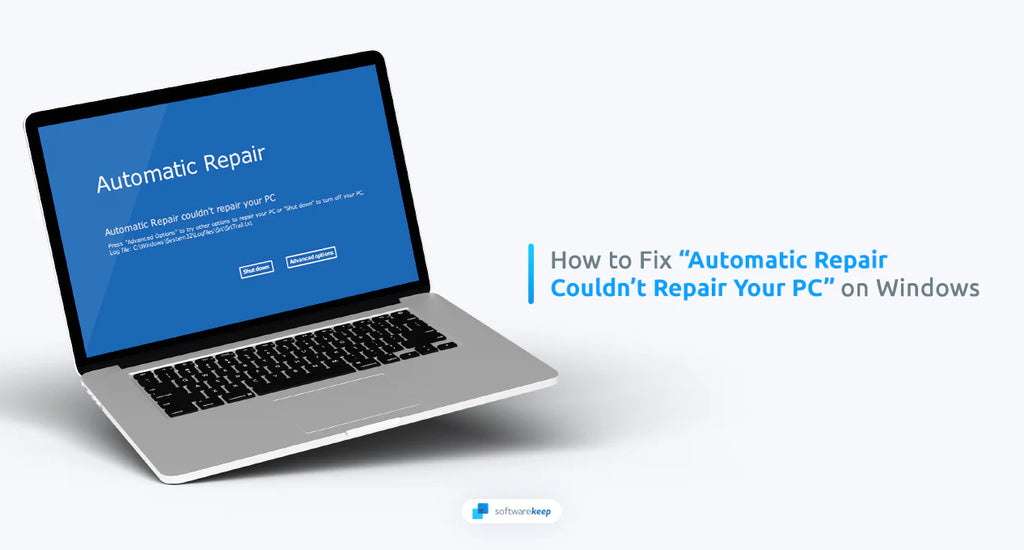
However, the tool may sometimes encounter an error and display the "Automatic Startup Repair Couldn't Repair Your PC" message on the screen. This can be frustrating and alarming, especially if you need to access important files or applications on your computer.
Fortunately, you can take steps to resolve this issue and get your computer back up and running. In this article, we will provide step-by-step instructions on how to use the Automatic Startup Repair tool to fix the error message and prevent it from happening again.
Jump To
- Restart Your Computer
- Boot in Safe Mode
- Disable Early Launch Anti-Malware Protection
- Disable Automatic Restart After Failure
- Use the "fixboot" and "chkdsk" Commands
- Run the System File Checker (SFC Scan)
- Run the DISM Tool
- Repair the Boot Configuration Data (BCD)
- Restore the Windows Registry
- Reset Windows
What Causes the "Automatic Startup Repair Couldn't Repair Your PC" Error?
Seeing an error message on your PC can be frustrating, especially when it's something like "Startup Repair couldn't repair your PC" or "Automatic Repair couldn't repair your PC." These messages can indicate various possible problems, from software issues to hardware failures.
Here are some common causes of the "Automatic Startup Repair couldn't repair your PC" error:
- Corrupted operating system - If your operating system files are corrupted or damaged, the Startup Repair tool may be unable to fix it. This could be due to a virus, malware, or other malicious software that has compromised your system files.
- Hardware issues - If any of your hardware components fail, they can cause severe problems with your PC's startup process and prevent the Automatic Startup Repair tool from working.
- System settings - Outdated drivers, incorrect BIOS settings, or incompatible programs can all cause the Automatic Startup Repair to fail.
- Not enough available space - Your computer might not have enough space or RAM to install new updates or fixes from Windows.
It's important to take the time to diagnose the issue and figure out the underlying cause. By doing so, you can more quickly and effectively resolve the problem and restore your PC to its full functionality. You can overcome any error message with patience and determination and confidently use your computer.
What is the Startup Repair Tool And How to Use It?
The Windows startup repair tool is an effective and reliable solution for fixing disk errors on your PC. This built-in function is one of the best recovery tools included in the Windows 10 operating system. To access the tool, you need to navigate to "Advanced options"> "Troubleshoot"> "Startup Repair."
The tool will thoroughly diagnose your system and repair any issues, ensuring that your PC runs optimally. With this tool at your disposal, you can rest assured that you can quickly and easily fix any disk errors that may arise on your computer.
Fixed: Automatic Startup Repair Couldn't Repair Your PC
We recommend following our troubleshooting methods to address the issue with the automatic Startup Repair utility from the beginning until the end. Although identifying the exact cause may be difficult, we believe this approach will be helpful.
1. Restart Your Computer
One of the simplest troubleshooting methods for the "Automatic Startup Repair couldn't repair your PC" error is to restart your computer. This often resolves any temporary issues or glitches preventing your PC from starting up properly. However, if the error persists after restarting your computer, you must try other methods to fix the issue.
2. Boot in Safe Mode
Booting your device in Safe Mode is a recommended method to troubleshoot and fix certain problems on your computer, such as the "Automatic Startup Repair couldn't repair your PC" error. In Safe Mode, your computer boots with a minimal set of drivers and services, allowing you to isolate and resolve issues causing the error.
3. Disable Early Launch Anti-Malware Protection
Early Launch Anti-Malware Protection (ELAM) is designed to start antivirus and security software before any other third-party driver on a Windows device, providing an extra layer of security.
However, in some cases, ELAM can interfere with your system's startup process and prevent the Automatic Startup Repair tool from running correctly. Disabling ELAM may help resolve the "Automatic Startup Repair couldn't repair your PC" error.
- Reboot your computer and hold the F11 or F8 key on your keyboard while the boot screen is visible to enter the Windows Recovery Environment (WinRE). You may also need to hold down the Fn (function) key on specific devices. Note that some devices may require a different key or key combination.
- If you can’t boot into WinRE using the keyboard shortcut, turn your computer on and off until it automatically starts in the repair environment. On average, three restarts should load the environment.
-
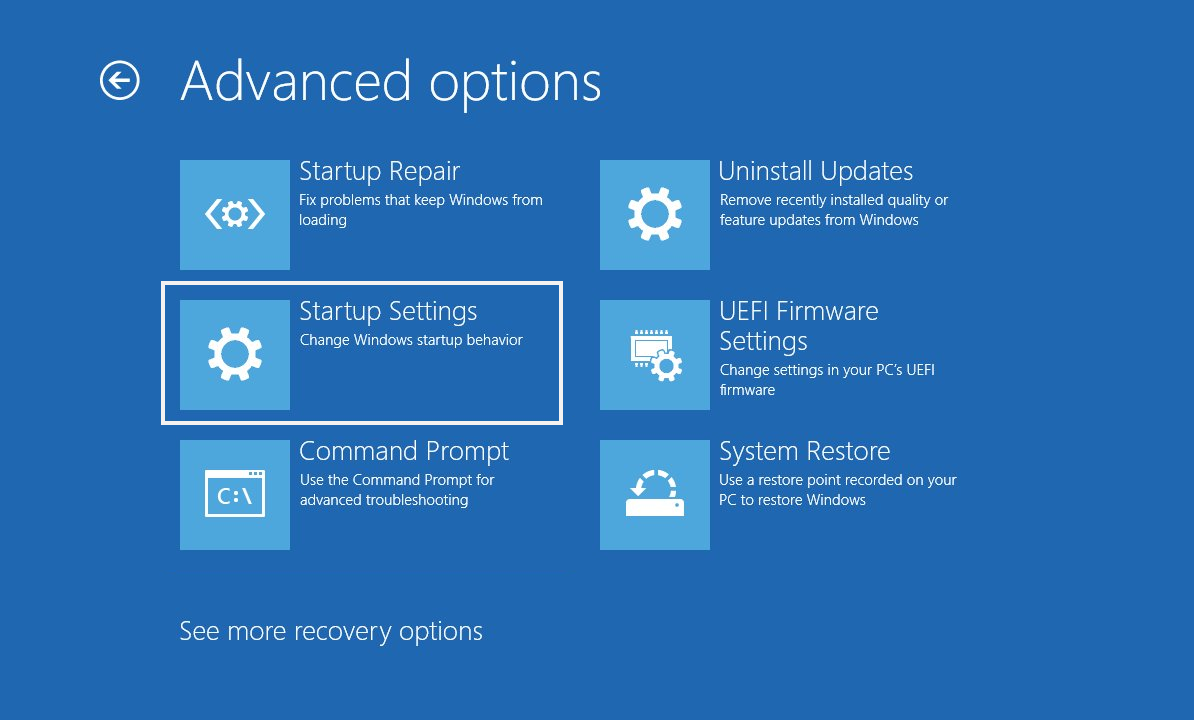
After successfully entering WinRE, navigate to Troubleshoot > Advanced options > Startup Settings.
-
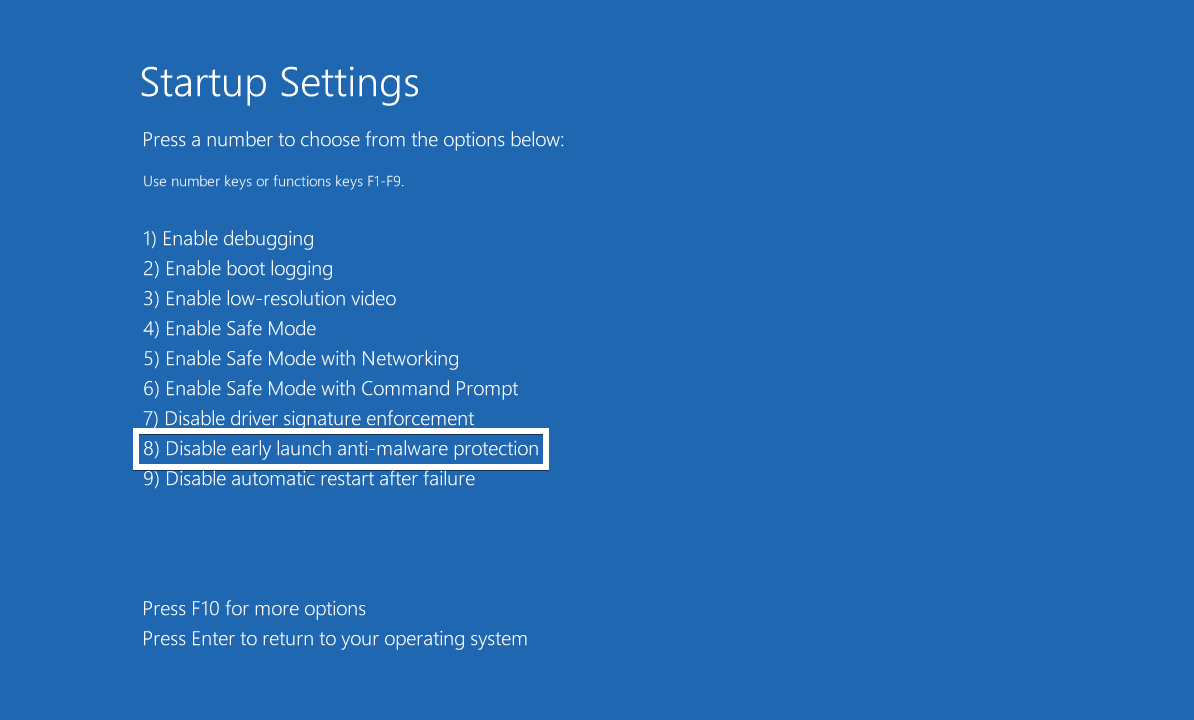
Press the number associated with the “Disable early launch anti-malware protection” setting. In most cases, the number you should press is “8.”
Your system will restart on its own, and you should be able to see if the error is resolved after turning off the anti-malware protection setting.
4. Disable Automatic Restart After Failure
When the Automatic Startup Repair tool fails to repair your PC, your computer may automatically restart, making it difficult to diagnose the issue as your system is in a "restart loop." Disabling automatic restart can help you identify the error message and take appropriate steps to resolve the problem.
- Enter WinRE and navigate to Troubleshoot > Advanced options > Startup Settings.
-
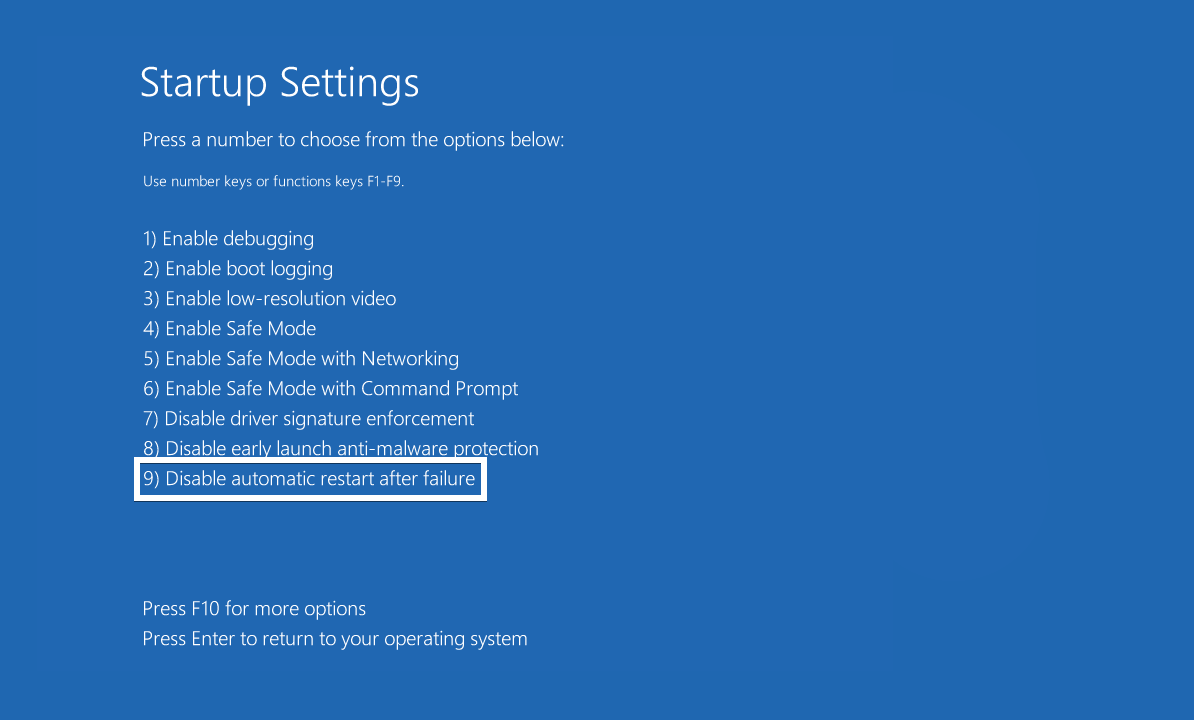
Press the number associated with “Disable automatic restart after failure.” In most cases, the number you need to press is “9.”
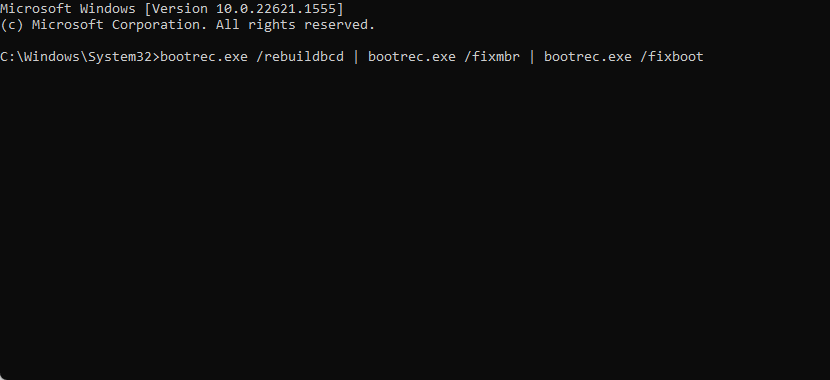
5. Use the "fixboot" and "chkdsk" Commands
The "fixboot" and "chkdsk" commands can scan your hard drive for errors and repair any corrupted sectors or files, ensuring your computer runs smoothly and efficiently. Combined with other troubleshooting methods, these commands can help you overcome even the most stubborn errors and get your PC back up and running quickly.
-
Enter WinRE and navigate to Troubleshooting > Advanced options > Command Prompt.
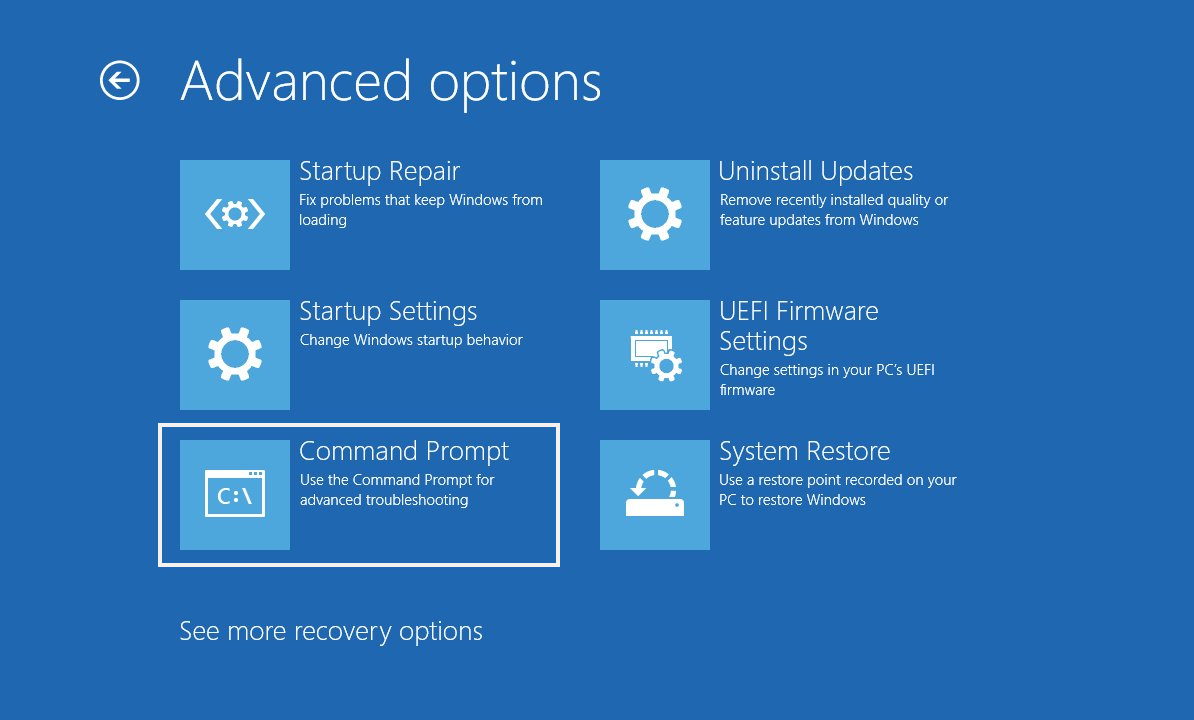
-
When the Command Prompt interface shows on the screen, input the following command and press the Enter key on your keyboard: bootrec.exe /rebuildbcd | bootrec.exe /fixmbr | bootrec.exe /fixboot
-
When the command finishes running, type in the next command: chkdsk /r c:

- Wait for the command to finish diagnosing your device with any possible problems. Your computer may restart on its own during the process.
6. Run the System File Checker (SFC Scan)
Run the System File Checker (SFC Scan) is a powerful method for identifying and repairing corrupted system files that may be causing the "Automatic Startup Repair couldn't tepair your PC" error. By scanning your computer's files and replacing any corrupted or missing files, the SFC Scan can help restore your PC to optimal performance.
- Enter WinRE and navigate to Troubleshooting > Advanced options > Command Prompt.
-
When the Command Prompt interface shows on the screen, input the following command and press the Enter key on your keyboard: sfc /scannow. Wait for the SFC scan to finish scanning your computer.
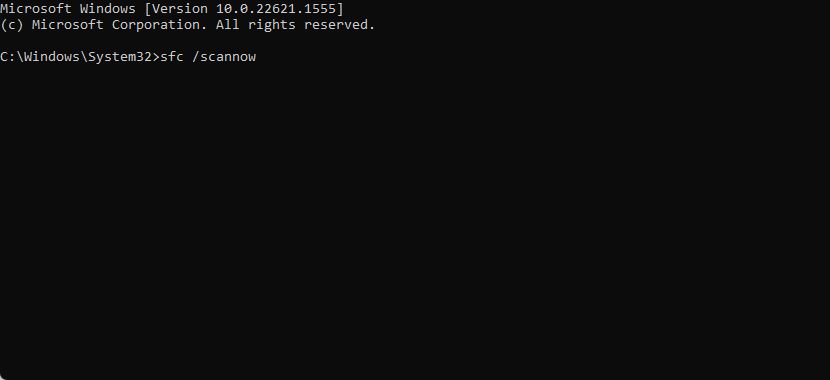
- Wait for the System File Checker to finish scanning your computer. In the case of a discrepancy, the utility will restore system files and fix all errors related to them.
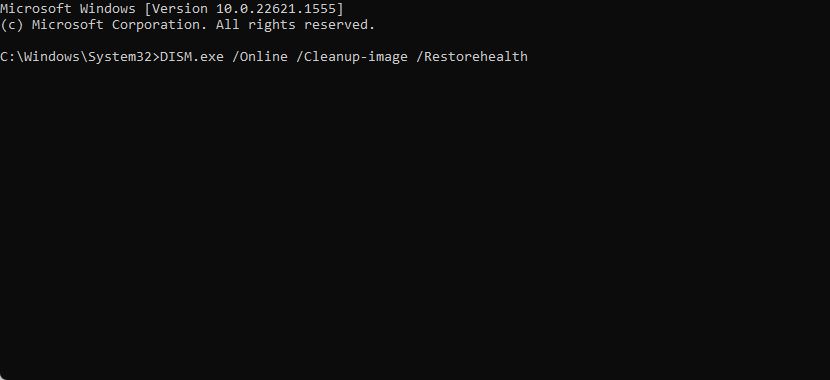
7. Run the DISM Tool
The DISM Tool is a powerful command-line tool that can repair and restore Windows system images. This tool can fix many issues, including the "Automatic Startup Repair couldn't repair your PC" error, by replacing corrupted system files with healthy copies from a local or online image source.
- Follow the steps in the previous solution to enter the WinRE environment, and then navigate to Troubleshooting > Advanced options > Command Prompt.
-
Input the following command and press Enter to execute it: DISM.exe /Online /Cleanup-image /Restorehealth. After you execute the command, wait for it to finish checking your PC.
8. Repair the Boot Configuration Data (BCD)
Repairing the Boot Configuration Data (BCD) can help fix the "Automatic Startup Repair couldn't repair your PC" error by restoring the boot files essential to launching your operating system. Issues with the BCD can often lead to startup errors. Still, fortunately, Windows provides several tools that you can use to repair or rebuild the boot configuration data and get your computer running again.
- Enter WinRE and navigate to Troubleshooting > Advanced options > Command Prompt.
-
When the Command Prompt interface shows on the screen, input the following commands and press the Enter key on your keyboard after each command finishes running:
- bootrec /rebuildbcd
- bootrec /fixmbr
- bootrec /fixboot
- Allow your computer to finish running the commands, and then restart it. See if this fixed the error with Startup Repair.
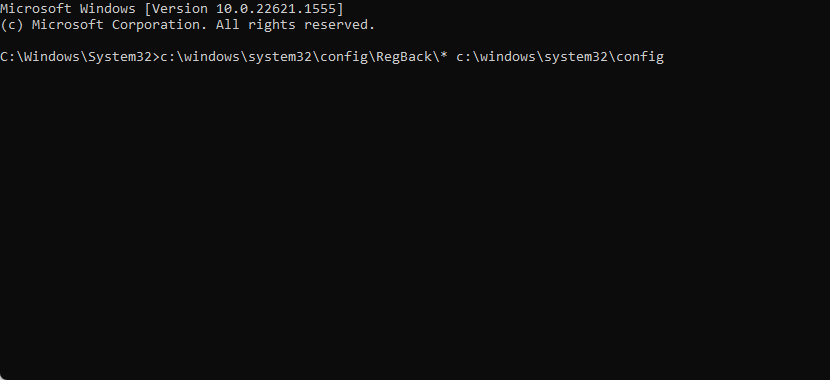
9. Restore the Windows Registry
The Windows Registry is a crucial database that stores important settings and configurations for your operating system and programs. If the registry becomes corrupted or damaged, it can cause serious issues with your computer, including the "Automatic Startup Repair couldn't repair your PC" error.
- Enter WinRE and navigate to Troubleshooting > Advanced options > Command Prompt.
-
When the Command Prompt interface shows on the screen, input the following command and press Enter to execute it: c:\windows\system32\config\RegBack\* c:\windows\system32\config
- Wait for the command to finish running and see if restoring the Registry fixed your error.
10. Reset Windows
If none of the above methods works, try resetting Windows. This will restore your computer to its default settings but may also erase any data stored on the hard drive in the process. Before taking this step, ensure you have a backup of all critical files and documents so you don't lose them during the reset.
You can reinstall Windows using a bootable USB or reset Windows without a bootable DVD/USB. Whichever method you choose should help you set up a new operating system that functions as needed.
Conclusion
The Automatic Startup Repair tool in Windows is essential to ensure your system is running optimally. As you can see, there are several steps you can take to try and resolve the "Automatic Startup Repair couldn't repair your PC" error. We encourage you to follow our step-by-step guide and troubleshoot thoroughly to find the source of the problem so that it doesn't happen again.
We hope that by following our steps and troubleshooting methods, you can fix the issue with the Automatic Startup Repair tool and get back to using your computer without any further issues.
One More Thing
We’re glad you’ve read this article. :) Thank you for reading.
If you have a second, please share this article on your socials; someone else may benefit too.
Subscribe to our newsletter and be the first to read our future articles, reviews, and blog post right from your inbox. We also offer deals, promotions, and updates on our products and share them via email. You won’t miss one.
Related Articles
» Fix Windows 10 Stuck in "Preparing Automatic Repair" Loop
» Fixed: Windows Could Not Automatically Detect This Network’s Proxy Settings
» How to Fix Windows 10 Stuck at “Getting Windows Ready”