If you've noticed that your computer is running slower than usual or experiencing lag, you might be wondering why your RAM usage is so high. Random Access Memory (RAM) is a crucial component of your computer's performance, and when it becomes overloaded, it can have a significant impact on the overall system responsiveness.
RAM plays a vital role in your computer's operations. It's a volatile memory that temporarily stores data that the processor needs to access quickly. When you open a program or file, it is loaded into RAM to ensure swift access. However, when you have too many programs running simultaneously or encounter memory leaks, your RAM usage can skyrocket, leading to performance issues.
In this article, we will explore the reasons behind high RAM usage and provide practical solutions to help you fix the issue on Windows 11/10.
Jump To
- Close Unnecessary Programs
- Disable Startup Apps
- Defragment Your Hard Drive
- Adjust Your Power Settings
- Increase Virtual Memory (VRAM)
- Disable the Superfetch Service
- Use the Registry Editor
- Scan Your Computer for Malware
- Disable NDU in Your Registry
- Install More RAM
What Causes High RAM Usage on Windows 11/10?
There are a few common causes of high RAM usage on Windows 11/10. The most likely explanations include:
- Too many programs running at once: A common reason for high RAM usage is having too many applications running at the same time. Each program consumes a portion of the available RAM, and if the combined usage exceeds the available capacity, your computer may become sluggish.
- Memory leaks: Memory leaks occur when programs fail to release the memory they have allocated, resulting in a gradual increase in RAM usage over time. Certain software or poorly optimized applications can be the culprits behind memory leaks, and they can significantly impact system performance.
- Not enough RAM: If your computer has insufficient RAM for the tasks you're performing, it can lead to high usage. Resource-intensive applications like video editing software or games often require more RAM to function smoothly. Insufficient RAM can cause your computer to rely on virtual memory, which is slower and can affect overall performance.
- Corrupted or outdated drivers: Problems with your computer's drivers can cause them to take up an excessive amount of memory and lead to degraded performance.
- Malware and viruses: Malicious software can steal resources from your system, causing its performance to suffer.
Fortunately, there are a few simple solutions you can use to address high RAM usage on your Windows 11/10 computer.
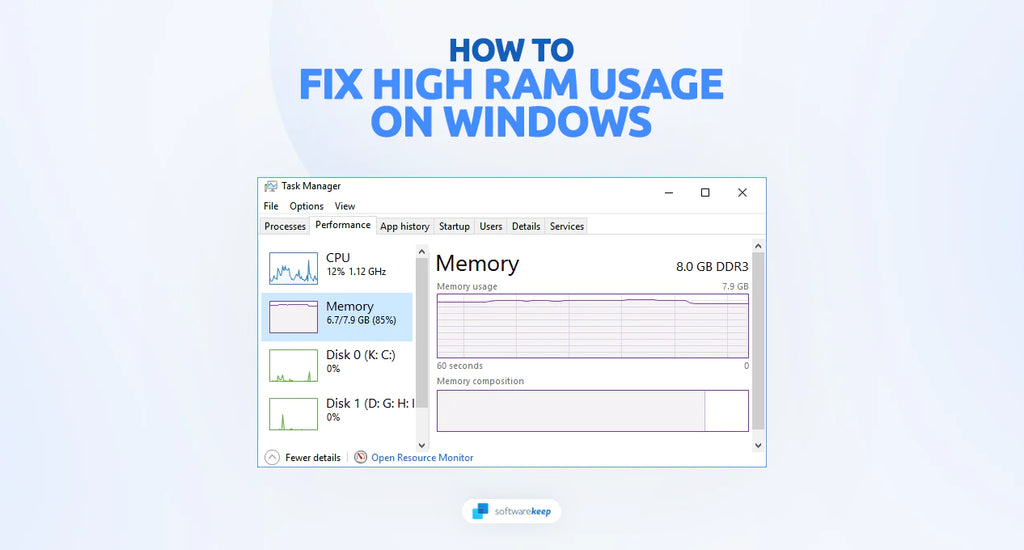
Monitoring RAM Usage on Windows 11/10
To identify the cause of high RAM usage, you can monitor your system's memory usage using built-in tools like Task Manager and Resource Monitor.
- Task Manager: Press Ctrl + Shift + Esc to open the Task Manager. Navigate to the "Processes" or "Details" tab and sort the processes by "Memory" to identify the programs consuming the most RAM.
- Resource Monitor: Open the Start menu and search for "Resource Monitor." In the Resource Monitor window, go to the "Memory" tab, and you'll find a detailed overview of the processes using RAM, including their associated modules.
After you've identified the applications that are taking up too much RAM, you can go ahead and take steps to address the issue.
How to Fix High RAM Usage on Windows 11/10
Here are a few tips to help you troubleshoot and resolve high RAM usage issues. The solutions below will work on both Windows 11 and Windows 10 systems, making them ideal for most users.
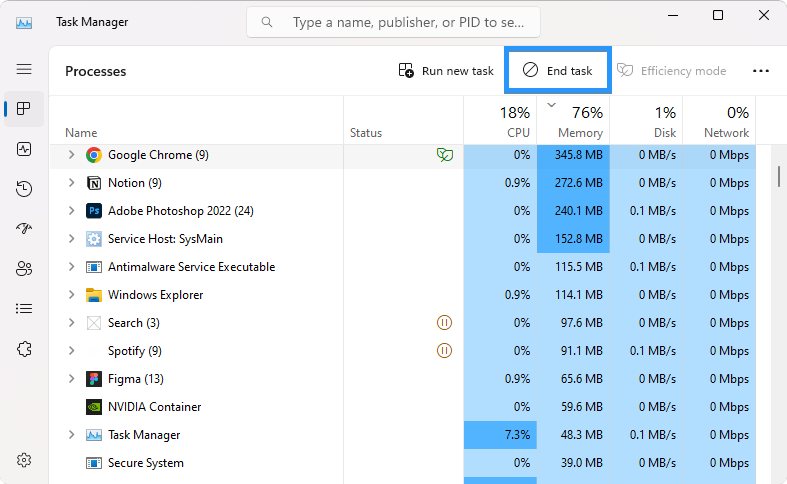
1. Close Unnecessary Programs
The first step is to check which programs are using up the most RAM and close any that aren't needed. To do this, open the Task Manager by pressing Ctrl + Shift + Esc at once and clicking on "Processes." This will list all of the active processes running on your system and how much memory they are consuming.
If you spot a program that's using more RAM than it should be, click on it and select "End task" to close it down. If you're not sure what certain processes are doing, you can right-click on them individually for more information.
If an application is using too much RAM, it may be helpful to uninstall it and look for a replacement. It might also be worth trying to reinstall the application by deleting all of its files and downloading the latest version from the official website.
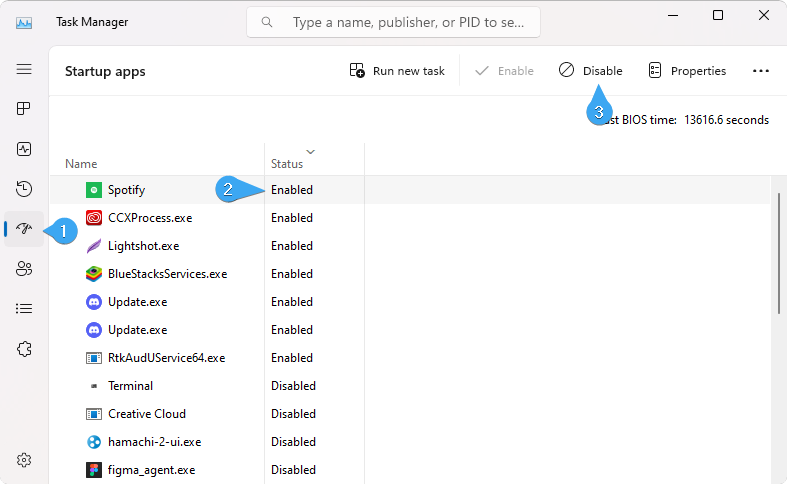
2. Disable Startup Apps
Many programs are set to launch automatically when you turn on your computer, which can add up over time and cause high RAM usage.
- To disable unnecessary startup applications, open the Task Manager (Ctrl + Shift + Esc) and navigate to the "Startup" tab. This will list all of the apps that start with Windows along with their current status.
- Review which applications are enabled and disable any that you don't need.
-
To prevent an app from running at startup, simply toggle its switch to "Off" or right-click on it and select "Disable."
- If you're unsure about a particular program's purpose, you can check out its description by selecting "More details" at the bottom of the window.
By disabling unneeded startup programs, you can reduce your RAM usage and help improve your system performance. Generally, we recommend disabling any apps you don't recognize or don't use often.
3. Defragment Your Hard Drive
Over time, the files on your hard drive can become fragmented, leading to slower performance and increased RAM usage. Defragmenting your hard drive is a process that reorganizes files and makes them contiguous, allowing your computer to access them more efficiently.
- Press the Windows key on your keyboard or click on the Start menu in your taskbar.
-
Type "Defragment and Optimize Drives" in the search bar and select it from the search results.
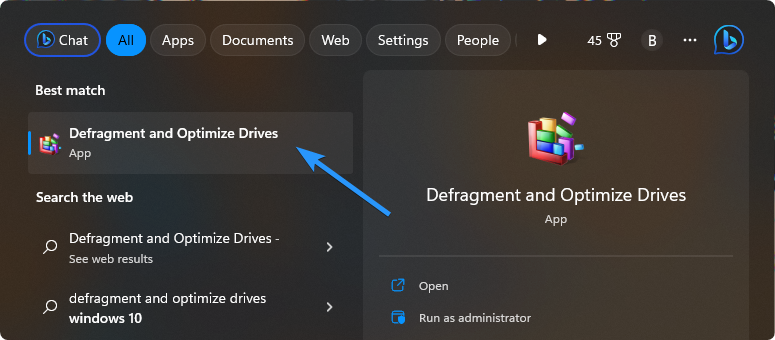
- The Disk Defragmenter window will open, displaying a list of drives connected to your computer. Select your system drive (usually "C:") and click "Analyze."
- After the analysis is complete, you will see a report indicating the fragmentation level of the drive.
-
Click on the "Optimize" button. The Disk Defragmenter will start defragmenting the selected drive.
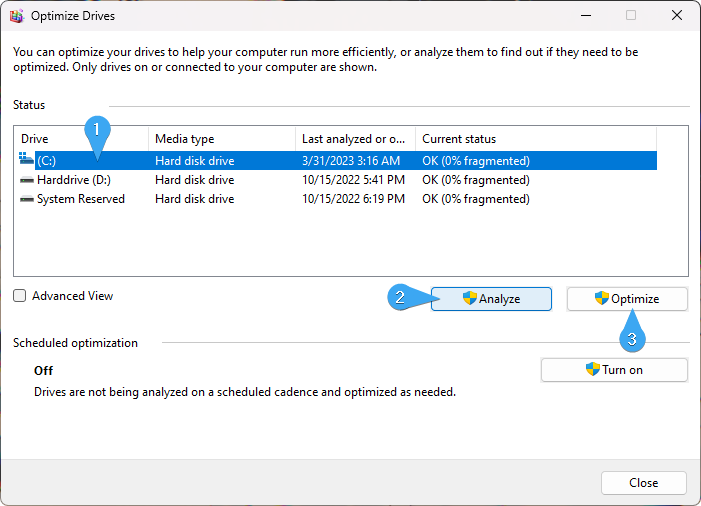
- You can monitor the progress of the defragmentation process in the "Status" column. It may take some time to complete, depending on the size and fragmentation level of the drive.
After the defragmentation process is complete, you should notice improved performance and reduced RAM usage. Keep an eye on your computer's overall performance and assess whether the defragmentation has made a noticeable difference.
4. Adjust Your Power Settings
The power settings on your computer determine how it balances performance and energy consumption. By default, most systems are set to a balanced power mode, which aims to provide a good balance between performance and energy efficiency. If you're experiencing high RAM usage, adjusting your power settings to "High Performance" can help.
- Right-click on the Start menu button or press the Windows key + X on your keyboard. From the context menu, select "Power Options." A separate window will open.
- Identify the power plans listed and click on the "Additional power settings" link.
-
In the next window, you will see a list of power plans. Select the "High Performance" plan.
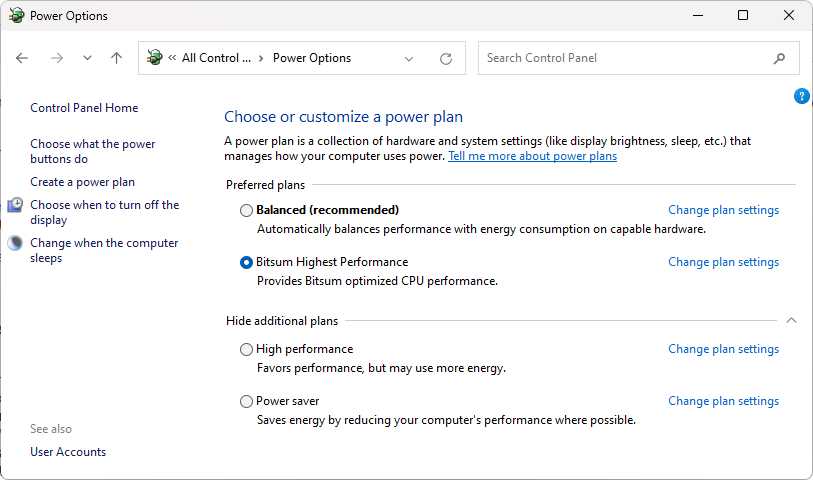
- Once you've selected the High Performance power plan, you may want to customize certain settings to optimize performance further. Click on the "Change plan settings" link.
- The Advanced Power Settings window allows you to fine-tune specific power-related options. Make any changes you want and click "OK" to save your settings.
By switching to the High Performance power plan, you should notice improved performance and reduced RAM usage.
5. Increase Virtual Memory (VRAM)
Virtual memory is a type of computer memory that allows your system to access additional RAM when built-in RAM is insufficient. Increasing the virtual memory on your computer can help reduce RAM usage by providing extra space for programs to run in.
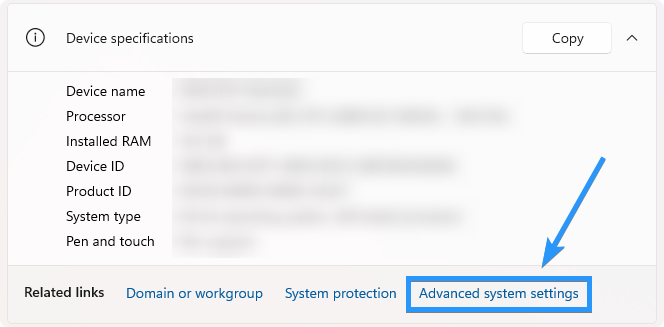
- Right-click on the Start menu button or press the Windows key + X on your keyboard. From the context menu, select "System."
-
Click on the "Advanced system settings" link located on the left-hand side. This will open the System Properties dialog box.
-
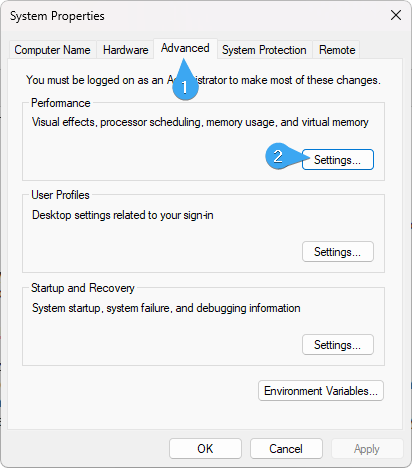
Navigate to the "Advanced" tab and click on the "Settings" button under the "Performance" section.
-
In the Performance Options window, navigate to the "Advanced" tab and click on the "Change" button under the "Virtual memory" section.
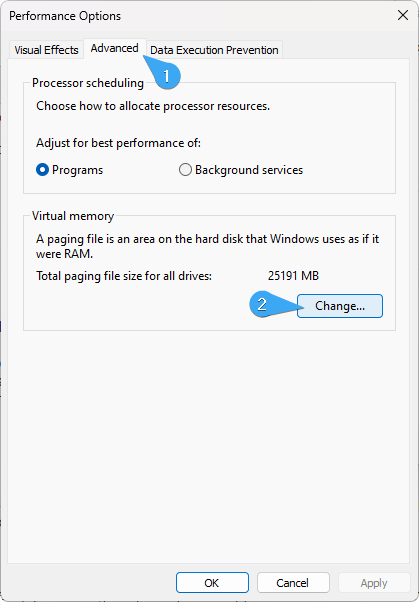
- Uncheck the option that says "Automatically manage paging file size for all drives" if it's selected.
- Select the drive where you want to modify the virtual memory. Choose either the "Custom size" or "System managed size" option.
- Custom size: Allows you to manually set the initial size (MB) and maximum size (MB) for the virtual memory. It's recommended to set the initial and maximum size to the same value to prevent frequent resizing.
- System managed size: Allows Windows to automatically manage the virtual memory size based on system requirements. This option is generally suitable for most users.
-
If you choose the custom size option, enter the desired values for the initial size and maximum size. It's recommended to set a size larger than your physical RAM, but not excessively so. The specific values will depend on your system configuration.

- Click on the "Set" button to apply the changes.
- After modifying the virtual memory settings, it's recommended to restart your computer to ensure the changes take effect.
Increasing the virtual memory size can provide additional space for your system to store data when physical RAM is insufficient, potentially reducing high RAM usage. However, it's important to note that virtual memory is stored on your hard drive, which is slower than physical RAM. It's best to have an adequate amount of physical RAM for optimal performance.
6. Disable the Superfetch Service
Superfetch is a Windows service that aims to improve system performance by preloading frequently used applications and data into memory. While Superfetch can be beneficial in some cases, it can also contribute to high RAM usage, especially on systems with limited physical memory.
Disabling the Superfetch service can help reduce RAM usage and optimize system performance.
-
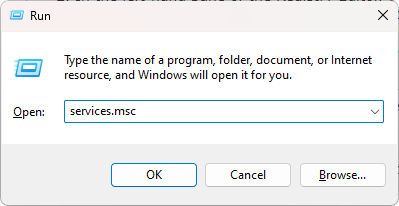
To access the Services app, use the keyboard shortcut Windows key + R. Type "services.msc" into the Run dialog box and click on OK.
-
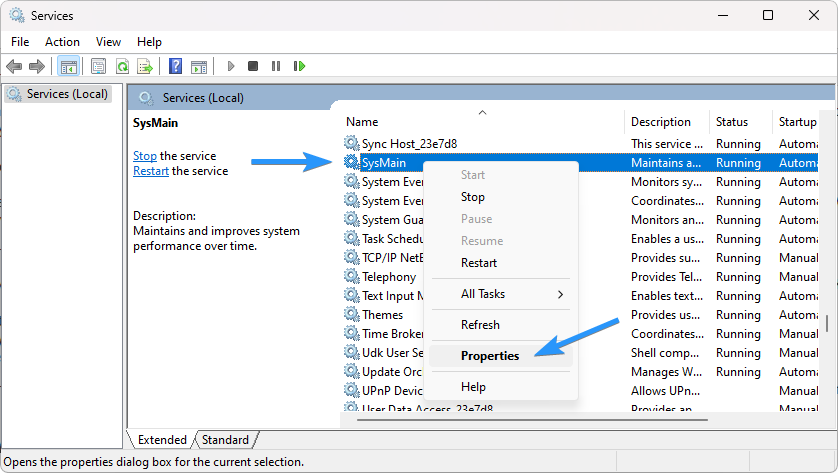
Scroll through the list of services until you find "SysMain." Right-click on the service and select "Properties." The Properties window will open.
-
In the "General" tab, locate the "Startup type" section. Click on the drop-down menu next to the Startup type and select "Disabled."
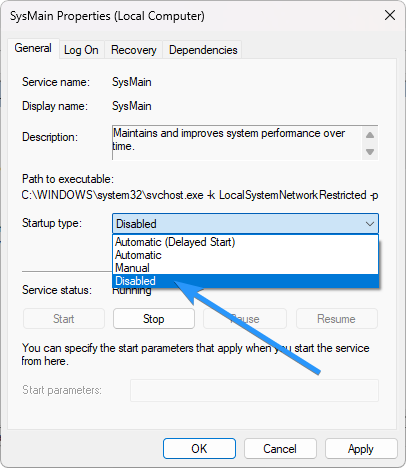
- Click on the Apply button, then click on OK to save the changes.
- After disabling the Superfetch service, restart your computer to ensure the changes take effect.
Disabling the Superfetch service can help reduce high RAM usage by preventing the preloading of applications and data into memory. However, keep in mind that disabling Superfetch may slightly increase the time it takes for applications to launch initially.
7. Use the Registry Editor
ClearPageFileAtShutDown is a registry value that determines whether Windows clears the virtual memory paging file (pagefile.sys) during system shutdown. Disabling this feature can help optimize system performance and reduce high RAM usage.
-
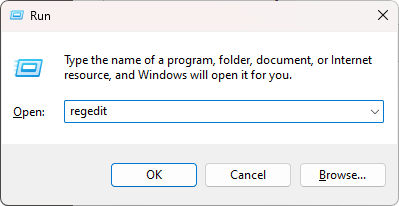
Press the Windows key + R on your keyboard. The Run dialog box will open. Type "regedit" in the text field and press Enter or click OK. The Registry Editor will open.
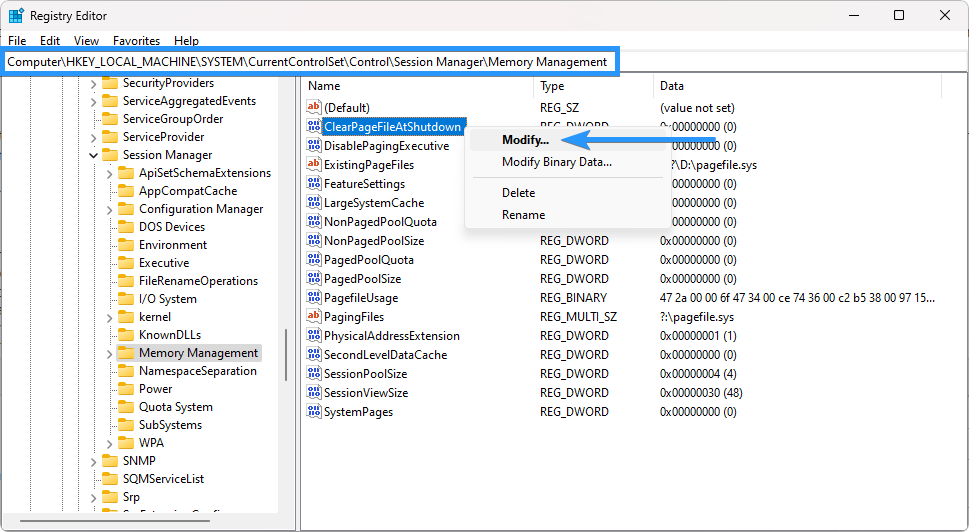
- In the left-hand pane of the Registry Editor, expand the following folders: HKEY_LOCAL_MACHINE > SYSTEM > CurrentControlSet > Control > Session Manager.
- Click on the "Memory Management" folder to select it.
-
In the right-hand pane of the Registry Editor, locate the "ClearPageFileAtShutDown" value. Right-click on it and select "Modify." The Edit DWORD Value window will open.
-
In the Edit DWORD Value window, change the "Value data" to "1."
- Click OK to save the changes.
Once you have disabled ClearPageFileAtShutDown, Windows will no longer clear the virtual memory paging file during system shutdown. This can help optimize system performance and potentially reduce high RAM usage.
It's worth mentioning that modifying registry values can have significant effects on your system, and it's crucial to be cautious while making changes in the Registry Editor.
8. Scan Your Computer for Malware
Malware infections can significantly impact system performance and contribute to high RAM usage. Performing regular malware scans is essential to ensure the security and optimal functioning of your computer. In this section, we will guide you on how to scan your computer for malware on Windows 11/10.
Windows 11/10 includes a built-in security solution called Windows Security, which provides antivirus and malware protection. To scan your computer using Windows Security:
- Click on the Start menu button or press the Windows key on your keyboard.
- Type "Windows Security" in the search bar and select Windows Security from the search results. The Windows Security app will open.
- In the Windows Security window, click on the "Virus & Threat Protection" tab located in the left-hand menu.
-
Under the "Current threats" section, click on the "Quick scan" or "Scan options" link. The Scan options window will open.
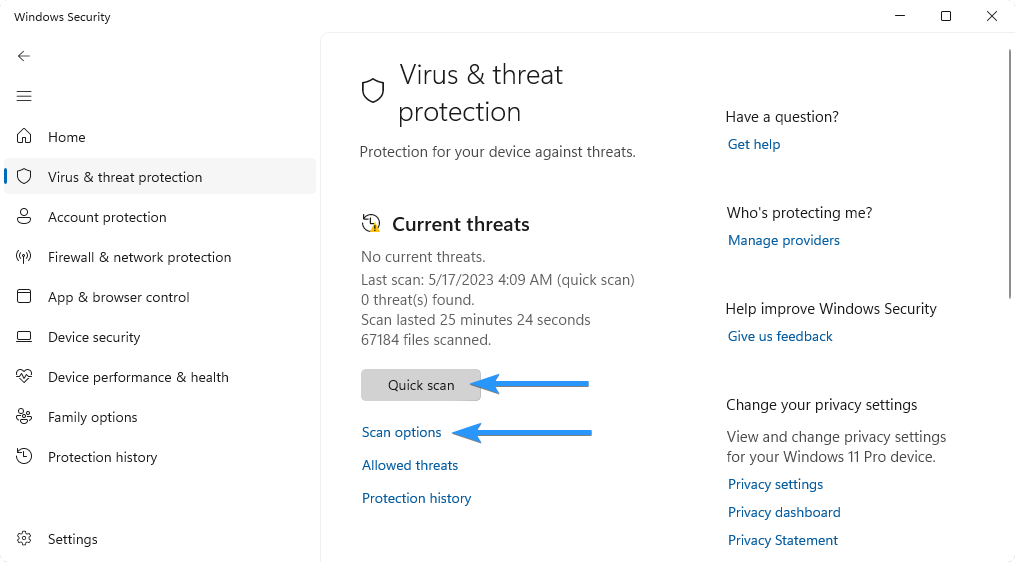
- Choose between a Quick scan or a Full scan.
- Quick scan: Scans the most critical areas of your computer, including running processes and commonly infected locations. It's faster but may not detect deeply hidden malware.
- Full scan: Scans your entire system, including all files and folders. It may take longer but provides a more comprehensive scan.
- Click on the "Scan now" button to start the selected scan.
If any malware or suspicious files are detected, Windows Security will notify you and provide options for action. Follow the recommended actions to remove or quarantine any identified threats.
9. Disable NDU in Your Registry
NDU (Network Data Usage) is a Windows service that monitors network data usage and can contribute to high RAM usage in certain scenarios. Disabling NDU can help optimize system performance and reduce memory consumption.
- Press the Windows key + R on your keyboard. The Run dialog box will open. Type "regedit" in the text field and press Enter or click OK. The Registry Editor will open.
- In the left-hand pane of the Registry Editor, expand the following folders: HKEY_LOCAL_MACHINE > SYSTEM > ControlSet001 > Services.
- Scroll down and locate the "Ndu" folder. Click on it to select it.
-
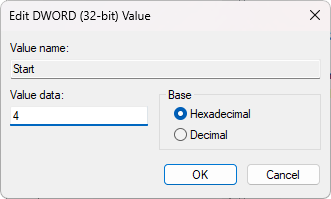
In the right-hand pane of the Registry Editor, locate the Start value. Double-click on it to edit it.
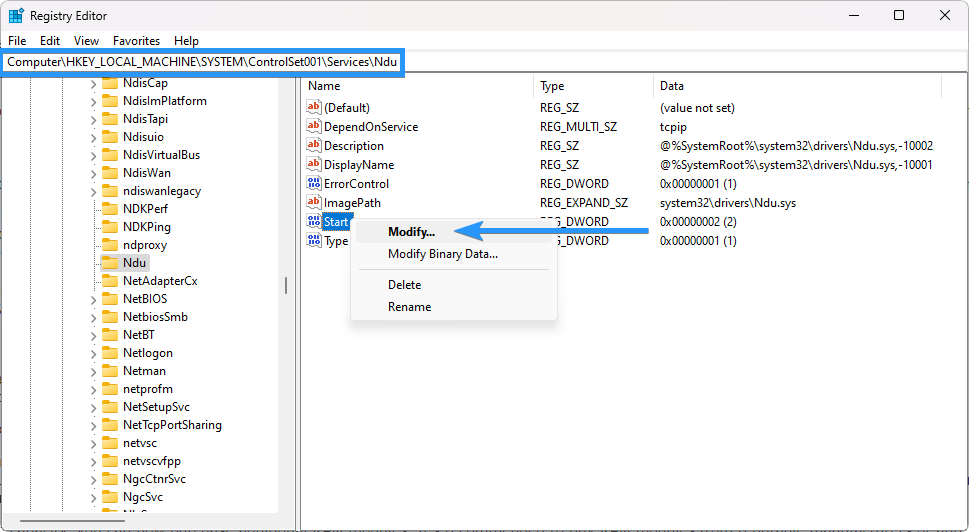
-
Change the value data to 4 to disable NDU, then click OK to save the changes.
- After making the changes in the Registry Editor, it's recommended to restart your computer to ensure the changes take effect.
10. Install More RAM
If you find that your RAM usage is consistently high and causing performance issues, one effective solution is to install additional RAM (Random Access Memory) in your computer. Increasing the amount of RAM can provide more memory resources for your system to handle tasks and applications efficiently.
Before purchasing new RAM modules, it's essential to determine the appropriate type and capacity that are compatible with your computer. Here's how you can find this information:
- Check your computer's documentation: Look for the user manual or specifications sheet that came with your computer. It should provide details about the type of RAM your system supports and the maximum capacity.
- Use system information tools: On Windows, you can use built-in system information tools to find information about your current RAM configuration. Press the Windows key + R on your keyboard, type "msinfo32," and press Enter. In the System Information window, navigate to the "Installed Physical Memory" section. Note down the "Total Physical Memory" and "Memory Speed" values.
With the knowledge of your computer's RAM type and capacity, you can now purchase additional RAM modules. It's recommended to buy RAM modules from reputable manufacturers or authorized resellers to ensure compatibility and quality.
Conclusion
In conclusion, understanding why your RAM usage is high and implementing effective solutions can significantly improve the performance of your Windows 11/10 computer. We have explored various methods to tackle high RAM usage and provided step-by-step instructions for each approach
Remember, it's essential to consider a combination of these methods based on your specific needs and circumstances. Each computer configuration may require a unique approach, and some methods may yield better results than others.