Does Avast antivirus slow down your computer? It’s possible, especially on lower-end devices. If you want to enjoy the full protection of Avast, but don’t want to risk performance drops, this guide is for you. We’ll explore how to fix Avast antivirus slowing down your computer on Windows 10.

Table of Contents
- Why does Avast slow down my computer?
- How to fix Avast slowing down my computer
- Solution 1. Load Avast after Windows 10’s services
- Solution 2. Disable Avast’s background updates
- Solution 3. Free up space on your harddisk
- Solution 4. Uncheck Avast Community and Data Sharing
- Solution 5. Disable Remote Assistance
- Solution 6. Disable some startup programs
- Solution 7. Update Windows 10 to the latest release
- Final thoughts
Why does Avast slow down my computer?
In most cases, Avast isn’t the one to blame for your performance drops. There are still a number of reasons why Avast might be slowing down your device. Let’s take a look at some common things that you might want to consider before troubleshooting the issue:
-
Your computer doesn’t have enough RAM. If your device is performing poorly, it’s possible that you don’t have enough memory installed. By installing more RAM, issues with performance are usually solved.
However, we recognize that you might not have the option to purchase additional memory. In this case, you can use the solutions below to improve the performance of your system and optimize Avast for use. - There’s no available disk space on your computer. If your hard disk is too full, your device will start functioning slower. You can easily help this by clearing up some disk space using our solution below.
- Too many start-up programs. If too many applications run on startup, your device might function slower due to the amount of software open. This can be helped by disabling unnecessary startup apps using our solution.
- Your system is outdated. If you’re running an old version of Windows, your system might not perform at its best. To fix this, simply update Windows 10.
- Too many Avast features are turned on. Avast antivirus is an extremely useful application with a robust variety of features. However, not everyone utilizes each and every tool included with the software. To reduce Avast’s impact on your device’s performance, simply turn off features you don’t need.
We’ve compiled several guides below to help you determine common features that leave a large footprint on your device’s performance. You can, in most cases, disable these without any repercussions.
How to fix Avast slowing down my computer
Use the following methods to fix Avast slowing down your computer
Solution 1. Load Avast after Windows 10’s services
(Source: MT)
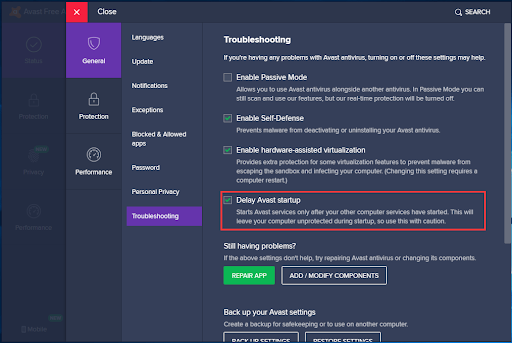
In some cases, Avast might load faster than some of Windows 10’s default services, causing it to conflict with various processes. This more often than not leads to slowdowns on your device. However, there’s an easy solution included in Avast to combat this from happening.
- Open your Avast antivirus application.
- Click on the Menu button, then choose Settings. You should be redirected to the General settings of Avast.
- Here, switch to the Troubleshooting tab. Make sure that the Delay Avast startup option is checked.
- In older versions of Avast antivirus, the option is called Load Avast services only after loading other system services.
- Click OK, then restart your computer. Avast will now wait, giving time for your Windows services to load first before the antivirus starts. This significantly reduces the likelihood of conflicts caused by this issue.
Solution 2. Disable Avast’s background updates
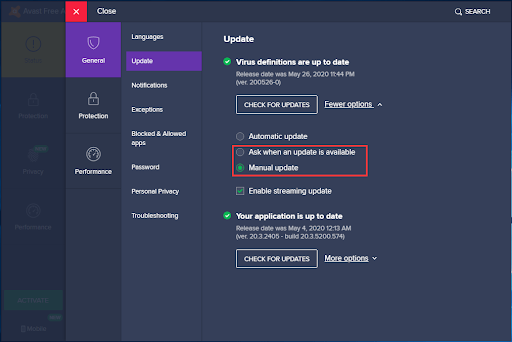
By default, Avast automatically checks for, downloads, and installs new updates as soon as they become available to the public. It goes without saying that this will most likely impact your computer’s performance for the duration of the update process, and you won’t even know what’s causing the issue. To avoid it, simply turn off background updates.
- Open your Avast antivirus application.
- Click on the Menu button, then choose Settings. You should be redirected to the General settings of Avast.
- Here, switch to the Updates tab.
- Under the Virus definitions section, click More options.
- Choose between either Ask when an update is available or Manual update depending on your personal preference. This will stop Avast from automatically updating in the background.
Solution 3. Free up space on your hard disk
A full hard disk can present a number of issues, mainly noticeable performance drops and the inability to update or install applications. This may cause your device to take a pretty bad hit in the speed and functionality areas.
Luckily, there are a number of effective ways of freeing up space on your harddisk:
- Uninstall unused applications: The best thing you can do is head to Settings, and uninstall applications you no longer need.
- Find and remove large files: There could be a number of leftover files that take up a surprisingly big portion of your hard disk’s available space. You can easily locate these files and delete them if they’re no longer needed on your device.
- Clean your computer with CCleaner: Download and install the CCleaner application, then run it to remove a wide variety of unneeded files from your device. This covers temporary files, leftover residual files from uninstalled apps, and even faulty registry keys.
Solution 4. Uncheck Avast Community and Data Sharing
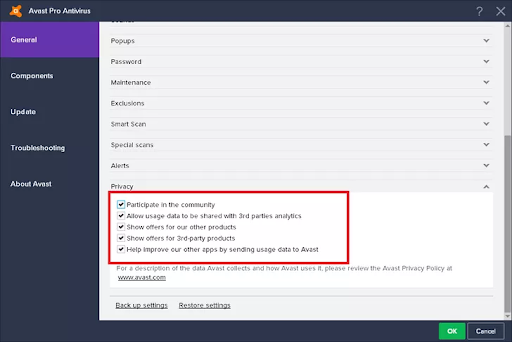
A setting most Avast users don’t like to use is related to data sharing and other community features. However, just because you don’t use it, that doesn’t mean it isn’t active. To spare some resources, turn off these two features in Avast to reduce its load on your device.
- Open your Avast antivirus application.
- Navigate to Settings → General → Privacy.
- Remove the checkmark from the following two options: Participate in the Avast community and Participate in data sharing.
Solution 5. Disable Remote Assistance
If you don’t often use the Remote Assistance feature, it might be better to disable it similarly to the Avast Community method.
- Open your Avast antivirus application.
- Navigate to Settings → Tools.
- Ensure that the toggle for the Remote Assistance feature is set to the turned-off state.
- After modifying the setting, switch to the Troubleshooting tab.
- Uncheck Allow remote control of this computer.
Solution 6. Disable some startup programs
Every time your system boots up, various applications launch at startup. This is a feature used by many apps that you might want to have ready from the moment you gain access to your computer, such as antivirus software. However, many apps are not necessary for your device to load upon startup.
Some apps, especially freeware, often make modifications to your system and set unnecessary startup apps. This doesn’t only slow down your boot time, but may cause serious performance drops as these applications continue running in the background.
Here’s how you can disable unwanted startup apps to improve the speed of your Windows 10 operating system.
- Open the Task Manager using one of the following ways:
- Right-click on any empty space in your taskbar. This will open up a context menu. Here, click on Task Manager.
- Alternatively, press the Ctrl, Alt, and Esc keys simultaneously on your keyboard.
- If your Task Manager launched in the compact view, click on the More details option seen in the bottom left of the window. This will expand the window and show you the necessary taps to access startup applications.
-
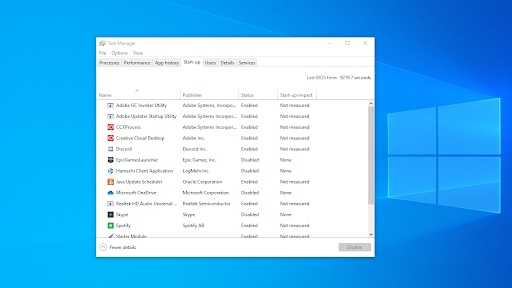
Switch to the Startup tab using the menu at the top of the Task Manager window. Here, you can see all of the applications that start along with your computer at launch.

-
You can check the Start-up impact column to determine which applications have a high impact measurement on your computer’s performance.
- Note: Make sure that the application you’re trying to disable doesn’t have Microsoft Corporation stated in the Publisher column. These applications usually don’t impact your system’s performance, and might be required for Windows 10 to run as intended.
-
Select an application you want to disable, then click on the Disable button in the bottom right of the window. Its status should change to Disabled.
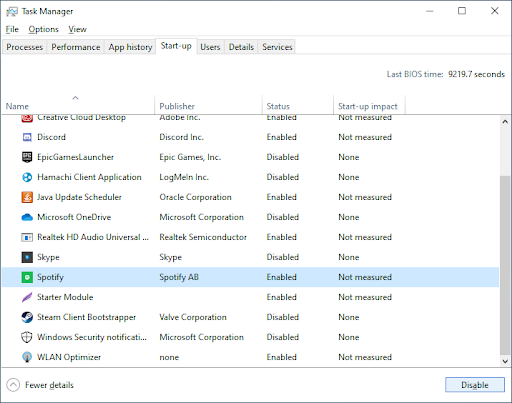
- Repeat this process for every app you don’t need at startup, then restart your computer.
Now, your computer should launch up without any impact-heavy or unnecessary apps automatically launching. This gives you the ability to test if your boot time and the performance of your device as well.
Solution 7. Update Windows 10 to the latest release
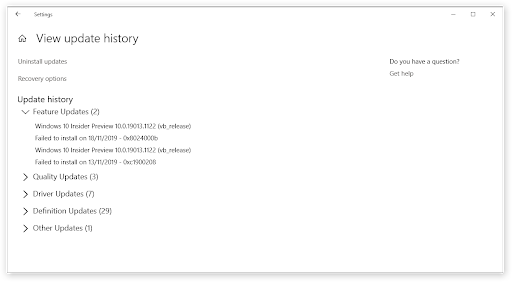
If none of the methods above seemed to work, the last thing you can try is simply upgrading to the newest Windows 10 release. This can fix bugs, bring you new features, patch up security holes, and much more.
Here’s how you can update Windows 10.
- Click on the Start menu and choose Settings. Alternatively, use the Windows + I keyboard shortcut for quicker access.
- Click on the Update & Security tile.
- Make sure to stay on the default Windows Update tab.
- Click on the Check for updates button.
- If an update is found, click on the Install button and wait for Windows 10 to download and apply the update.
After the update has successfully been installed, make sure to check the performance of your computer. If it still doesn’t seem to work, you might need to contact Microsoft and seek a professional to restore your device.
Note: Sometimes, the problem may be because of high CPU usage. You may need to check that out as well.
Final thoughts
If you need any further help, don’t be afraid to reach out to our customer service team, available 24/7 to assist you. Return to us for more informative articles all related to productivity and modern-day technology!
Would you like to receive promotions, deals, and discounts to get our products for the best price? Don’t forget to subscribe to our newsletter by entering your email address below! Receive the latest technology news in your inbox and be the first to read our tips to become more productive.