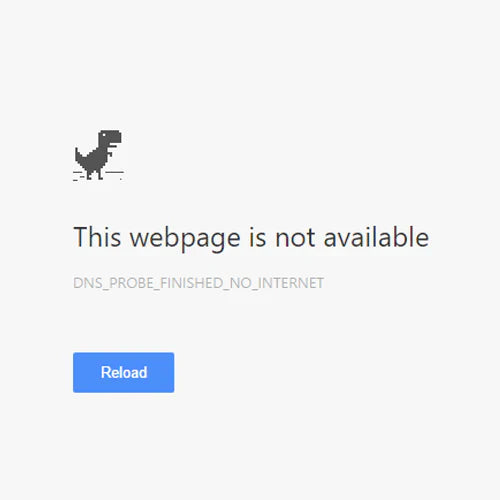
You may have come across the DNS_PROBE_FINISHED_NO INTERNET error in Google Chrome and wonder what it means. Most importantly, you should know how to fix it. In this article, you can find the answers to all of your questions.
In this article, we'll show you how to fix this issue using a few simple steps! Find out what this error is, what can cause it, and how to prevent it from happening again in the future.
What is the DNS_PROBE_FINISHED_NO_INTERNET error?
Every device connected to the internet has an IP address assigned by its ISP (Internet Service Provider). This helps online services identify your computer and other devices connected online. It’s necessary in order to browse the internet, play online games, and more.
DNS stands for Domain Name Service. It’s a system that translates domain names into IP addresses. Using a DNS, your computer can connect to websites or other computers on the internet.
The DNS_PROBE_FINISHED_NO INTERNET error tells you that there's a problem connecting to DNS servers, which prevents access to any website. If you’re trying to browse using Google Chrome but keep seeing this error, chances are that something is wrong with your DNS server.
What causes the DNS_PROBE_FINISHED_NO_INTERNET error?
In some cases, the DNS_PROBE_FINISHED_NO_INTERNET error can be caused by a slow internet connection. Other times, this message pops up when a website fails to establish a connection to your device via the DNS server.
There are many possible causes for this error, some more serious than others. Here are the most common symptoms and causes:
- The DNS server you're using is not responding. The DNS server you’re connected to at the moment may be experiencing temporary issues. In this case, you can either wait for the server to fix itself, or switch to a different provider for the time being.
- Your computer's DNS cache is full. If you’ve been using your computer for a long time, it’s possible that the DNS cache has become full. This can, in some rare cases, cause problems with DNS connectivity. Simply clear the cache and try getting online again.
- There's a problem with your network connection. More often than not, the problem doesn’t lie with your device, but with your ISP. If there’s a temporary outage or a problem with the provider, you need to wait for them to troubleshoot the issue or ask for direct assistance.
This guide will help you troubleshoot the DNS_PROBE_FINISHED_NO_INTERNET error, no matter what is causing it to appear.
Solved: DNS_PROBE_FINISHED_NO_INTERNET in Google Chrome
This common Google Chrome problem can be fixed in a variety of ways. We've compiled a list of the most efficient and simple options for getting your browser back up and running in a matter of minutes.
Method 1. Change your DNS server
If your problem is related to the network, then you may need to change your DNS address to a different one. There are plenty of public DNS providers that you can try out. Alternatively, switch your device to automatically obtain the required details. Here’s how to access the DNS settings on Windows.
-
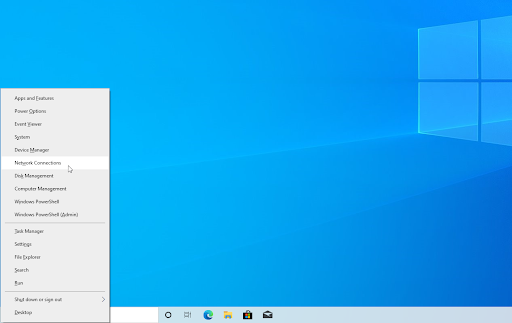
Press Ctrl + X on your keyboard, and then click on Network Connections from the context menu.
-
Select your current connection type (for example “Wi-Fi” or “Ethernet”) in the left pane, and then click on Change adapter options on the right pane.
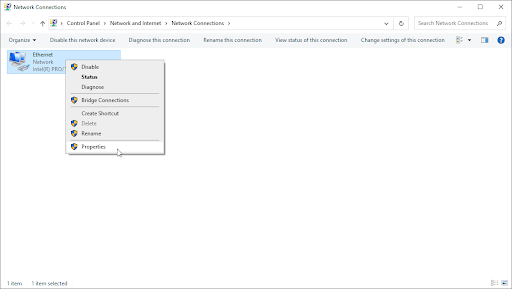
- Right-click on the connection you’re currently using and select Properties.
-
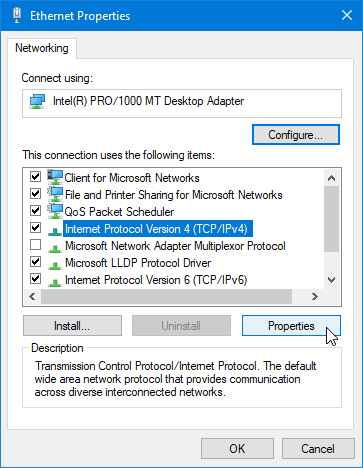
Scroll down until you see the Internet Protocol Version 4 (TCP/IPv4) option. If there’s no checkmark next to it, click on the box once to enable it. Afterwards, click on the Properties button to open a popup window.
-
Select Use the following DNS Server addresses. Now, you have some choices for what DNS server you want to use:
- Type 1.1.1.1 into the first row, then 1.0.0.1 into the second row. This will change your DNS to the popular 1.1.1.1 server.
- Alternatively, use Google’s DNS server by typing in 8.8.8.8 as the Preferred DNS server and 8.8.4.4 as the Alternate DNS server.
-
You can also use OpenDNS if you type in 208.67.222.123 and 208.67.220.123 instead
- Select the Validate settings upon exit option if you don’t want to restart your computer — otherwise, and then click OK and reboot. See if the changes have helped you restore the functionality of Google Chrome.
Method 2. Clear your browsing data
Try to clear your browser data as well as cache in Google Chrome. Clearing browser data will allow you to keep custom settings intact but will remove your cookies and history.
-
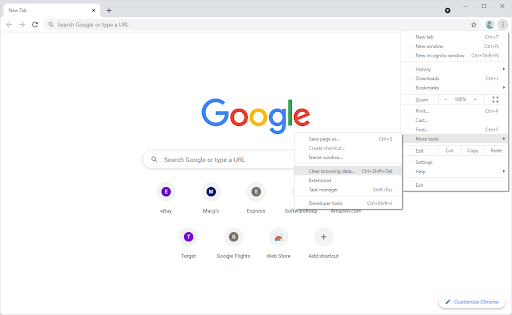
Open Google Chrome, then click on the More icon, displayed by three dots arranged vertically. Hover over More Tools, and then select Clear browsing data.
-
Make sure the Time range is set to All time. Tick the following options: Browsing history, Cookies and other site data, and Cached images and files.

- Click on the Clear data button. Note that you’ll lose your browsing history, cookies, and may have to sign back into your online accounts! Make sure to note down your passwords in case you have trouble signing in.
- After the process is over, restart Google Chrome and see if the error is still appearing when you try to access a website.
Method 3. Flush and clear DNS cache
If your DNS is outdated, you can manually clear its cache (also known as temporary files) to potentially fix the issues this causes. The method takes no more than a few minutes and involves using Command Prompt.
- Open the search bar in your taskbar by clicking on the magnifying glass icon. You can also bring it up with the Windows + S keyboard shortcut.
-
Type Command Prompt in the search box. When you see it in the results, right-click on it and choose Run as Administrator.
- When prompted by the User Account Control (UAC), click Yes to allow the app to launch with administrative permissions.
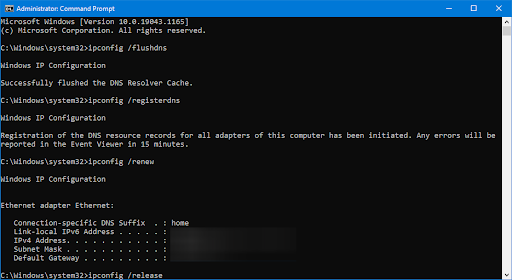
- Input the commands below in the following order, pressing the Enter key on your keyboard after each line:
ipconfig /flushdns
ipconfig /registerdns
ipconfig /renew
ipconfig /release - Close the Command Prompt and open any web browser. Check if you’re able to access a website without running into the DNS_PROBE_FINISHED_NO_INTERNET error.
Method 4. Disable web filtering
Some antivirus apps may have web filtering built-in. It’s a feature that aims to make the internet safer to browse. However, this can cause problems when Google Chrome displays errors like DNS_PROBE_FINISHED_NO_INTERNET. To fix these issues on your computer, you need only disable any security features that use web filtering.
Widely used apps such as ESET Antivirus and McAfee Internet Security have web filtering in them. Disable web filtering in your antivirus app:
- Disable SSL filtering in ESET for Windows
- Adjusting settings for Avast Antivirus Core Shields
- Enable or disable Web Control for McAfee
Don’t see your app here? Get in touch with us and we’ll help you disable web filtering!
Method 5. Restart the DNS Client service
You could try restarting your DNS service on Windows 10 directly. Remember that you may want administrator access to complete the procedures below!
- Press the Windows + R keys on your keyboard. This is going to bring up the Run utility.
- Type in services.msc and click on the OK button. This is going to launch the Services window, which might take a few seconds to fully load.
- Right-click on the DNS Client service and choose Refresh from the context menu. This will automatically turn the service off, and back on again safely.
- After refreshing the DNS Client service, check if you’re able to connect to the internet properly.
Method 6. Reset Google Chrome flag settings
If the problem is with Google Chrome itself, a quick and easy solution could be resetting the flag settings of your browser. Here are the steps you need to take to do this successfully.
- Launch Google Chrome and type chrome://flags into the address bar, and then hit Enter on your keyboard.
- Click on the Reset all button. You can find this in the top-right area of the page. Note that in some older versions of Chrome, the button may be called “Reset all to the default”.
- Click on the Relaunch button to restart Google Chrome with the default flag settings. You’ll be able to test if this helped you restore the DNS_PROBE_FINISHED_NO_INTERNET error immediately after the browser has rebooted.
Method 7. Clear Host Cache in Google Chrome
Google Chrome keeps a record of all DNS entries in order to reduce the loading time of various websites you visit on a regular basis. However, a faulty cache can result in errors such as DNS_PROBE_FINISHED_NO_INTERNET. Clear the cache in your Google Chrome browser to resolve this problem.
- Launch Google Chrome and type chrome://net-internals/#dns into the address bar, and then hit Enter on your keyboard.
- Click on the Clear host cache button. You’ll be prompted to relaunch Google Chrome for the changes to take effect. Check if this method has helped you with the DNS error at hand when you're done.
Method 8. Perform a Winsock reset
Resetting your Winsock library will help get rid of any problems and restore the default settings on Windows Sockets API so that everything is running smoothly again! This could help you resolve the DNS_PROBE_FINISHED_NO_INTERNET error code in Google Chrome.
- Open the search bar in your taskbar by clicking on the magnifying glass icon. You can also bring it up with the Windows + S keyboard shortcut.
- Type Command Prompt in the search box. When you see it in the results, right-click on it and choose Run as Administrator.
- When prompted by the User Account Control (UAC), click Yes to allow the app to launch with administrative permissions.
- Input the commands below in the following order, pressing the Enter key on your keyboard after each line:
netsh int ip set dns
netsh winsock reset - Close the Command Prompt and see if you’re able to browse the internet using Google Chrome without the DNS_PROBE_FINISHED_NO_INTERNET error.
Method 9. Update Google Chrome
Sometimes browsers release updates with bugs still in them. It can happen even in Google Chrome. This is a common mishap that’s almost required for software to develop and improve. If you're using an outdated browser, you might be dealing with a problem already fixed in an update.
- Close Google Chrome entirely by right-clicking on it in your taskbar and using the Close window option from the context menu.
- Relaunch Google Chrome and look in the top-right corner. If there’s an available update, the More icon (displayed by three dots arranged vertically) will have a colored bulb next to it:
- Green: An update was released less than 2 days ago.
- Orange: An update was released about 4 days ago.
- Red: An update was released at least a week ago.
- Click on the Update Google Chrome option. If you can't find this button, you're currently on the latest publicly available version.
- Click on the Relaunch button. You should be on the latest version of Google Chrome now. Test if the same problem appears when using the most up-to-date release.
Method 10. Update your network driver
Updating or completely reinstalling your network device may be able to resolve your problems with Google Chrome. Let’s give it a try:
- Press the Windows + X keys on your keyboard and click on the Device Manager option from the WinX menu.
- Expand the Network adapters menu by clicking on the arrow next to it. Right-click on your adapter listed in the menu, and then choose the Update driver option.
- Choose the Search automatically for drivers option and wait for Windows to locate the latest drivers for your adapter. Follow any on-screen instructions to finish the installation.
- If the update didn’t work, navigate back to the same window in the Device Manager, select your network adapter and choose Uninstall device.
- Click on the Uninstall button to confirm the action.
- After uninstalling the adapter, navigate to Action > Scan for hardware changes from the toolbar menu. Windows 10 will detect that the network adapter device is missing and reinstall it.
- Restart your computer and see if you’re able to browse without the DNS_PROBE_FINISHED_NO_INTERNET error code showing up in Google Chrome.
Final thoughts
Thanks for reading this article and we hope it helped you understand what the DNS_PROBE_FINISHED_NO INTERNET error code is and how to fix it. We also hope that you have found some useful tips here on how to identify, diagnose, and resolve other Chrome browser issues as well.
If there are any questions left unanswered or problems not addressed, please feel free to reach out — our team of experts would love to help! In the meantime be sure to keep up with all things tech by checking back for more articles about troubleshooting Google Chrome errors, and following us on social media.
Follow our Blog for more great articles like this one! In addition, you can check our Help Center for a wealth of information on how to troubleshoot various issues.
One more thing
Sign up for our newsletter at SoftwareKeep and get early access to our blog posts, promotions, and discount codes. Thank you for reading! We hope to see you again soon.