Windows Defender uses the Antimalware Service Executable (or MsMpEng) process to execute its functions. MsMpEng.exe is the executable that runs MsMpEng.exe. However, several Windows users have noted that the MsMpEng sometimes shows high CPU usage. Some users even get concerned that MsMpEng.exe could be a virus.
Antimalware service executable is a component of Windows Security that runs in the background. In this article, you’ll learn what MsMpEng.exe is, why it uses high CPU and how to fix the High CPU Usage By MsMpEng.

Table of Contents
- What is Antimalware Service Executable? What is Msmpeng.exe?
- Why Msmpeng.exe causes High CPU Usage
- Is MsMpEng.exe a virus
- Why does Antimalware Service Executable use a lot of CPU?
- Should I remove MsMpEng.exe?
- How to remove MsMpEng.exe in Windows 10
- Fix #1: Scan your Computer for Malware
- Fix #2: Disable Windows Defender
- Fix #3: Change Windows Defender Scheduling settings
- FIX #4: Add Antimalware Service Executable to the Windows Defender’s exclusion list
- How to Stop Antimalware Service Executable from using too Much CPU
- Wrapping Up
What is Antimalware Service Executable? What is Msmpeng.exe?
Antimalware service executable is a Windows Security process that executes real-time protection against malware. The MsMpEng.exe is the file executable that runs the Windows Antimalware Service Executable to enable Windows Defender to monitor your PC for potential threats continuously. When it runs, the Antimalware Service Executable also ensures that Windows Defender provides real-time protection against viruses, malware, and cyberattacks. Also known as msmpeng.exe, the antimalware service executable runs in the background to scan files and programs occasionally.
MsMpEng.exe is an important and core process of Windows Defender. Its function is to scan downloaded files for spyware, such that it finds any suspicious items will remove or quarantine them. It also actively prevents spyware infections on your PC by searching the system for known worms and trojan programs.
When an antimalware service executable detects a virus or other malicious attacks, it deletes or quarantines them.
Why Msmpeng.exe causes High CPU Usage
However, there have been many users reports that sometimes the MsMpEng.exe can also be the cause of disproportionately high CPU and Memory usage. The two common reasons for MsMpEng.exe to be consuming high CPU usage are:
- Protection in Real Time: The Windows Defender real-time feature constantly scans files and connections, etc. in real-time.
- Full Scan: Windows Defender conducts a full scan of all files, either scheduled when the computer wakes up or when connected to a network. High CPU usage can cause your system to experience frequent hanging, lagging, and delayed access/response.
However, other possible causes of the Antimalware Service Executable (MsMpEng) using high CPU also include:
- Low hardware resources;
- Windows components/software conflicts;
- Malware or virus infection;
- Misconfigured or corrupt Windows system files;
- Outdated Windows Defender definitions;
- Self-scanning function of Windows Defender directory;
Is MsMpEng.exe a virus
MsMpEng.exe is not a virus but a legitimate built-in Windows process that runs in the background to ensure Windows Defender functions appropriately.
However, when you notice MsMpEng.exe using high computer resources, you should not rule out the possibility of a virus or malware infection. Since it is a .exe executable file, it is vulnerable to both imitation by malware and virus attacks. Some malware creators can create malware codes that imitate the MsMpEng.exe name to evade detection.
Why does Antimalware Service Executable use a lot of CPU?
The main reason that antimalware service executable (MsMpEng.exe) uses too much CPU is that it runs constantly in the background. While running in the background, it actively scans programs and files and carries out the appropriate actions whenever it detects anything malicious.
In addition, the antimalware service executable uses too much CPU because it scans its own folder - C:\Program Files\Windows Defender.
So, stopping antimalware service executable from scanning its own folder is one of the ways you can make it use less CPU.
Should I remove MsMpEng.exe?
If MsMpEng.exe is causing problems on your computer, such as high CPU usage, you can disable or remove it.
Note that if you disable the Antimalware Service Executable, your computer will remain vulnerable to malware and other threats that might want to attack your files and data such as spyware or trojans.
So, before you disable Antimalware Service Executable, ensure you have a third-party antivirus program installed on your computer.
How to remove MsMpEng.exe in Windows 10
Use the following solutions to fix high CPU usage by the Antimalware Service Executable:
Fix #1: Scan your Computer for Malware
There have been instances where malware or virus infection hijacked the MsMpEng.exe process. In this case, you need to scan your PC with a quality anti-malware application such as Malwarebytes and Trend Micro to identify and delete any malware that could be residing on your PC and causing such PC errors.
Fix #2: Disable Windows Defender
If the high CPU usage by the MsMpEng problem persists, you may need to disable Windows Defender. Note that disabling the Windows defender may leave you vulnerable to many cyber-attacks if you don't have a third-party antivirus program.
To disable Windows Defender (through the registry editor):
- Press Wins Key + R to open the Run Dialog Box.
- Type Regedit and click OK to open the Registry Editor.
-
Check the left navigation pane, and double click the folders to navigate to the following path:
HKEY_LOCAL_MACHINE\SOFTWARE\Policies\Microsoft\Windows Defender. - Locate a registry entry named DisableAntiSpyware > then double-click and set its value data to 1.
- If there is no registry entry named DisableAntiSpyware, go back to the main Registry Editor pane and right-click on it > select New > DWORD (32 bit) Value.
- Now, name the new registry entry DisableAntiSpyware > double-click and set its value data to 1.
Fix #3: Change Windows Defender Scheduling settings
Several Windows users who report high CPU usage by MsMpEng.exe say that it occurs during a full system scan. To sort these issues out, you can reschedule the scan to occur when you’re not using your PC:
-
Open Windows search and type Task Scheduler
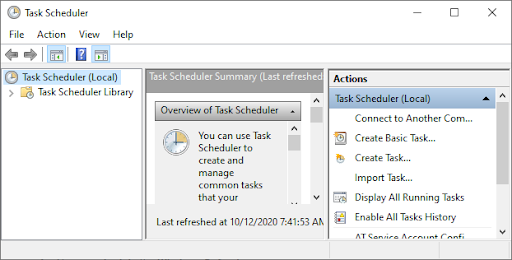
- On the Task Scheduler screen, navigate to the left pane and double-click Task Scheduler Library
-
Expand the folders as you navigate to the following path: Library/Microsoft/Windows/Windows Defender.
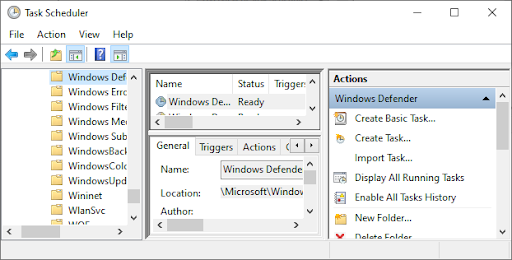
- In the Windows Defender folder, locate Windows Defender Scheduled Scan in the middle pane and double click on it.
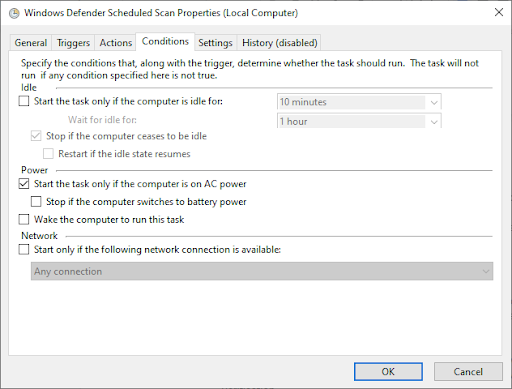
-
On the new Window go to the Conditions tab, and uncheck all options then click OK. This will clear the scheduled scans on your PC.
-
Now, reschedule the Windows Defender scans.
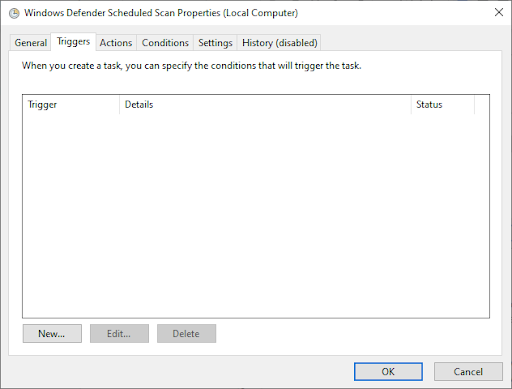
- Again double click the Windows Defender Scheduled Scan.
- Go to the Triggers tab and then click New.
- Next, create a new scan schedule - either weekly scans or monthly scans depending on what suits your needs, and can enable you to balance between protection and system efficiency.
- Now, choose the Day of the scan and click OK. Make sure the scan is enabled.
- Repeat the same process for the other three services: Windows Defender Cleanup, Windows Defender Cache Maintenance, and Windows Defender Verification.
This process will reschedule your PC’s Windows Defender to function as per your preference. Restart your PC and see if the Antimalware Service Executable is still using a high CPU.
FIX #4: Add Antimalware Service Executable to the Windows Defender’s exclusion list
When scanning your PC, Windows Defender checks all the files – including itself - which is a common cause of system lag. You exclude Windows defender from scanning itself by simply adding it to the exclusion list.
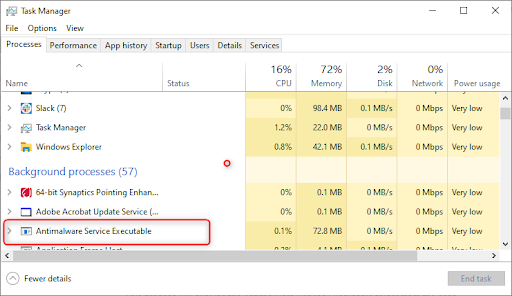
- Open Task Manager by pressing Ctrl + Shift + Esc (or right-click the Taskbar and select Task Manager).
-
In the list of items, locate Antimalware Service Executable > right-click on it and select Open File Location.
- Copy the full path of Antimalware Service Executable on the address bar.
- Now, open the Windows Start menu and type “windows defender” then click the top result to launch Windows Defender Security Center.
- Next click on Virus & threat protection > then click Manage settings on Virus & threat protection settings.
- Now, scroll down to “Exclusions” then click Add or remove exclusions.
- Click Add an exclusion, select Folder option then paste the Antimalware Service Executable (MsMpEng.exe) path you copied from the address bar.
- Now, click Open.
This process will exclude the Antimalware Service Executable folder from the scan.
How to Stop Antimalware Service Executable from using too Much CPU
The 2 main ways you can stop antimalware service executable from using too much CPU are:
- Reschedule Windows Security scans
- Prevent it from scanning its own folder.
Rescheduling scans won't make scans happen all the time, and preventing the executable from scanning its own folder will disable real-time protection.
Wrapping Up
Windows Defender is an important tool because it comes free with your Windows operating system. However, it can put a drain on your system’s CPU. If you carefully follow the steps described in this article, you’ll take control of the Antimalware Service Executable on your PC and keep your computer running at full speed.
Did you find this article informative and helpful? Please send this master guide to everyone you work with to enhance your team’s productivity further. Return to our website for deals on Microsoft Office software, as well as more helpful guides and articles related to Microsoft’s most popular productivity suite.
Would you like to receive promotions, deals, and discounts to get our products for the best price? Don’t forget to subscribe to our newsletter by entering your email address below! Receive the latest technology news in your inbox and be the first to read our tips to become more productive.