Are you seeing the “Audio services not responding” error when running the Windows 10 sound troubleshooter? Here, you'll learn what it means and how to fix it manually.
There are many common errors in Windows 10, some of which can easily be fixed with one of the built-in troubleshooters. However, these troubleshooters can’t always fix errors on their own, and instead, describe the issue to aid you in finding help. One of these errors comes from the Playing sound troubleshooter and reads “Audio services not responding”.
If you’ve run into this error, you might be confused as to how you can fix it on your own. Below, you can find working methods to fix “Audio services not responding” in Windows 10.
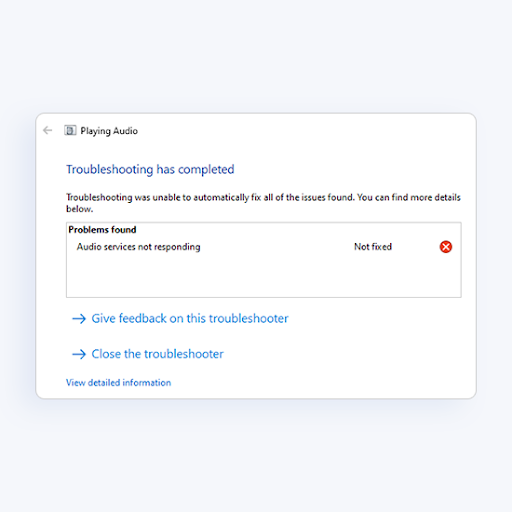
Table of Contents
- What Causes the Audio Services Not Responding Error?
- Solved: Audio Services Not Responding in Windows 10
- Method 1. Restart the Audio Services
- Method 2. Start the Necessary Audio Components
- Method 3. Add Local and Network Services With Commands
- Method 4. Install the Default Sound Drivers
- Method 5. Install the Realtek or High Definition Audio Device
- Method 6. Use a Restore Point
- Method 7. Reinstall Windows 10
- Final Thoughts
What Causes the Audio Services Not Responding Error?
The most common cause of this error is your audio drivers. If your driver is outdated, damaged, or installed improperly, you may run into some audio issues including the "audio services not responding" error.
Windows 10 users also noticed that this error occurs after installing a new Windows Update. While updates primarily aim to fix issues, it’s common that a new update brings new bugs as well.
Luckily, there are several things you can try before having to make a drastic decision, such as resetting or reinstalling Windows 10.
Solved: Audio Services Not Responding in Windows 10
Method 1. Restart the Audio Services
The first thing you should try is simply to restart the Audio services. This service manages the sound on your computer, so restarting it may fix your issues.
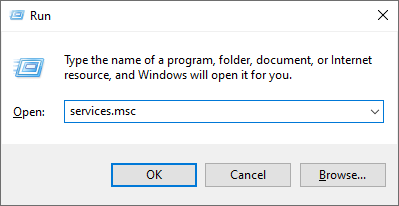
- Press the Windows + R keys on your keyboard. This is going to bring up the Run utility.
-
Type in services.msc and click on the OK button. This is going to launch the Services window, which might take a few seconds to fully load.
-
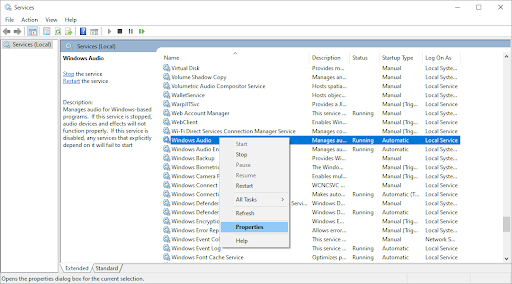
Right-click on the Windows Audio service and choose Properties.
-
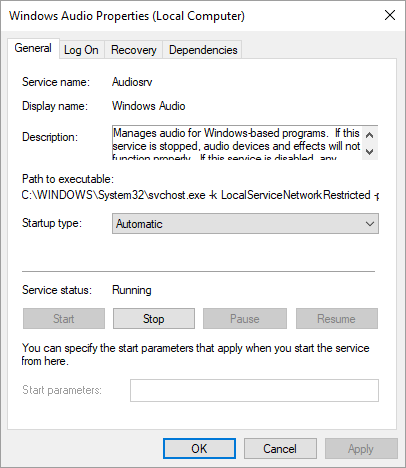
Set the Startup type to Automatic. If the service isn’t running, click on the Start button. Click Apply, then OK. You should be back at the list of services.
- Repeat the same steps for the Windows Audio Endpoint Builder service. After both services have been changed to automatic startup, restart your computer.
Method 2. Start the Necessary Audio Components
Some other services related to system audio may need to be started to fix the “Audio services not responding” error. It’s possible that you, another person, or an application recently disabled these services, causing errors on your device.
- Press the Windows + R keys on your keyboard. This is going to bring up the Run utility.
-
Type in services.msc and click on the OK button. This is going to launch the Services window, which might take a few seconds to fully load.

-
Right-click on each one of the following services, and then click on the Start option:
- DCOM Server Process Launcher
- Remote Procedure Call (RPC)
- RPC Endpoint Mapper
- After all 3 services are running, right-click on them again and choose Properties. Make sure that the Startup type is set to Automatic.
- Restart your computer and check if your audio issues are still present.
Method 3. Add Local and Network Services With Commands
There are some commands you can input in the Command Prompt to potentially fix the issue at hand. With these commands, you’ll be adding network service and local service to the local Administrator group.
Note that in order to perform this method, you need an account with administrative permissions.
- Open the search bar in your taskbar by clicking on the magnifying glass icon. You can also bring it up with the Windows + S keyboard shortcut.
-
Type in Command Prompt. When you see it in the results, right-click on it and choose Run as Administrator.
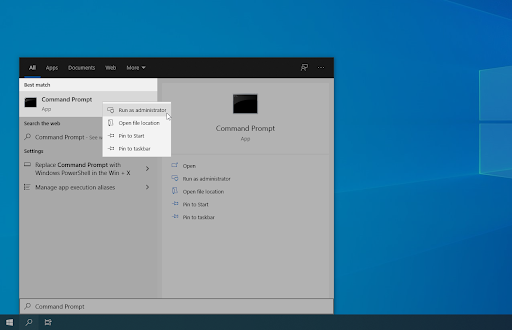
- When prompted by the User Account Control (UAC), click Yes to allow the app to launch with administrative permissions.
-
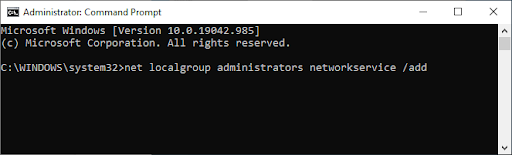
Once the Command Prompt window is open, type in the following command and press Enter to execute it: net localgroup administrators networkservice /add
-
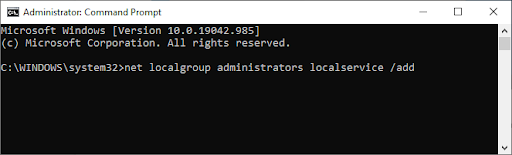
Afterward, execute the following command: net localgroup administrators localservice /add
We recommend you restart your device and check if the audio issues persist after inputting these commands. Don’t worry — we still have many things for you to try if you still experience the “Audio services not responding” error.
Method 4. Install the Default Sound Drivers
Users have reported that simply installing the default sound drivers helped them fix the “Audio services not responding” error.
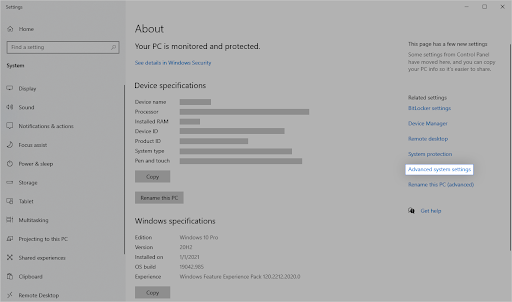
- Click on the Windows icon in the bottom left of your screen to bring up the Start menu. Choose Settings, or use the Windows + I shortcut.
-
Click on the System tile, and then click on Advanced system settings from the right-side menu.
-
Switch over to the Hardware tab on the top, then click on the Device Installation Settings icon.

-
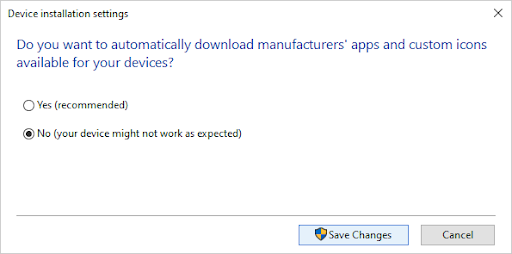
A new window will appear. Here, select the option that says “No (your device might not work as expected)”. Click the Save changes button afterward.
-
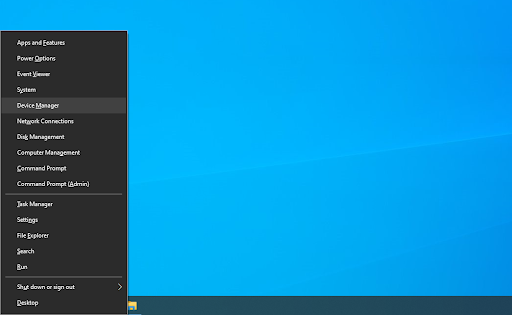
Next, you need to disable your current audio driver(s). Press the Windows + X keys on your keyboard at the same time, then click on Device Manager.

-
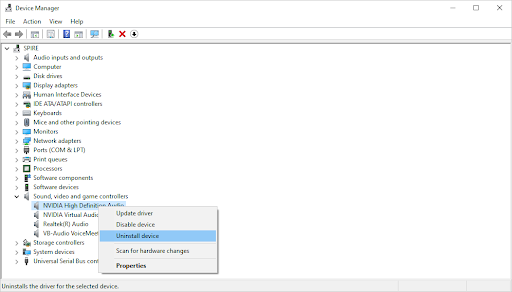
Expand the Sound, video, and game controllers section by clicking on the arrow icon in front of it. Here is where all of your audio drivers are located. Right-click on your audio driver and select Uninstall device.
-
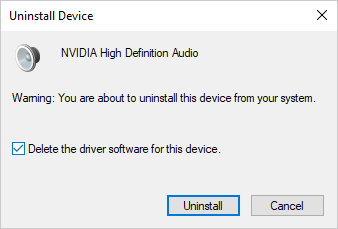
Make sure to place a checkmark to the Delete the driver software for this device option and click Uninstall. This is going to remove the driver itself.
-
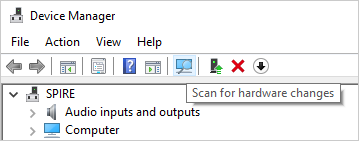
After you uninstall the device and driver, click on the Scan for hardware changes button. This will install the default sound drivers.
We recommend that you plug any sound devices out, then restart your computer. Once you plug the devices back in, test if your issues with audio are fixed.
Method 5. Install the Realtek or High Definition Audio Device
In some cases, the IDT High Definition Audio Codec is the source of this error. If the default drivers didn’t help resolve it, try to install the Realtek or High Definition audio device instead.
-
Press the Windows + X keys on your keyboard at the same time, then click on Device Manager.
-
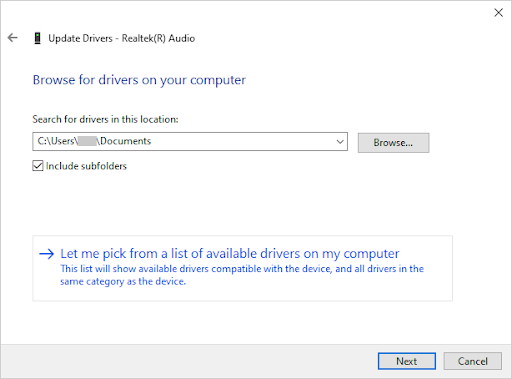
Expand the Sound, video, and game controllers section by clicking on the arrow icon in front of it. Right-click on the sound device and choose Update Driver.
-
In the dialog window, choose to Browse my computer for driver software, and then click on the Let me pick from a list of available drivers on my computer button.
-
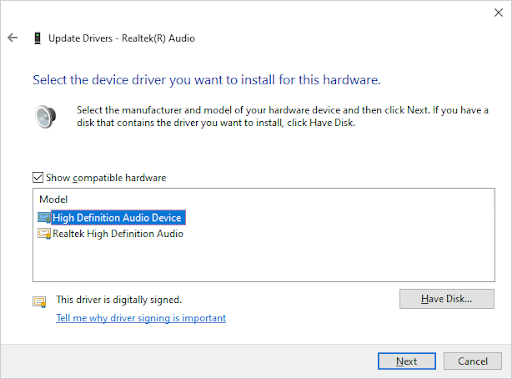
Find and select High Definition Audio Device. If you can’t see it in the list, uncheck the Show compatible hardware option. Click Next to continue.
- Follow the on-screen instructions until the installation is complete, and then restart your computer. If the issues aren’t fixed, repeat the steps and select Realtek High Definition Audio instead.
Method 6. Use a Restore Point
If you or your system created a restore point before the audio issues appear, you’ll be able to return your system to that state. This could fix the “Audio services not responding” error.
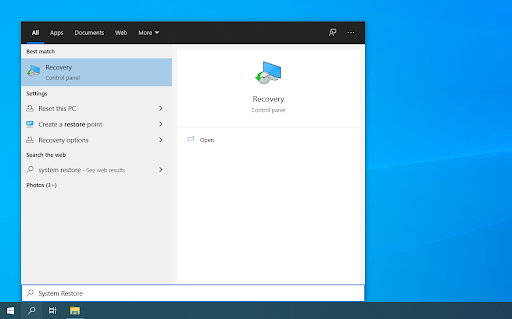
- Open the search bar in your taskbar by clicking on the magnifying glass icon. You can also bring it up with the Windows + S keyboard shortcut.
-
Type in System Restore and click on Recovery from the search results. This should be on the top, in the Best match category.
-
Click on the Open System Restore link in the Advanced recovery tools section.

-
Follow the on-screen instructions to restore a past point in time. You can select a restore point yourself, or use the recommended one. Make sure to check what files and applications will be affected when you restore your system.
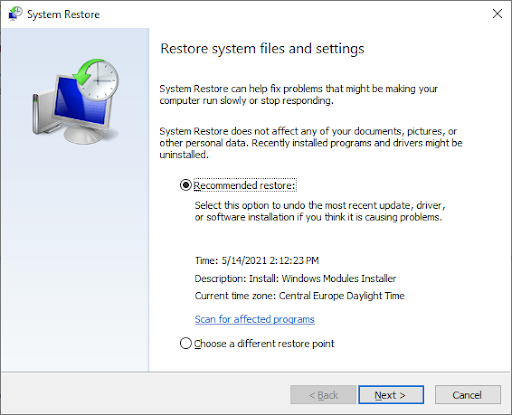
- After choosing the options you’re happy with, click on the Finish button and wait for Windows 10 to restore your computer.
After the restoration process is complete, check if you’re still experiencing the same audio issues. Don’t see any improvement? It may be time to think about reinstalling Windows 10.
Method 7. Reinstall Windows 10
If nothing above worked, your issue may only be fixed if you reset or reinstall Windows 10. Depending on your preferences, you may reinstall the system without losing any personal files. Unfortunately, most of your applications and system configuration will be deleted to give your device a fresh start.