
Do you need help keeping track of your contacts and calendars in Microsoft Outlook? Good news – managing them with Outlook is easier than ever! With Outlook's features, you can seamlessly organize your emails, meetings, appointments, addresses, birthdays, and more. You'll never miss an important date or a necessary contact again.
In today's fast-paced world, staying organized is crucial for success. One of the best ways to manage your day-to-day tasks is by utilizing Microsoft Outlook's contacts and calendar features. Outlook offers a range of tools and features that can help streamline your daily tasks, making it easier to stay on top of your emails, contacts, and calendar events.
Here are some tips on how to use Outlook to manage your busy schedule and contacts list.
Table of Contents
- How to Manage Your Calendar in Outlook
- How to Add Schedules to Your Outlook Calendar
- How to Import Calendars in Microsoft Outlook
- How to Use the Scheduling Assistant in Outlook
- How to Set Up Reminders in Outlook
- How to Manage Your Contacts in Outlook
- How to Add a Contact in Microsoft Outlook
- How to Edit a Contact in Outlook
- How to Create Contact Groups in Outlook
- How to Import Contacts to Microsoft Outlook
How to Manage Your Calendar in Outlook
The Outlook calendar is great for staying organized and attending your appointments. You can view upcoming events, add new meetings, schedule reminders, and more! Launch the app and select "Calendar" from the navigation menu to start calendar management in Outlook. From here, you can view a list of all upcoming events.
To manage individual events on your calendar, click on an event to bring up its details page. Here you will be able to edit or delete the event as needed. You can also create a recurring event by clicking "Create Recurring Event" at the bottom of the page. Recurring events are great for those with regular meetings or tasks that come up consistently.
If you want to remove an event from your calendar, select "Remove" from the event details page. This will delete the event from your calendar, but if you need to keep a record of it, you can always choose "Archive" or "Save to Archive" instead.
How to Add Schedules to Your Outlook Calendar
Adding calendar items to Outlook is a simple and helpful feature that can help keep you organized and on track with your daily schedule. You can add any event or appointment to your Outlook calendar, such as:
- Business meetings or conferences
- Project deadlines
- Doctor or dentist appointments
- School or extracurricular activities
- Birthdays or special occasions
- Personal or social events
Adding events to your Outlook calendar is a simple and effective way to stay on top of your schedule and ensure you never miss an important appointment or meeting. Here are some steps to follow to add an event or appointment to your Outlook calendar:
- Open Outlook and go to the Calendar tab.
- Click on "New Appointment" to create a new event.
- In the "Subject" field, give your event a name or a brief description. This can be anything from a meeting, a doctor's appointment, a school project deadline, or a social event.
- Type in the name of the event's location in the "Location" field. It can be a physical location like an office or a park or a virtual location like a Zoom meeting or a conference call.
- Select the start and end times for your event. Use the drop-down menu to select the date and time, or type it in manually.
- If you want to invite others to the event, click the "Invite Attendees" button. Type in the names or email addresses of the people you want to invite, and Outlook will automatically send them a meeting invitation.
When you're finished, click "Save & Close" if it's just an appointment or "Send" if it's a meeting.
How to Import Calendars in Microsoft Outlook
If you use other calendars outside of Outlook (such as Google Calendar or Apple Calendar), you can import them into Outlook! This is a great way to sync all of your events and appointments in one place. Outlook makes the transition from one calendar to another easy and hassle-free.
Select "File" from the ribbon bar at the top of your screen to import a calendar into Outlook. Then click "Import & Export," followed by "Import an iCalendar (.ics) or vCalendar file (.vcs)." You will then be prompted to select the file you want to import. Once you select the file, Outlook will import all your other calendar events into its platform!
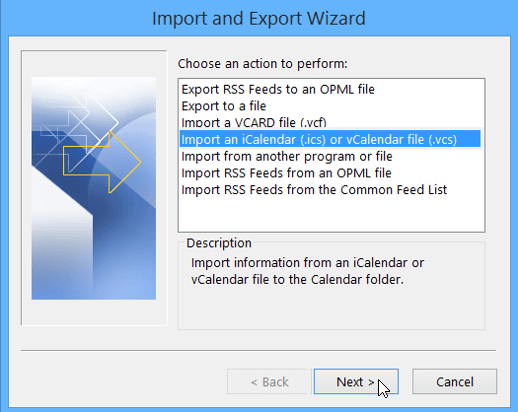
Once imported, these events will be displayed alongside any existing events that you have already created in Outlook.
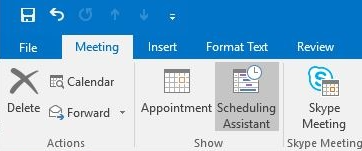
How to Use the Scheduling Assistant in Outlook
The Scheduling Assistant is a helpful tool in Outlook that helps you find the best time for your meeting or appointment. It allows you to see your attendees' availability and conference rooms, so you can schedule your event at a time that works for everyone. Here are some steps to follow to use the Scheduling Assistant:
- Create a new meeting request by clicking "New Meeting" in the Calendar tab.
-
Click on "Scheduling Assistant" to open the Scheduling Assistant window.
- In the "To" field, add the names or email addresses of the attendees that you want to invite to the meeting.
- In the "Location" field, add the conference room or location where the meeting will occur.
- Use the vertical bars in the shaded area to adjust the meeting time to a time that works for everyone. Drag the bars to the left or right to change the duration of the meeting.
- The grid below the shaded area shows when each attendee is available. Look for a time slot where all attendees are available and select that time slot.
- To the right of the meeting request, Outlook shows suggested times and the number of conflicts. Use this information to find the best time for your meeting.
- When you're finished, click "Send" to send the meeting request to your attendees.
Using the Scheduling Assistant in Outlook is a simple and effective way to find the best time for your meeting or appointment. By following these easy steps, you can easily schedule your event at a time that works for everyone and avoid scheduling conflicts or misunderstandings.
How to Set Up Reminders in Outlook
Reminders are essential if you want to stay on top of your calendar. They help you remember important dates, tasks, and events. With Outlook, you can easily set up reminders for your meetings, appointments, and other events.
Here are some steps to follow in order to set a reminder in Outlook:
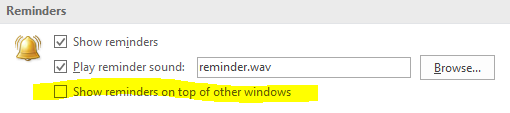
- Click on the "File" tab in Outlook.
- Click "Options" and select "Advanced" from the left-hand menu.
-
In the "Reminders" section, check the box next to "Show reminders on top of other windows."
- Click on "OK" to save your changes.
- To set a reminder for a specific task or event, create a new task or appointment in Outlook.
- In the "Due Date" or "Start Time" field, enter the date and time when you want to be reminded.
- When the reminder pops up on your screen, you can choose to snooze it for a few minutes, hours, or days, or you can dismiss it if you've already completed the task.
Reminders are not available for Outlook 2013, Outlook 2016, or 2019. Microsoft 365 subscribers can use reminders on Version 1804 (Build 9226.2114) or higher.
How to Manage Your Contacts in Outlook
Your Outlook contacts list is essential if you want to stay organized and in touch with your contacts. With Outlook, you can easily store contact information such as phone numbers, email addresses, and physical addresses. An organized contacts list makes sending emails to specific contacts or groups of contacts easier.
How to Add a Contact in Microsoft Outlook
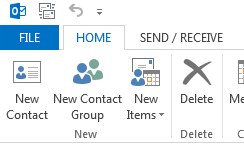
Adding a contact in Outlook is a great way to keep track of important information for people you communicate with. A contact is a person or organization you add to your address book, allowing you to quickly and easily send emails or schedule meetings with them. Here are some steps to follow to add a contact in Outlook:
- Click on the "People" icon in Outlook, located in the screen's bottom left-hand corner.
-
Click on "New Contact."
- Enter the name of the person or organization you want to add in the "Full Name" field.
- Fill out any other information that you want to include for the contact, such as their email address, phone number, or job title.
-
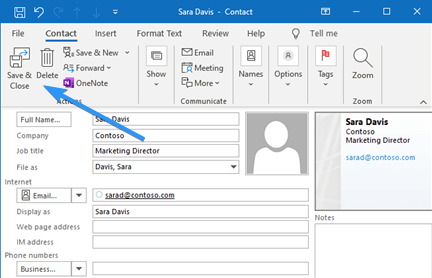
Once you have entered all the information you want to include, click on "Save & Close" if you are done creating the contact.
- If you want to create another contact, click "Save & New" instead, and then repeat the process for the next contact.
Adding contacts in Outlook is a simple way to keep track of important information for people you communicate with. By following these easy steps, you can easily manage your address book and stay organized.
How to Edit a Contact in Outlook
Editing a contact in Outlook is a great way to update information for someone you communicate with regularly. Whether their email address has changed or you need to add additional information to their contact information, it's easy to make these updates in Outlook. Here are some simple steps to follow in order to edit a contact in Outlook:
- On the Navigation Bar, click on the "People" icon, which is located in the bottom left-hand corner of the screen.
- Click on the "People" tab to view your address book.
- Double-click on the contact you want to edit to open their contact information.
- Add or update any information for the contact you want to change, such as their phone number, address, or job title.
- Once you have made the necessary updates, click "Save & Close" to update the contact information.
How to Create Contact Groups in Outlook
A contact group in Outlook is a collection of contacts you can use to send emails, schedule meetings, and stay in touch with groups of people all at once. Whether you want to create a group for your coworkers, classmates, or family members, it's easy to do in Outlook. Here are some simple steps to follow to edit a contact group in Outlook:
- On the Navigation Bar, choose the "People" icon, which looks like a small silhouette of a person and is usually located in the lower-left corner of the screen.
-
Select the "Home" tab and choose "New Contact Group" from the toolbar.

- In the Contact Group box, type the name of the group.
- Select "Add Members," and then choose an option, such as "From Outlook Contacts," "From Address Book," or "New E-mail Contact."
- To add people from your address book or contacts list, select the option that applies and choose the contacts you want to add by holding down the Ctrl key and selecting multiple members.
- Once you have selected the members you want to add, choose "OK."
- Finally, choose "Save & Close" to save your changes to the contact group.
How to Import Contacts to Microsoft Outlook
If your contacts are stored in other programs, you can easily import them into Outlook. It's a great way to save time and keep all your contacts organized in one place. Here are some simple steps to follow to import contacts into Outlook:
- Open Outlook and click on the “File” option in the top left corner of the screen.
- Select “Open & Export” > “Import/Export” to start the import wizard.
- Choose "Import from another program or file" and click Next.
- Select "Comma Separated Values" and click Next again.
- Browse to the location of your contacts file and select it. You can choose how you want Outlook to handle duplicate contacts: replace duplicates with items imported, allow duplicates to be created, or do not import duplicate items.
- Click Next and select the “Contacts” folder as the destination folder.
- Click “Finish”, and Outlook will start importing your contacts immediately.
- When the Import Progress box closes, your contacts will be available in the People section of Outlook.
By following these steps, you can quickly and easily import your contacts into Outlook and have all your contact information in one place.
Conclusion
Managing your contacts and calendar in Outlook can help you stay organized and keep track of important dates. By taking advantage of features such as contact groups, reminders, email sorting, and linking accounts with different devices, you can maximize the efficiency of your daily tasks.
Whether you are importing contacts from another program or editing an existing contact in Outlook, these tips will help you stay on top of your emails and prioritize the tasks that matter most.
We hope you have found this article useful in learning how to manage your contacts and calendar events in Outlook. With a bit of practice, you’ll soon be an Outlook pro!
One More Thing
We’re glad you’ve read this article. :) Thank you for reading.
If you have a second, please share this article on your socials; someone else may benefit too.
Subscribe to our newsletter and be the first to read our future articles, reviews, and blog post right from your inbox. We also offer deals, promotions, and updates on our products and share them via email. You won’t miss one.
Related Articles
» How to Optimize Your Outlook Inbox in 5 Easy Steps
» Outlook E-book [Ultimate Guide] | Outlook training
» How to Fix Unable to Download Attachments From Outlook Web App