Have you just started using Word for Mac? If you're new to Microsoft Word 2019 for Mac, here's a quick review of what to expect and improved features.
At first sight, the new Microsoft Word for Mac appears like its predecessor – the 2016 version. Coupled with several changes and updates, the 2019 version offers fresh ways to handle your documents.
You want a word processor that focuses on usability and rich features. You want an effective tool for your daily business activities. You want Word 2019 for Mac!
The unbroken, flawless and invincible 2019 version of MS Word comes with advancements like improved learning tools, translation features, visual updates, focus mode, and many more.
Microsoft Word 2019 Features
This write-up highlights the key updates since Word for Mac 2016.
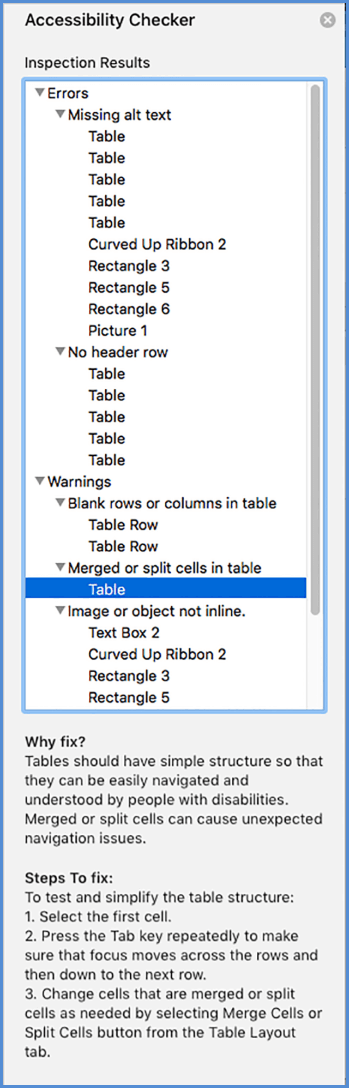
1. Improved Accessibility Checker
Microsoft’s creators, when revamping Word 2019 for Mac, had the needs of people with disabilities in mind. Check accessibility issues in your content with only one click! The international standard checker offers necessary recommendations should your document have problems with accessibility.
Content without accessibility issues is easy to read and write for persons with disabilities. The handy checker classifies issues under errors, warnings, and tips.
Errors and warnings show content that is hard to read and understand in a document for people with disabilities. Tips show comprehensible content but could be tweaked for a better experience with reference to people with disabilities.
How to use the Accessibility Checker feature;
- Move your cursor on the ribbon atop and click on the Review tab.
- Click Check Accessibility to reveal accessibility issues if any.

- Inspection results appear to show all warnings and errors. Also, the checker lists solutions to the issues.
- Under each error or warning, read the reasons why fixing the issues is important. Follow the step-by-step guidelines to tweak the document.
Major improvements like the IntelliSense Services ensure all images in your document entail alt texts. Alt texts are generated through artificial intelligence technology. Also, the alt texts describe pictures or non-text content that the visually impaired cannot see.
2. Better Visual Basic Editor Feature
The revamped Visual Basic Editor in Word 2019 for Mac comes with handy extras like debug tools, IntelliSense, object browser, and VBA menus. Programming skills are not needed to create, edit, or record macros in Microsoft Word. This is because tasks are automated on the go as you write and edit macros in Word 2019 for Mac.
So, how do you use the Visual Basic Editor?
Here, read how to find and activate the Developer tab in the MS Word application, open the Visual Basic Editor, and gain entry to Visual Basic for Applications.
- Navigate to the Developer tab and click Visual Basic. If the Developer tab is not exist, follow the steps below to add it to the ribbon:
- On the File tab, click Options.
- Find Customize Ribbon and navigate to Main Tabs. Check the adjacent box to select Developer.
- Hit OK to return back to your Word interface.
- Repeat step (i) to open Visual Basic for Applications.
- On the Help tab, click Microsoft Visual Basic for Applications Help.
- First-time users have to select their desired browser on which they would like to proceed with when interacting with the help webpage.
- While on your chosen browser, navigate to Word on the left pane. Click on Word VBA reference to show details.
- Navigate to the Concepts or Object model that you need help with on the left pane.
- Also, you can use the search feature located at the uppermost right corner of your browser. Type any query you have and receive relevant help or results.
Word 2019 for Mac users have the privilege to use the IntelliSense feature on Visual Basic Editor. IntelliSense is a handy auto-completion feature – the feature auto-completes functions, enumerations or arguments next to the cursor while typing. You want to use this incredible feature for speedy completion of tasks.
3. Focus Mode Advancements
Kill disruptions and focus on your words with the new Focus mode feature. Clearing distracting clutter and hiding Ribbon tabs and commands by the focus mode ensure that your concentration is on your document.
To activate the Focus mode in your Word 2019 for Mac, navigate to View tab > then Focus. Hit the Esc key on your keyboard to exit the Focus mode.
If you want to remain in Focus mode but want to access the ribbon tabs and commands, move your mouse cursor atop the interface and select ‘…’.
4. Visual Updates
Microsoft Word 2019 for Mac comes with many visual updates. A new library of graphics exists and contains many icons, 3-dimension images, and scalable vector graphics (SVGs).
-
Inserting Icons in Word for Mac 2019;
- On the Insert tab, click on icons.

A huge collection of icons categorized in different categories appears. Categories include arts, arrows, vehicles, animals, buildings, sports, and many more. You are needed to sift through the categories and click on the desired icon(s).
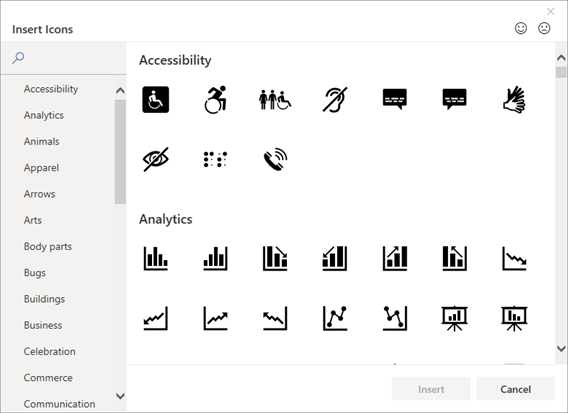
- Add several icons simultaneously by selecting the desired ones, clicking on them, and then clicking Insert.
You can customize the icons to your liking. You can make them larger or smaller, wider or shorter, or spin them around. To change the color of icons, navigate to the Graphic Format tab > choose Graphics Fill, Graphics Outline, or Graphics Effects.
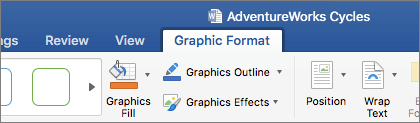
- The Graphics Fill feature changes the color of the icons. There are tons of colors to choose from and the color you choose applies to the whole icon.
- The Graphics Outline option changes the color of the edges around the icons.
- The Graphics Effects feature presents numerous effects like Soft Edges, 3D Rotation, Glow, Reflection, and many more.
- The Wrap Text feature helps control how texts flow around your icon.
- The Send Backward and Bring Forward tools are handy when layering your icon. Place your document or any object behind or in front of your icon.
- The Align function helps you place your icon on the right edge, at the center, or the left edge of your page.
- Fuse many icons to become one object using the Group function. What you need to do is choose one icon, hold down the CRTL key, click on all desired icons, and hit Group. Click Group > then Ungroup if you want to ungroup your icons.
- There exists a size feature that entails tools to resize or crop your icons. If you want to change the height besides dragging on the edges, you can type in your desired dimensions on the Height and Width boxes on your top right side.
- Also, you can crop the icon as you wish using the Crop feature. To crop one side, drag the cropping edge inward from the desired side. To simultaneously crop two sides, hold on Option and Shift keys and drag the cropping edges inward.
- Rotate or flip your icon horizontally or vertically using the Rotate command.
- To change the icons at the same time retaining the existing effects, go to Change Graphics and choose from a file, online sources, or icons.
- With the Format Pane, you gain access to tools that help change your icon.
2. Insert Scalable Vector Graphic (SVG) files
SVGs are specials images you can modify without losing their original quality. This means you can spin, change color, and resize vectors and keep their quality.
Insert an SVG file by going to the Insert tab > then Pictures > and Picture from a file.
You have several options to modify the appearance of your SVG images in MS Word. Access the customizing tools by clicking on your SVG image to reveal a Graphic Format tab. Customizing features for SVG files are like those of icons. Refer to the “inserting icons” guidelines above for SVG file customization.
5. Enhancing Creativity with 3D Models
The recent MS Word for Mac update also lets you insert interactive 3D models to your documents and projects. You can rotate models 360 degrees or tilt up and down to reveal a precise feature of an object.
Note that models in Word 2019 for Mac are supported on specific macOS versions - 10.12, 10.13.4, and later. Unfortunately, macOS version 10.11 and earlier don’t support 3D models. Also, support is not offered for macOS version 10.13.0 through 10.13.3. This means you have to get an upgrade of your macOS to enjoy the 3D feature.
How to Adding 3D Objects from A Local File;
Inserting 3-dimension images is like inserting icons or pictures
- Got to Insert tab > choose 3D Models > then From a File.

After inserting the 3-dimension image, interact with the controls to maneuver the model:
- The 3D control rotates and tilts your image in all directions. To manipulate the model, click, hold, and drag the mouse.
- Drag inward or outward to broaden or narrow your model.
- The rotation handle helps rotate your 3D model in a clockwise or counter-clockwise direction too.
Adding 3D Models from The Online Library
- Select 3D Models > then From Online Sources. A dialog box appears from where you can look for 3D images on the online catalog.
- Choose one or many desired images and click Insert.
Modifying the Appearance of Your 3D Models in Word
You get a contextual Format tab after inserting a 3D model in Word 2019 for Mac. The tab appears on the ribbon beneath 3D Model Tools. There exist other helpful tools on the format tab to help you modify your images to your liking.
The 3D Model Views gallery offers a plethora of pre-designed views to help tweak your models. For instance, you can choose either the head-on or top-down view.
Have trouble choosing a 3D model to use? Access the Selection Pane to turn on the list of objects. Go to Home tab > Arrange > then Selection Pane and pick your desired image.
Use the Align tool to maneuver your image on Word – bottom, top, or sideways. Pan & Zoom helps modify how your models fit within the frame. To use the tool, click the Pan & Zoom button > click and drag your image to position it.
The Zoom arrow on the right side of the frame zeroes in or out your image.
6. Breaking Language Barriers with The Translator
Gone are the days when you couldn’t read a document written in a foreign language. With the inbuilt translation features, you can now communicate and understand foreign languages. Drawing and handwriting enhancements are other tools for persons using pen-enabled devices on Mac. Word 2019 for Mac packs exciting features that are discussed below.
Use the Microsoft Translator to translate words, phrases, or sentences to a language you can understand. Access the translation features on the Review tab.
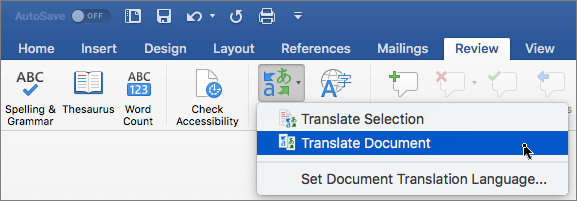
Translate the Entire Document;
- On Review tab> select Translate > then Translate Document.
- Choose your desired language to see the translation.
- Choose to Translate and a copy of the translated content will appear in a separate window.
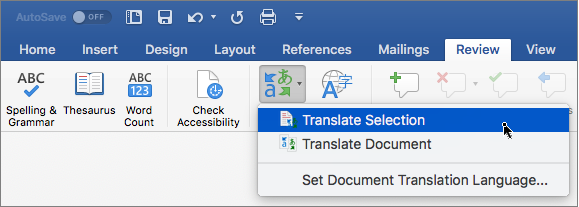
Translate Specific Texts;
- Highlight phrases, words, or sentences that need translating.
- Choose Review > select Translate > then Translate Selection.
- Choose the language you are looking to translate the texts to.
- Choose Insert and the translated content will replace the one which you highlighted.
7. Better Reading Experience
The new Word 2019 for Mac has a revamped reader experience. Strain your eyes no more when you can sit back and listen while MS Word reads your texts aloud. Find other cool features like adjusting text spacing, page color, and column width that offer you an excellent reading experience.
Cool Learning Tools
The new tools help you read documents with ease. To access the tool;
Navigate to the View tab > then Learning Tools and make your selections:
- Column Width adjusts line length to enhance concentration.
- A great choice of Page Color makes texts easier to scan with minimal distractions.
- Text Spacing enhances the white space; hence, making documents neat and presentable.
- Syllables reveal pauses between syllables; thus, enhancing word recognition and pronunciation.
- Read Aloud helps you hear every word.
You can change the reading speed and voices too.
Use Your Digital Pen to Write and Draw
If you like writing and drawing in a natural way, this update is a blessing! Here, you have several sets of pencils and pens that are customizable. Use the digital pens on Word 2019 for Mac to highlight texts, do the math, draw and transform ink into a shape.
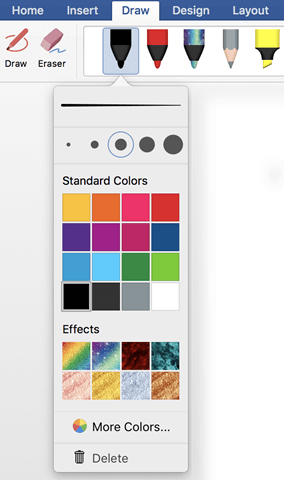
Click the Draw tab and pick your desired pen.
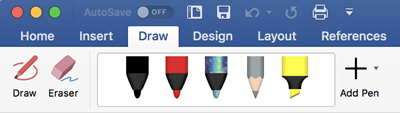
Click on your chosen pen to see the Thickness and Color selections. choose your desired color and thickness. The drawing tools come with 16 solid colors, light effects, and a range of thicknesses. Examples of effects include ocean, gold, rainbow, lava, and many more.
Touch Drawing with A Trackpad
Choose use draw, write and erase on the trackpad using your fingers. To erase unwanted drawings or texts, click Draw tab of the ribbon > Tools > then Eraser. You have three erasers to pick from. Drag your finger over the object you want to erase.
In general, Word 2019 for the Mac is an essential update, offering the best of word processing to Apple aficionados. As an important daily tool for business persons, individuals, and students Word 2019 for Mac remains top among the most used productivity applications worldwide.
Tweaks to the program’s learning tools make reading bliss. The user interface has a fresh design like its predecessor making it easier to navigate from one command to another.
Some of the key takeaways include:
- Ability to add 3D models and presentations.
- Focus mode is very vital for total concentration on the task at hand. Productivity is improved manifold in Word 2019 for Mac.
- Persons with disabilities find the programs handy and very easy to use thanks to the advanced features like IntelliSense and Accessibility Checker.
- The read-aloud feature helps reduce fatigue in the eye and prolongs eye-sight life.
Microsoft Word 2019 for Mac doesn’t come with flaws.
- Some features found in MS Word for Windows are not available in the Mac version.
- For the best experience, you have to upgrade your macOS to the latest versions.
All bugs found in Word 2016 for Mac are cleared in the newest version. Word 2019 for Mac remains the go-to program for Mac users looking for a great bargain and a rich-in-features word processor.
Conclusion
Word 2019 for Mac remains the top word-processing program with great features. The program comes with handy tools to keep you more productive. You want flawless integration with your other software like calendar events, to-do lists, etc.
Mac users who live around computing will find MS Word 2019 a must-have program.
Have you enjoyed reading the review :)
Please share it on your socials for someone else to benefit too.
One more thing...
If you’re looking for a software company you can trust for its integrity and honest business practices, look no further than SoftwareKeep. We are a Microsoft Certified Partner and a BBB Accredited Business that cares about bringing our customers a reliable, satisfying experience on the software products they need. We will be with you before, during, and after all the sales.
subscribe to our newsletter to get our deals, promotions, and more right in your inbox.
Editor's Recommendations
> Microsoft Outlook 2019 Review
> Microsoft Access 2019 Review
> Microsoft Outlook for Mac 2019 Review
> A Comprehensive Microsoft Excel 2019 for Mac Review