While Windows 10 Home in and of itself is a great operating system, some people seek out the advanced features of the Pro edition. Today’s article will focus on how you can upgrade your copy of Windows 10 Home to Windows 10 Pro using a dummy key provided by Microsoft and a real product key.
Why should you update from Windows 10 Home to Pro?
The biggest difference between the two systems is their security. The Pro version comes with way better protection against cyber threats, allowing you to keep even sensitive materials on your computer comfortably. Some other, additional features include domain linking and a Remote Desktop.
If you want to learn how you can update from a Windows 10 Home system to Windows 10 Pro with the SLMGR command, you’re in the right place. This method allows you to upgrade without having to reinstall your entire device or sit through hours of upgrade screens.
Note: You might be required to have access to an administrator account to perform all of the steps described below. If the account you’re currently using doesn’t have administrative permissions, make sure to change this in your settings or contact your IT professional.
Upgrade Windows 10 from Home to Pro using your Upgrade Key
Let’s not waste any more time and get right to the guide. Make sure to follow the steps described below accurately to ensure you don’t run into any errors during the upgrade process.
- Make sure you have your Windows 10 Pro product key ready. You can purchase a Windows 10 Pro product key from various online retailers, or the official Microsoft website. You should receive a 25-character long key that’ll allow you to activate Windows 10 Pro after the upgrade process.
-
For this method to work, you need to turn your internet off completely. Here are the steps depending on what type of connection you’re using:
- Click on the Network icon in your taskbar notification area. This should open a sliding tab with a list of detected wireless networks listed.
- Click on the Wi-Fi button to temporarily disable your Wi-Fi.
- Right-click on the Network icon in your taskbar notification area, then select Open Network & Internet settings.
- Click on the Change adapter options link. A new window should appear.
- Right-click on your wired connection, then select Disable from the context menu.
- For wireless (Wi-Fi) follow these steps:
- For cabled (Ethernet) follow these steps:
- After temporarily turning off your connection to the internet, open the Settings application using the Windows + I keyboard shortcut.
- Click on the Update & Security tab, then choose Activation from the sidebar menu.
- Scroll down until you see the Activate Windows now section. Here, you need to click on the Change product key link. A new window should appear.
- Enter the following Windows 10 Pro dummy key provided by Microsoft: VK7JG-NPHTM-C97JM-9MPGT-3V66T
- With the internet disabled, you’ll be able to convert Windows 10 Home into Windows 10 Pro. Wait for the process to finish and allow your computer to restart.
- After the automatic reboot, your computer will be on Windows 10 Pro, however, you still have to activate it with your own product key to validate the license.
- Start your system and open the Command Prompt in one of the following ways:
- Using the search function in your taskbar, look up Command Prompt. When you see it in the results, right-click on it and choose Run as Administrator.
- Press the Windows + R keys on your keyboard to bring up the Run utility. Type in “cmd” and press the Ctrl + Shift + Enter keys on your keyboard. By doing so, you’re launching the Command Prompt with administrative permissions.
- Press the Windows + X keyboard shortcut, then select Command Prompt (Admin).
- If prompted, click Yes to allow the Command Prompt to make changes on your device. You might be required to input the administrator password as well.
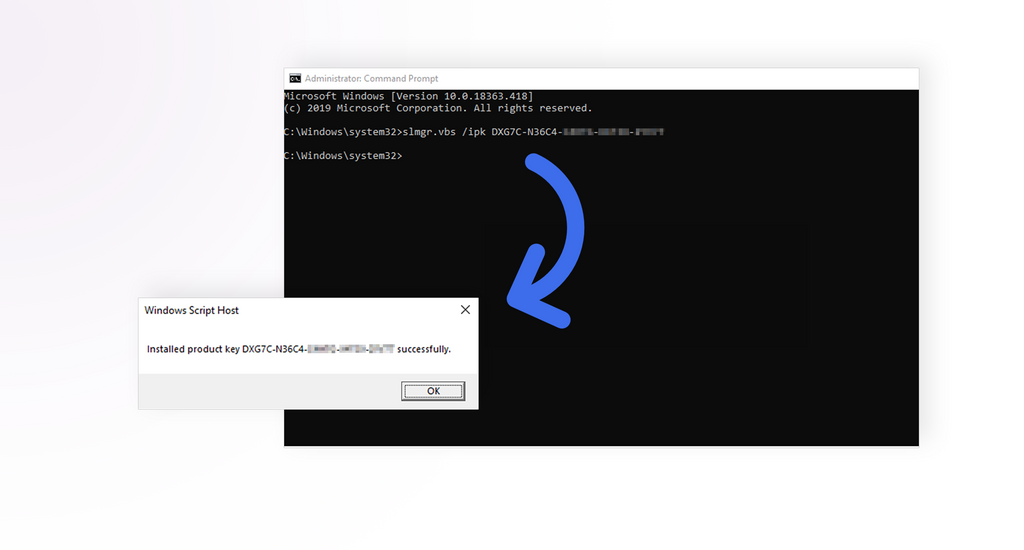
- Type in the following command, complete with your 25-character product key formatted this way: SLMGR /ipk xxxxx-xxxxx-xxxxx-xxxxx-xxxxx
- Hit the Enter key on your keyboard. You should see a dialog box pop up on your screen, informing you about the activation of your product key.
How to check if you successfully converted Windows 10 Home to Windows 10 Pro
After completing the steps in the section above, your system should be successfully activated with the Windows 10 Pro version. You can double-check this by following this short guide:
- Open the File Explorer.
- Right-click on This PC and choose Properties.
- Check the Windows edition section. It should display Windows 10 Pro with the architecture of your system.
We hope that our article was able to help you upgrade from Windows 10 Home to Windows 10 Pro with ease. Enjoy the advanced protection and new, unique features with your operating system upgrade!