


Data validation is a crucial tool in ensuring accurate data entry in Excel. It helps prevent errors by restricting the type of data entered into a cell, such as numbers or dates.
An accurate data entry can lead to major issues in a business, including financial losses and misinformed decisions. This is why mastering data validation in Excel is essential for anyone working with data.
Whether you're an Excel beginner or an experienced user, this guide will help you avoid errors and streamline your data entry process. So, let's dive in and discover how to master data validation in Excel.
Table of Contents
- What is Excel Data Validation?
- How to Use Excel's Data Validation for Accurate Data Entry
- Excel Data Validation Examples
- Date and Time Validation in Excel
- Excel text and drop-down validation
- Editing Data Validation in Excel
- Copying Data Validation in Excel
- FAQs
- Final Thoughts
What is Data Validation in Excel and How to Use It?
Data validation is a feature in Excel that is used to control what users can enter into a cell. It allows you to dictate specific rules. It also allows users to display a custom message if users try to enter invalid data.
So, what is data validation in Excel?
Data validation in Excel is a technique that restricts user input in a worksheet. It is often used to limit user entry.
Let's explain this in detail below.
What is Excel Data Validation?
Excel's data validation is a useful tool that helps ensure that the data entered into a worksheet is accurate and error-free. It sets up rules that control what type of information can be entered into a specific cell.
It can help prevent typos, incorrect dates, and values outside acceptable ranges.
Here are a few examples of what Excel's data validation can do:
- Only allow numbers or text to be entered in a cell.
- Only allow numbers within a certain range, like between 1 and 100.
- Limit data entries to a specific length, like a six-digit code.
- Prevent dates and times outside a specific range, like only allowing dates within the current month.
- Create a drop-down list of acceptable values for a cell.
- Set up a validation rule based on another cell's value.
- Provide an input message when the user selects a cell.
- Show a warning message when an incorrect value has been entered.
- Highlight incorrect entries in validated cells.
Excel's data validation can help ensure your data is accurate and consistent, which can be important for making informed decisions. It can also help save time by reducing the need to go back and correct mistakes later on.
Data Validation in Excel Features
There are three key features of data validation in Excel:
- Settings Tab
- Input Message Tab
- Error Alert Tab
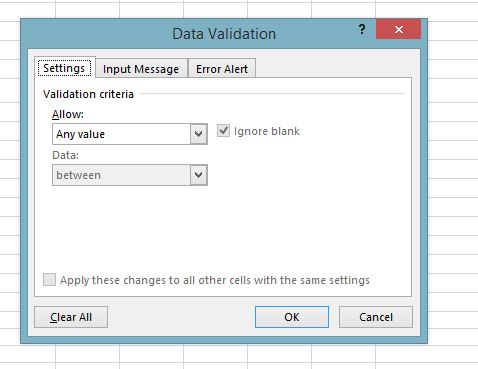
a. Settings Tab
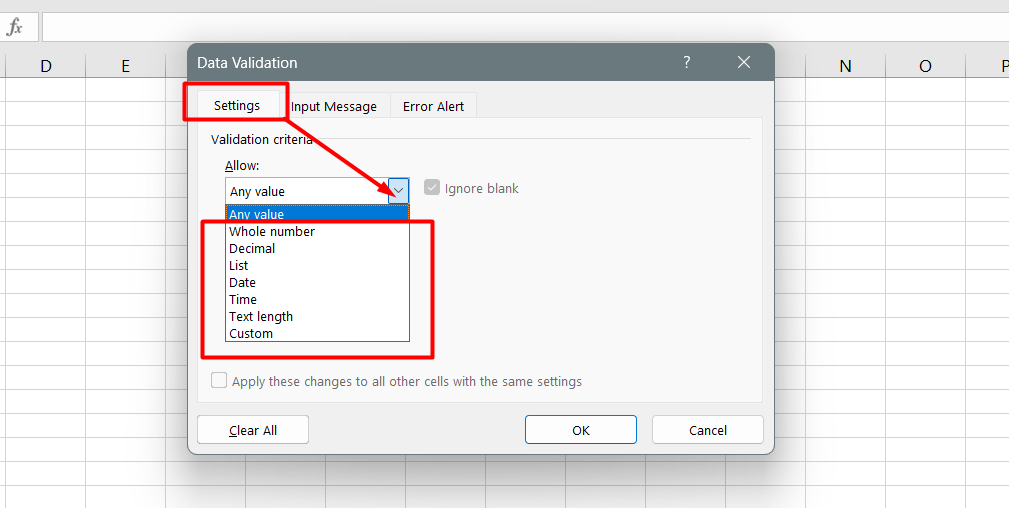
The settings tab in Excel data validation is where you enter the validation criteria. There are eight options available to validate for user input:
- Any Value - Removes any existing data validation.
- Whole Number - Allows only whole numbers. For example, you can specify that the user must enter a number between 0 to 30.
- Decimal - The user must enter a number with decimal values.
- List - Must create a drop-down list to choose from.
- Date - Must enter the date format.
- Time - Should enter a time.
- Text Length - Validates input based on the length of the data.
- Custom - Validates the user input using a custom formula.
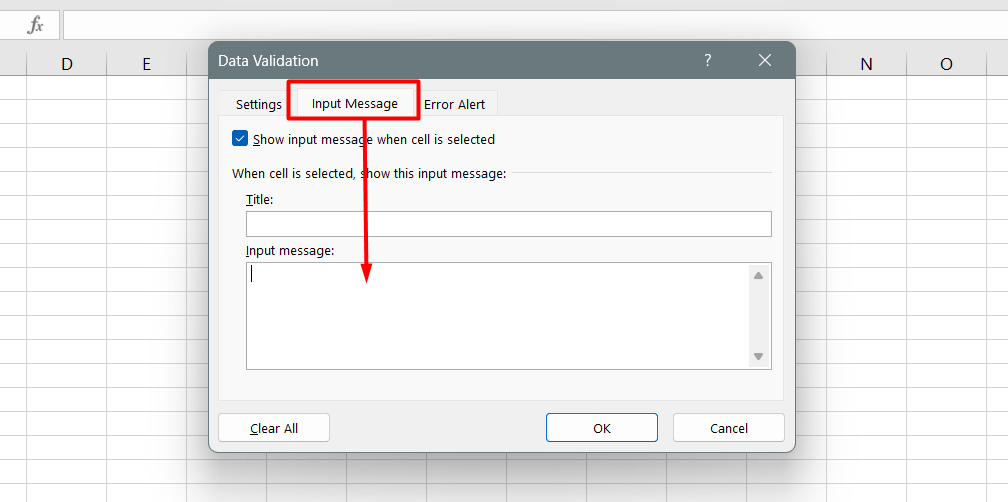
b. Input Message Tab
You can set the input message (tab) to explain what data is allowed in a given cell. This validation tab is optional. To use it do the following:
- Check the 'show input message when the cell is selected'.
- Enter a title.
- Enter an Input message.
Here's an example:
c. Error Alert Tab
You can set the validation to show the error message if the user tries to enter invalid data. On the error message tab, do the following:
- Check the ‘Show error alert after invalid data is entered’ box.
- Enter a title.
- Enter an error message.
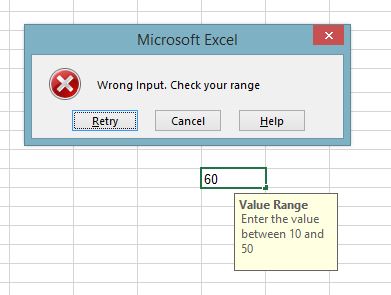
- Now, when you try to enter the value beyond the range, you will get an error message.
Now that we understand (know) the basic concepts of data validation in Excel, let’s look at a step-by-step process to implement data validation in excel below.
How to Use Excel's Data Validation for Accurate Data Entry
To add data validation in Excel and ensure accurate data entry, follow these simple steps:
-
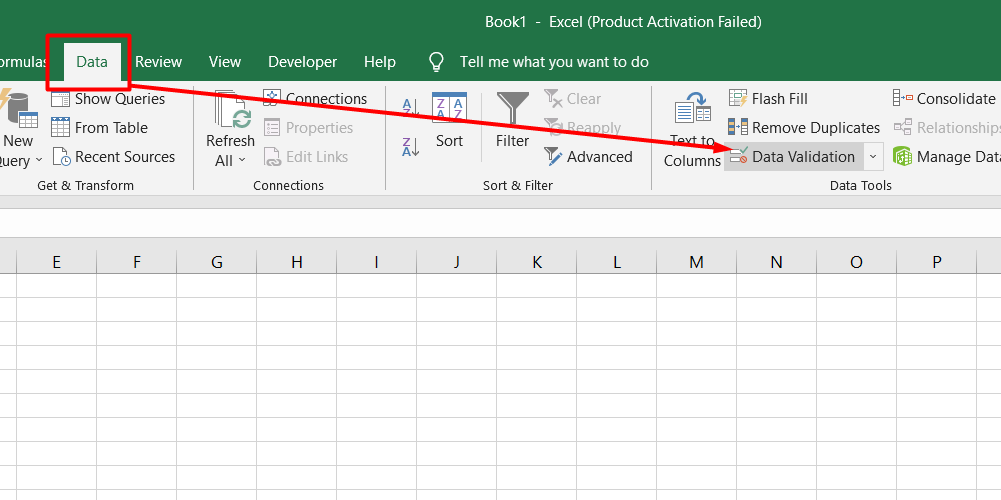
Open the Data Validation dialog box by selecting one or more cells to validate, going to the Data tab > Data Tools group, and clicking the Data Validation button.
-
On the Settings tab, define the validation criteria according to your needs. You can supply values, cell references, or formulas.
-
Once the validation rule is configured, you can add an input message to display to the user when they select the validated cell. This message explains what data is allowed in that cell.
- You can also display an error alert when invalid data is entered in a cell. To configure a custom error message, go to the Error Alert tab and select the desired alert type.
It's important to note that data validation can help prevent mistakes like typos and incorrect values and save time by reducing the need to correct them later.
By following these simple steps, you can ensure that the data entered into your Excel worksheet is accurate and consistent, which can help you make informed decisions.
Summary: How to Validate Data in Excel?
- Select The Cell For Validation: Go to the Data tab > Data tools, and click on the Data Validation button. A data validation dialogue box will appear having 3 tabs - Settings, Input Message, and Error Alerts.
- Specify Validation Criteria: On the settings tab, specify your validation criteria.
- Select The Criteria: Under Allow, select an option from Whole Number, Decimal, List, Date, Time, Text Length, and Custom.
- Select Condition: Under Data, select a condition and set required values based on what you choose for Allow and Data.
- Input Message: You can enter the input message if you want. This step is optional.
- Custom Error Message: You can also set your custom error message. This step is optional.
- Click Ok. Now, if you try entering a value outside the specified range (10, 50), it will result in an error
Excel Data Validation Examples
When working with data in Excel, it's important to ensure that the information entered into each cell is accurate and fits within certain guidelines. One way to do this is through data validation, which sets up rules for what types of data can be entered into specific cells.
Excel offers several built-in options for data validation, and you can also create your own custom rules. To access these options, open the Data Validation dialog box (Data tab > Data Validation).
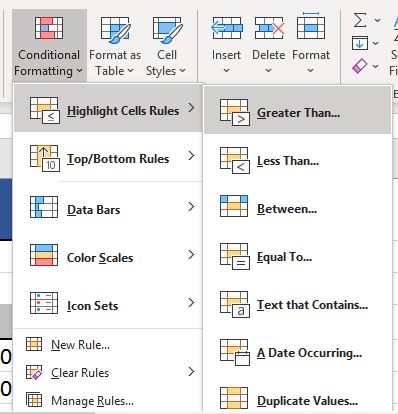
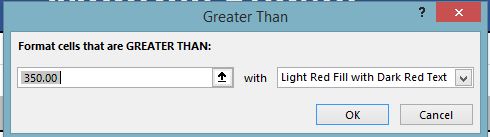
Here are a few examples of the types of validation rules you can set up:
- Whole numbers and decimals: You can restrict data entry to only whole numbers or allow decimals. You can also set criteria for whether the number must be equal to, greater than, or less than a certain value or whether it falls within a specific range.
- Text length: You can limit the number of characters entered into a cell or set a specific length that must be met.
- Date and time: You can restrict data entry to a certain date or time range or allow only dates that fall on certain days of the week.
- Dropdown lists: You can create a list of options for a cell so the user can only choose from those pre-defined options.
Setting up data validation rules ensures that the information entered into your Excel sheet is accurate and consistent.
Date and Time Validation in Excel
Excel has a data validation feature that restricts user input to a worksheet. It helps control what kind of data can be entered into a cell. One of the things that data validation can do is validate dates and times in Excel.
Select Date in the Allow box to validate dates and choose criteria from the Data box. Excel has many predefined options to choose from. You can restrict entry to dates between two dates, equal to, greater than, or less than a specific date, and more.
Similarly, select Time in the Allow box to validate times and define the required criteria. This feature allows you to control the time entered into a cell. You can also add an input message or error alert if invalid data is entered.
Excel text and drop-down validation
If you want to limit the number of characters entered in a cell or group of cells, use the Text length option in Excel's data validation. This option allows you to set a specific length limit for text and numbers.
Another useful validation option is the drop-down list, which creates a list of options that users can choose from.
- Select the target cells and open the Data Validation dialog box to create a drop-down list in Excel.
- Choose List in the Allow box, then enter the list items separated by commas in the Source box.
- You can select the In-cell dropdown box to make the drop-down arrow appear next to the cell.
It's important to be aware of the Ignore blank option, which allows any value to be entered in the validated cell if the referenced range has at least one blank cell. This option can also affect validation formulas.
Editing Data Validation in Excel
To make changes to an Excel data validation rule, follow these steps:
- Choose any cell that has validation applied to it.
- Go to the Data tab and click on the Data Validation button.
- The Data Validation dialog box will appear. Here, make the necessary changes to the rule you want to modify.
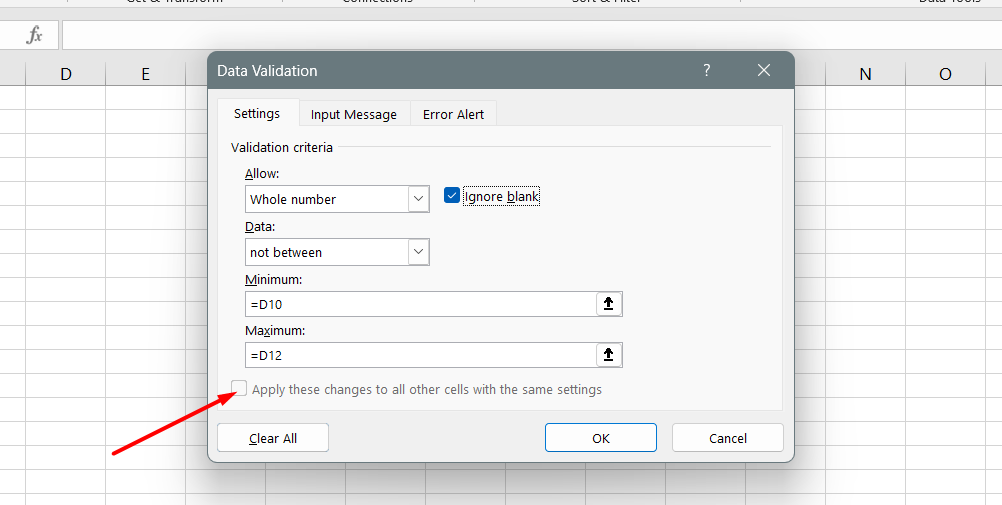
-
If you want to apply the same changes to all the other cells with the same validation criteria, select the "Apply these changes to all other cells with the same settings" checkbox.
- Finally, click OK to save the changes.
By following these steps, you can easily modify the validation rules for your data in Excel.
Copying Data Validation in Excel
If you have set a validation rule for one cell in Excel and want to apply it to others, you don't have to create it again. Here's how to do it:
- Select the cell with the validation rule and press Ctrl + C to copy it.
- Select the other cells you want to apply the same validation rule to. If the cells are not next to each other, hold down the Ctrl key while selecting them.
- Right-click on the selection, then click on Paste Special and choose the Validation option. Alternatively, you can use the shortcut Ctrl + Alt + V, then N.
- Click OK to apply the validation rule to the selected cells.
If you have a dataset and want to add more rows, you can convert it to an Excel table instead of copying the validation rule to each cell. Excel will automatically apply the validation rule to new rows added to the table.
FAQs
How do you use data validation in Excel to ensure data accuracy?
You can use data validation in Excel by setting specific criteria or rules for data entry, such as restricting input to a certain range or format, to ensure data accuracy.
How do you ensure your data entry is accurate?
To ensure data entry accuracy, you can double-check the entered values, use validation rules or formulas to enforce data constraints, perform data verification through cross-referencing or data comparison, and implement proper data entry procedures.
What is Excel's data validation used for?
Excel's data validation feature is used to control and restrict the type, format, and range of data that can be entered into specific cells, helping to ensure data accuracy and integrity.
How do you validate results to ensure accuracy in data analysis?
To validate results and ensure accuracy in data analysis, you can cross-verify data with external sources, perform data audits, conduct statistical tests or calculations, use data visualization techniques, and validate data against predefined business rules or benchmarks.
Why is it important to ensure accurate and appropriate data collection?
Ensuring accurate and appropriate data collection is crucial because it forms the foundation for reliable analysis, decision-making, and reporting, ensuring the integrity and credibility of the insights derived from the data.
Final Thoughts
In conclusion, Excel's data validation feature is a powerful tool that helps ensure accurate data entry and reduces the likelihood of errors.
Users can set validation rules based on specific criteria to prevent incorrect or incomplete data from being entered into their spreadsheets.
The various options for data validation, including whole numbers and decimals, dates and times, text length, and drop-down lists, allow for flexibility in customization to fit various business needs.
Additionally, the ability to edit and copy validation rules to other cells saves time and improves efficiency.
By utilizing data validation in Excel, users can improve the quality of their data and make more informed decisions based on reliable information.
One more thing
If you have a second, please share this article on your socials; someone else may benefit too.
Subscribe to our newsletter and be the first to read our future articles, reviews, and blog post right in your email inbox. We also offer deals, promotions, and updates on our products and share them via email. You won’t miss one.
Related articles
» How to Limit Rows and Columns in an Excel Worksheet
» Troubleshooting "OLE Action Excel" Error in Microsoft Excel
» Ways To Alternate Row Colors in Excel [Guide]