Whether you're new to Excel or just looking for fresh tips, we'll show you how to master this productivity tool and get more done in less time using these 13 tips.
Undoubtedly, Microsoft Excel is one of the most powerful and popular software applications in the world. With its endless capabilities, it's no wonder so many people rely on it for their work and personal lives.
But for all its benefits, Excel can be quite challenging to learn and use effectively. If you want to get the most out of this application without breaking a sweat, check out these 13 tips!
Content Summary
In this article, you will:
- Get to know the Excel ribbon interface and how to customize it for your needs.
- Learn how to use keyboard shortcuts to speed up your workflow.
- Find out how to use Excel's built-in functions and formulas to save time on data entry and analysis.
- Discover tips for working with large data sets, and learn how to use PivotTables to your advantage.
- Get tips for using Excel's visual tools, including charts and graphs, to make your data more understandable.
- Learn to use Excel's collaboration features to work with others on shared spreadsheets.
So, whether you're new to Excel or just looking for some fresh tips, this article is for you! Read on to learn how to master Excel and get more done in less time. Let's get started!
13 Tricks You Must Know if You Use Excel
Excel is a powerful tool that can help you get more done in less time. By taking advantage of its many features, you can work smarter, not harder. Try out these tips and tricks the next time you use Excel, and see how they can help you work more efficiently.
These tips and tricks are designed to help you get the most out of Excel and cover a wide range of topics. From interface customization and keyboard shortcuts to working with formulas and large data sets, we've got you covered.
1. Quick Analysis Tool
The Quick Analysis Tool is a great way to visualize your Data quickly without creating charts and graphs from scratch. To utilize Quick Analysis, simply highlight your table, and an icon will appear in the lower right corner.

This tool has beneficial information. You can choose charts, format them, perform computations, and add sparklines.
Without a doubt, this is a fantastic tool to utilize.
2. Remove Duplicates
If you have a large data set, there are some duplicate values in there. Excel has a built-in tool to help you quickly remove duplicates from your data.
- Highlight the table you're working with and go to the Data tab in your ribbon.
- Click on the Remove Duplicates button in the Data Tools section.
- Select the Data that you want to remove using the dialog box.

Your sheets can have undesirable duplicate cells, especially if you have a lot of data. While manually locating these entries is doable, there is a far easier way to do so using this simple trick.
3. Delete Empty Cells
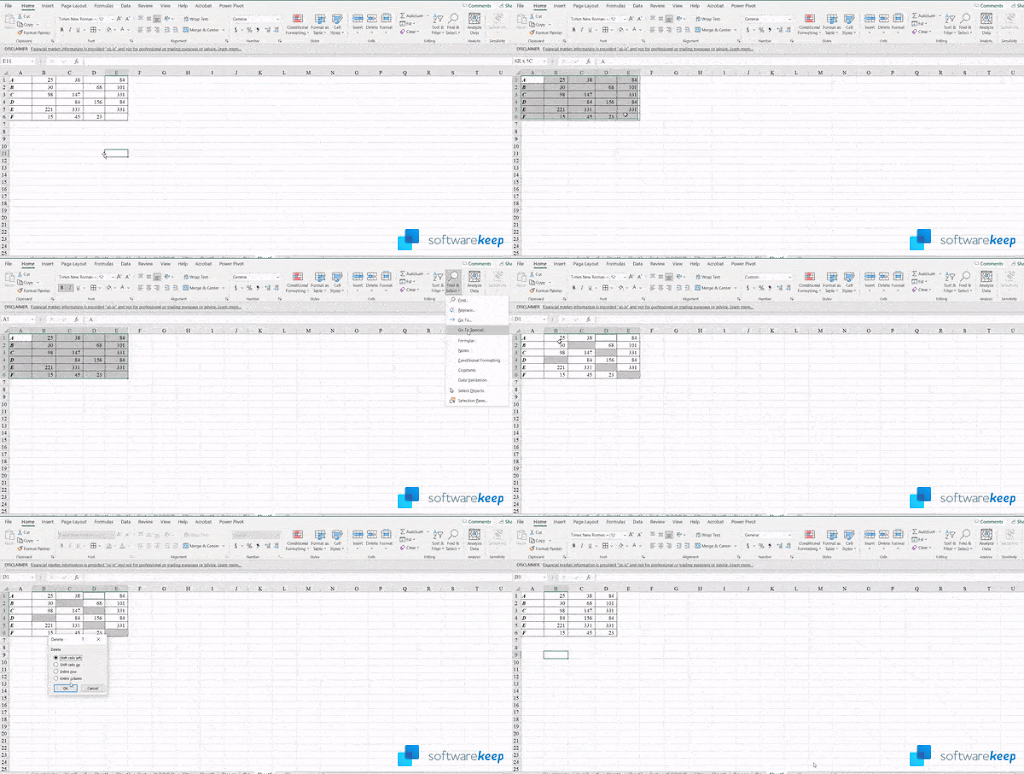
If you have a lot of empty cells in your data set, they can take up valuable space and make it harder to read and understand your data. Excel has a handy feature that allows you to delete all empty cells in a range with just a few clicks.
- Select the Data you want to work with.
- Stay on the Home tab of your ribbon, then go to Find & Select > Go to Special > Check Blanks.
- Right-click one of the highlighted cells, click the Delete option, and select Shift cells left. You'll notice that every empty cell was removed from your data.

You'll never have to move your cells around to fill empty spaces manually. This feature does it for you at the click of a few buttons!
4. Text to Columns
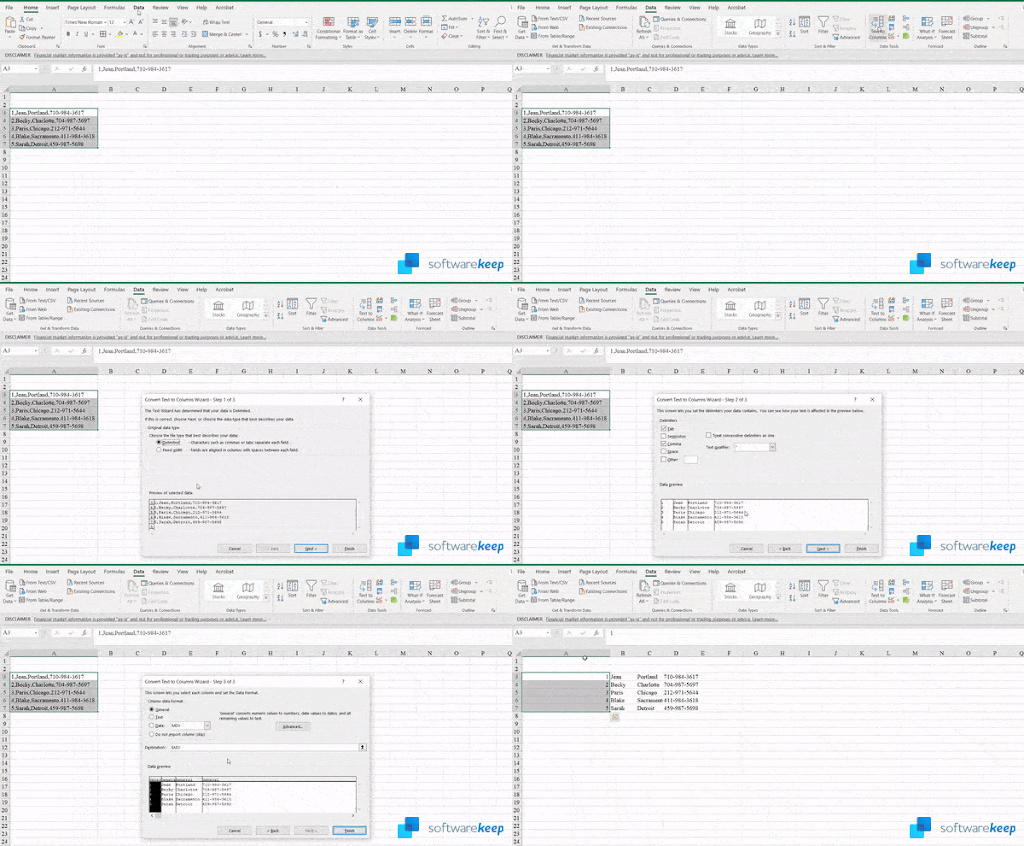
If you have data in a single column that you want to split into multiple columns, Excel's Text to Columns feature can help. This feature can be helpful when working with data imported from other sources, such as databases or text files.
- Select the data table you're working with.
- Go to the Data tab in your ribbon, and then click on the Text to Columns button from the Data Tools section.
- Check Delimited > Comma in the dialog box, then click on the Finish button.

Text to columns is a tool for separating text in a cell or column into columns based on certain criteria. The comma is used to separate our data.
5. Populate Information Faster
Did you know that dragging down isn't the only way to populate cells with information? You can use a special feature to get this done quicker.
- Select the Data you're working with.
- Press the F5 button on your keyboard, or click Go to Special from the ribbon.
- Click Blank in the dialogue box that shows up on your screen.
- Type the "=" sign without quotation marks in the top first empty cell.
- Select the region on top, and then press the Ctrl + Enter keys.

This is faster to populate your data than dragging it down with your mouse. A straightforward trick to speed up your workflow in Excel!
6. Import Data From the Internet
One of Excel's most powerful features is its ability to import data from the internet. This can be helpful when you need to pull data from a website or online database quickly.
- Go to the Data tab in the ribbon, and then click on the From Web button in the Get & Transform Data section.
- Input the web URL from which you want to extract data, and then click the OK button.
- Go through the data in the pop-up box and select what you want to import into Excel.

A table or data can be downloaded from the internet and imported into Excel. This is a huge time saver, especially when doing research, and you can just grab the figures and go to work.
7. Analyze Data
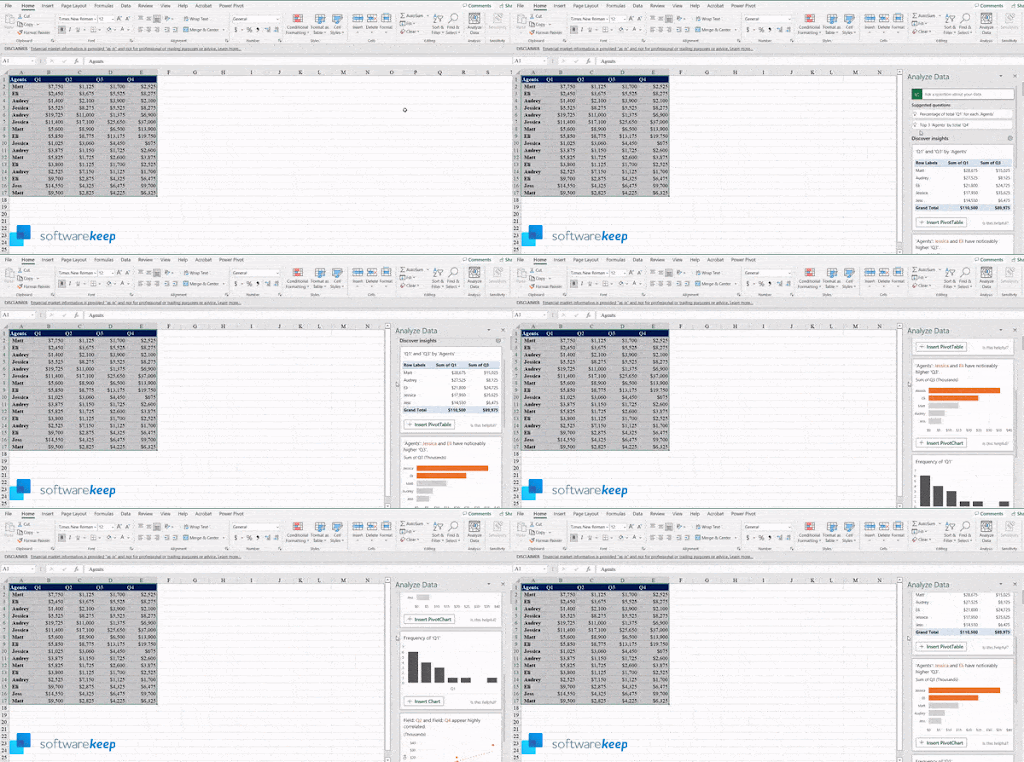
The Analyze Data feature provides several suggestions regarding what your data might be attempting to tell you. It also suggests pivot table templates for you to utilize. You may also ask a question about the Data that you have using this tool.

You can find the Analyze Data button in the Home tab of your ribbon.
8. Data Types
This is a fantastic tool for gathering statistics from specific nations or regions. We chose states in this example and got information on their flags, cities, populations, and the proportion of people with bachelor's degrees or higher.
Select the Data you're working with, and then switch to the Data tab in your ribbon. Here, click on any suitable option from the Data Types section as shown below:

9. Filled Map
A filled map shows how a value varies in proportion throughout geography by using shading, coloring, or patterns.
- Select the Data you want to use within your spreadsheet.
- Go to Insert > Map > Filled Map.

10. People Graph
Using a People graph is a quick way to obtain data from a simple two-column table with values in the second column.
- Go to the Insert tab in your ribbon and select People graph.
- Select the Data you want to work with and customize your graph. To achieve your intended result, modify the title, theme, and form.
11. Recommended Pivot Table
Based on the data in your sheet, Excel can recommend a PivotTable for you and lay it out in a suggested format. You can always change this later, but it's a great starting point.
- Select the Data you want to work with.
- Open the Insert tab in your ribbon, and then click on the Recommended Pivot Table button.
- Pick any Pivot table from the recommendations.

12. Create a Pattern From a Set of Data
If you have a set of data that follows a pattern, Excel can help you extrapolate that pattern and fill in the rest of the data for you.
- Type the first pieces of data in the first two columns of your table.
- Press the Ctrl + E buttons to populate the rest of the list.
This can be done with addresses, names, and other data that follow a similar pattern.

13. Check for Differences Between Lists
If you have two lists of data and want to know what's different between them, Excel can help. You can use the built-in Compare feature to see the differences between two lists quickly.
- Highlight both lists you want to compare while holding the Ctrl key on your keyboard.
- From the Home tab in your ribbon, go to Conditional formatting > Highlight cells rules.
- Click on the Duplicates button.
- In the dialogue box, change from duplicate to unique. You'll see all the differences pointed out by Excel immediately in your spreadsheet.

As you can see, even tools like conditional formatting can be used for more than one purpose. That's the magic of Microsoft Excel!
Conclusion
Excel is a powerful application that can help you manage all aspects of your life, from business to personal. These 13 tips will help you use Excel like a pro and make the most of its features. With a little practice, you'll be an Excel expert in no time!
If you found this article helpful, be sure to check out our other Excel tips and tricks articles. And if you have any questions, please don't hesitate to reach out to us on social media or in the comments section below. We're always happy to help!
If you want to learn more about using Excel or other software applications, check out our Blog for more helpful articles. Thanks for reading!
One More Thing
Looking for more tips? Check out our other guides in our Blog or visit our Help Center for a wealth of information on how to troubleshoot various issues.
Sign up for our newsletter and get early access to our blog posts, promotions, and discount codes. Plus, you'll be the first to know about our latest guides, deals, and other exciting updates!
Keep Learning
» How To Use "If Cell Contains" Formulas in Excel
» Free Expense Tracking Worksheet Templates (Excel)
» How to Sort by Date in Excel
Feel free to reach out with questions or requests you'd like us to cover.
