Windows 10 users have run into an issue with an item called Windows Modules Installer Worker consuming a large amount of CPU power on their device. It often occupies more than 50% of your CPU resources, and in severe cases even jumps up to 100%. This leads to a slow computer and presents various risks such as overheating or damaged hardware.
Don’t worry — the Windows Modules Installer Worker is not a virus or malware. It’s a completely safe process to have on your computer, however, it has issues. This article focuses on how you can fix the high CPU usage error and restore your computer to working order.
If you hear your computer’s fans spin up and feel it getting hotter for no apparent reason, check the Task Manager and you might see “Windows Modules Installer Worker” as the reason for the CPU issue your PC is experiencing. This process, also known as TiWorker.exe, is a part of the Windows operating system.
Here's the important information you need to know about Windows Modules Installer Worker.
Jump to Section:
- What is Windows Modules Installer Worker?
- Is Windows Modules Installer Worker a virus or malware?
- Why does Windows Modules Installer Worker Load my system CPU?
- Can I Disable the Windows Modules Installer Worker?
- Methods to Fix Windows Modules Installer Worker high CPU usage
- Method 1. Remove the SoftwareDistribution folder
- Method 2. Restart the Windows Update Service
- Method 3. Use the Windows Update Troubleshooter
- Method 4. Run the System File Checker (SFC scan)
- Method 5. Use the DISM command
- Method 6. Turn off Automatic Updates for Windows 10
- Method 7. Change your Internet settings
- Final Thoughts
What is Windows Modules Installer Worker?
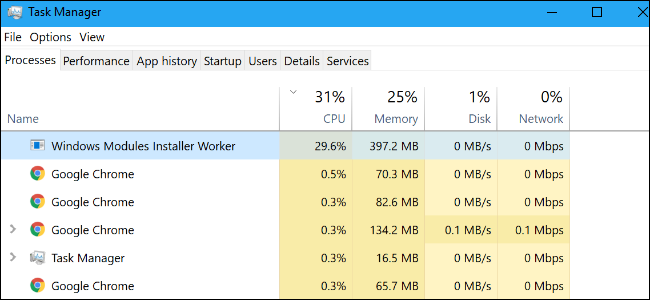
Windows Module installer worker is an important PC tool that helps the PC to check the windows updates automatically. It is an essential tool if you want Windows to check for the updates automatically on your PC or laptop because it automatically runs while checking for, and installing, any Windows Updates.
Essentially, Windows Modules Installer Worker (or TiWorker.exe) is a Windows Update Service. It looks for newly available Windows system updates and installs them on your computer. Whenever your system automatically looks for updates or you manually start a search for updates, this process will be running.
Whenever users notice sudden slowdowns and open the Task Manager to see what’s going on, they may see the Windows Modules Installer Worker consuming up to 100% CPU usage. This is why some users relate the Windows Update Installer worker with CPU usage issues while the tool is looking for available updates.
Is Windows Modules Installer Worker a virus or malware?
some users, when they notice Windows modules installer worker high CPU usage or modules installer worker high disk usage, they may think it is a virus.
No, it is not a malware or virus.
Windows modules installer worker is just an essential part of the Windows system that is used for Windows Updates. So, you don’t need to worry about it. If still, you are worried about the same, then you can run any of the virus scans using a quality antivirus solution or use the help of a windows defender.
Why does Windows Modules Installer Worker Load my system CPU?
The high CPU usage often occurs due to the constant search of updates by the Windows Modules Installer Worker. In Windows, the OS plays a preeminent role. Usually, updates and upgrades are set to be installed at night - when the PC is inactive. But in some of the cases, when the system is turned off at night, the only solution is for the updates to download and install the updates at day time or when your PC is active.
In some rare cases, Windows modules installer worker high CPU usage occurs when the RAM is loaded or because of outdated PC drivers. This can happen when you manually or automatically search for the updates of Windows 10 or install them. Most of the time, it also occurs then when servicing a laptop or PC.
Another common question is how long there is a high activity of the modules installer worker process? There's is no correct answer for this. You may see it until the process is complete or until the next Windows start.
However, if you either see that the TiWorker.exe process causes a load of 80—100% for an hour, two, or more, then, first of all, try to reboot your PC or laptop. Let the system reboot easily, then wait for about 5 minutes and observe the activity of the installer process. Usually, after a restart, the action/activity of the Windows modules installer worker process is significantly reduced.
Read: How to Fix Sedlauncher.exe Full Disk Usage on Windows 10
Can I Disable the Windows Modules Installer Worker?
In the course of your quest for a solution for the Windows Modules installer worker's high CPU usage, you may encounter some advice recommending that you should disable it. Yes, you can disable the Windows Modules Installer worker system service. But this will prevent Windows from installing updates properly, and you shouldn’t do it.
It is important to always keep your Windows OS up to date.
So, it is best to just bite the bullet and allow the TiWorker.exe process to occasionally do its thing despite its high CPU or high disk usage. This is just how Windows installs updates work, and it’s for your own good.
Methods to Fix Windows Modules Installer Worker high CPU usage
Use the following methods to fix Windows Modules Installer Worker - High CPU Usage
Method 1. Remove the SoftwareDistribution folder
The first thing you should try when attempting to troubleshoot this issue is deleting a specific folder called SoftwareDistribution. This folder is used by default to store new updates in. When a corrupt file is stored here it can lead to a number of errors with the Windows Modules Installer Worker.
Deleting the folder has no risks, as Windows 10 will automatically generate a fresh folder with the same name when a new update is found. Please note that you may be required to have access to an administrator account to perform this method.
- Temporarily disable the Windows Update service using these steps:
- Press the Windows + R keys on your keyboard to open the Run utility.
- Type in “services.msc” without the quotation marks, and click the OK button. The Services window will open up.
- Locate the Windows Update service. Right-click on it, then select Pause/Stop.
-
Using the File Explorer, navigate to C:\Windows.

-
Select the SoftwareDistribution folder right-click on it. Hit the Delete option from the context menu.

- Restart your device and test if your Windows Modules Installer Worker issue is fixed.
Method 2. Restart the Windows Update Service
(Lifewire)
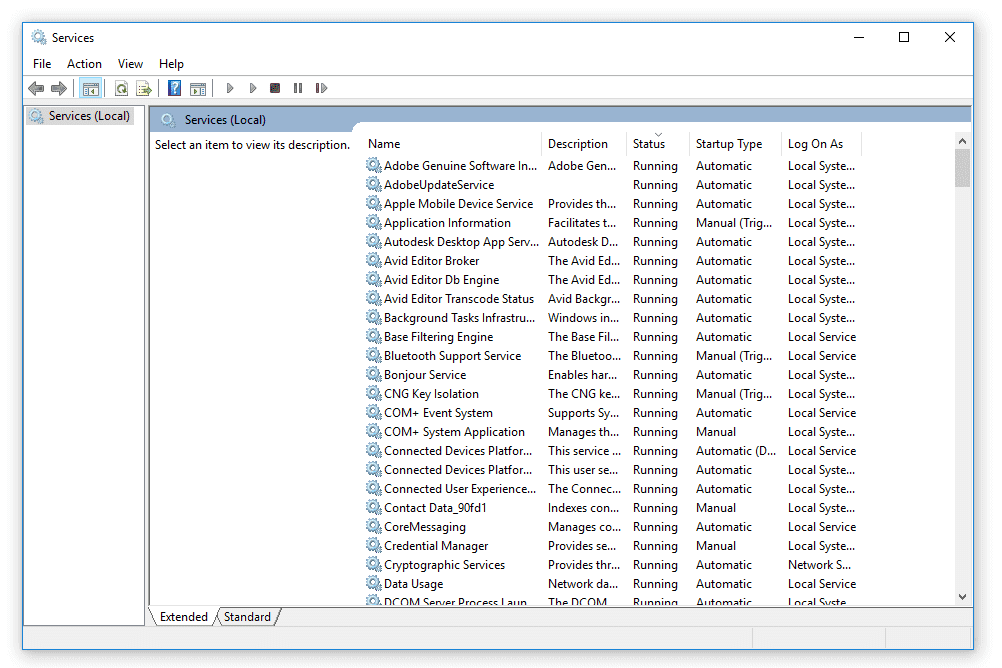
There’s a possibility that your Windows Modules Installer Worker is consuming a lot of resources because the update service isn’t running properly. To check and fix this, simply follow the steps below.
- Press the Windows + R keys on your keyboard. This is going to bring up the Run utility.
- Type in “services.msc” and click the OK button to launch Services. This might take a moment to fully load.
- Scroll down until you find the Windows Update service. Right-click on it and select the “Stop” option.
- Wait for 30 seconds.
- Right-click on the Windows Update service again and select “Start.” This should fully restart the service.
Method 3. Use the Windows Update Troubleshooter
Microsoft themselves have issued a designated tool to help fix issues with Windows updates. This tool is free and available for download to anyone, even without a Microsoft Account. All you have to do is simply run the tool and see if it’s able to identify and fix any errors.
- Download the Windows Update Troubleshooter. This download link is directly from Microsoft’s website, which is verified, trustworthy, and entirely safe.
- Open the WindowsUpdate.diagcab file you just downloaded by double-clicking on it. This will launch the troubleshooter window.
- Follow the on-screen instructions. If the troubleshooter is able to identify any issues, simply click on them to automatically apply a fix or get more information on your issue.
Note that the Windows Update Troubleshooter is not perfect. Even if it’s unable to find any errors on its own, you should continue with our methods until you find something that works to fix the Windows Modules Installer Worker High CPU error.
Method 4. Run the System File Checker (SFC scan)
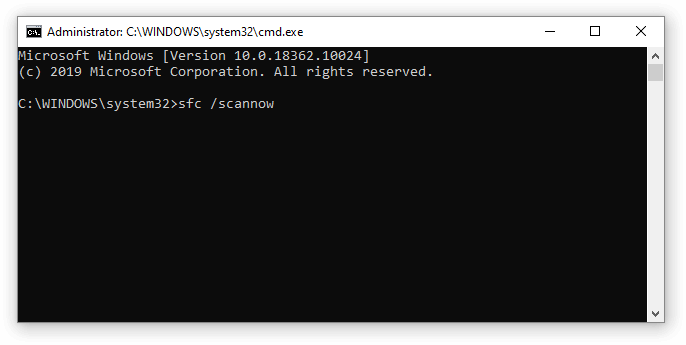
The System File Checker is a tool available in Windows 10 by default. It’s also called an “SFC scan,” and it’s your quickest way to automatically fix corrupted system files and other issues.
Some users have reported that running this scan fixed the Windows Modules Installer Worker High CPU issue from happening again.
- Press the Windows + R keys on your keyboard. This is going to bring up the Run utility.
- Type in “cmd” and press the Ctrl + Shift + Enter keys on your keyboard. Doing so, you’re launching the Command Prompt with administrative permissions.
- If prompted, click Yes to allow the Command Prompt to make changes on your device.
- Once in the Command Prompt, type in the following command and press Enter to execute it: sfc /scannow
- Wait for the SFC scan to finish scanning your computer and repairing corrupt files. This may take a long time; ensure that you don’t close the Command Prompt or shut your computer down.
- Restart your device after the scan is complete.
Method 5. Use the DISM command
The DISM tool allows you to identify and fix corruption issues with your system by simply running commands in the Command Prompt application. It checks for corruption system-wide and automatically attempts to restore damaged or missing files.
- Press the Windows + R keys on your keyboard. This is going to bring up the Run utility.
- Type in “cmd” and press the Ctrl + Shift + Enter keys on your keyboard. Doing so, you’re launching the Command Prompt with administrative permissions.
- If prompted, click Yes to allow the Command Prompt to make changes on your device.
- Once in the Command Prompt, you need to start the DISM scan which will run and look for issues system-wide. Type in the following command and press Enter to execute it: DISM.exe /Online /Cleanup-image /Scanhealth.
- Next, you need to execute a command to fix any issues found on your system. Simply type in the following line and press Enter again: DISM.exe /Online /Cleanup-image /Restorehealth
- Wait for the process to finish. Upon completion, close the Command Prompt window and restart your device.
Method 6. Turn off Automatic Updates for Windows 10
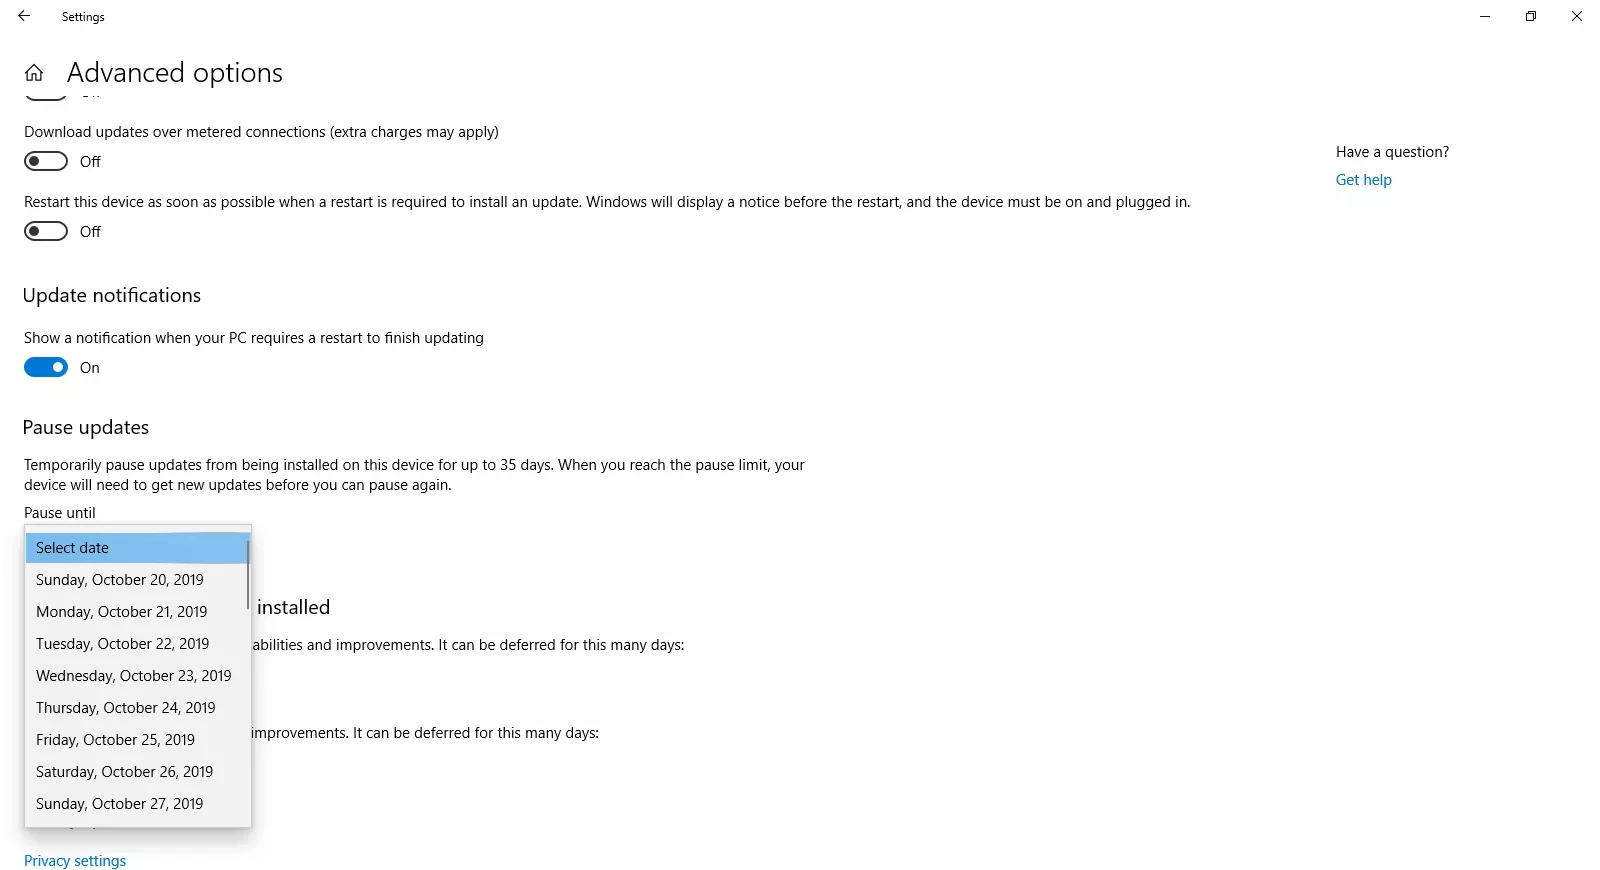
(Lifewire)
As the Windows Modules Installer Worker is part of Windows Update, you may try to disable automatic updates to fix the high CPU usage. This can be done by following the steps below.
- Press the Windows + I keys on your keyboard to open the Settings application. You can also open Settings from the Start menu by clicking on the gear icon.
- Click on Update & Security.
- Select Windows Update from the menu in the left panel.
- Click on Advanced Options.
- Select how long you want to pause updates by using the drop-down menu.
You can disable updates for 35 days at a time — make sure to repeat these steps every month to ensure you don’t get automatic updates. If you want to permanently disable Windows 10 updates, make sure to read our article on How to Disable Windows 10 Updates.
Method 7. Change your Internet settings
Case 1. You have a Wi-Fi connection
- Press the Windows + I keys on your keyboard to open the Settings application. You can also open Settings from the Start menu by clicking on the gear icon.
- Click on Network and Internet.
- Open the Wi-Fi tab using the menu in the left-side panel.
- Select your current Wi-Fi network.
- Scroll down to the Metered connection section and turn on the Set as metered connection option for the Wi-Fi network.
Case 2. You have an Ethernet connection
- Press the Windows + R keys on your keyboard. This is going to bring up the Run utility.
- Type in “regedit” without the quotation marks and press the OK button. Doing so will launch the Registry Editor in a new window.
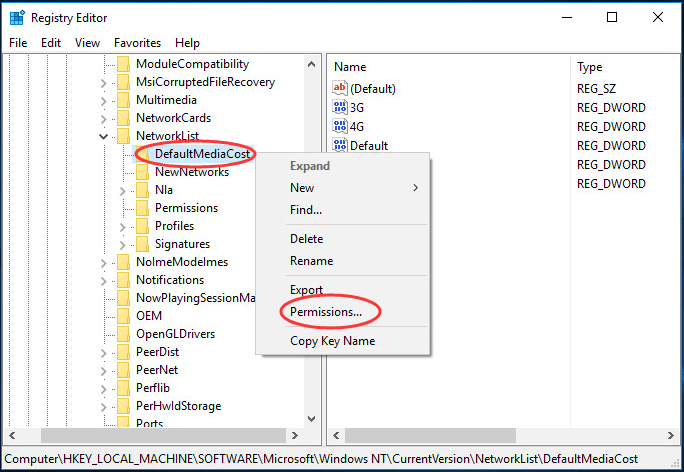
- Navigate to the following key: HKEY_LOCAL_MACHINE → SOFTWARE → Microsoft → Windows NT → CurrentVersion → NetworkList → DefaultMediaCost
-
Right-click on the DefaultMediaCost folder and select Permissions…
-
Click on the Add... button. Type your username into the Enter the object names to select field and click Check Names.
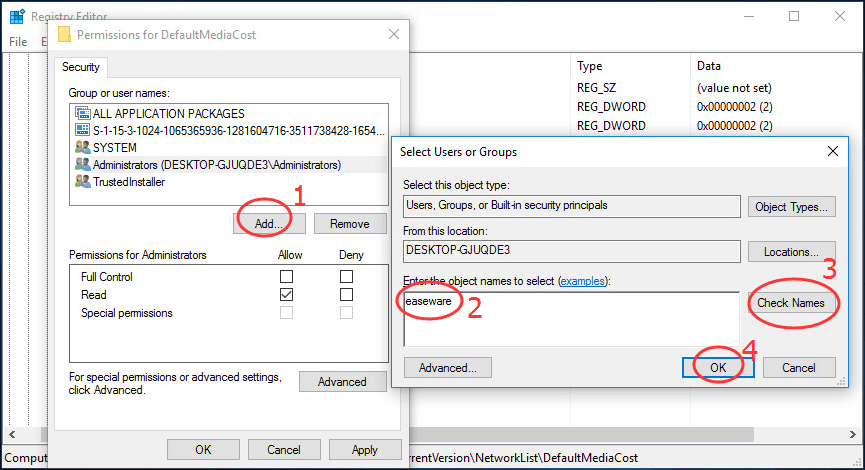
- Click the OK button.
-
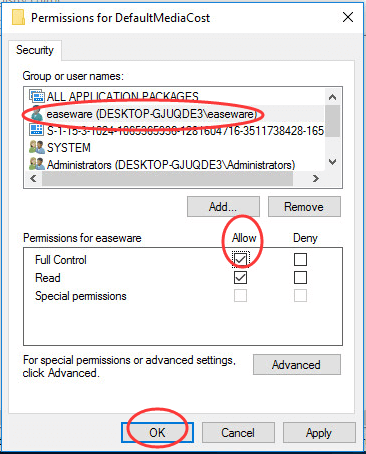
Select the user you just added and tick on the Allow square in the Full Control row. Click the OK button to close this window and return to the Registry Editor.
-
Double-click on the Ethernet value in the DefaultMediaCost folder, and make sure the Data value is set to 2.

- Click the OK button and restart your computer.
Final Thoughts
We hope that this article was able to help you answer "what is Windows modules installer worker" and fix the Windows Modules Installer Worker high CPU usage on Windows 10. If you run into similar issues in the future, don’t be afraid to return to our website and help center. You will find a solution.
One More Thing
Would you like to receive promotions, deals, and discounts to get our products for the best price? Don’t forget to subscribe to our newsletter by entering your email address below! Receive the latest technology news in your inbox and be the first to read our tips to become more productive.
Read Next
> What is Windows Service Host SuperFetch, and how do you fix it
> What is Msmpeng.exe and Should You Remove It [New Guide]?
> Fixed: Hard Drive Not Showing Up on Mac