Simply put, Service Host Superfetch in Windows is an essential program built to speed up your system’s performance but one that sometimes creates problems instead.
Have you met a situation like this: “Your computer ran into a problem that it couldn’t handle, and the disk usage was nearly 100%, and you find that this problem is caused by Service Host: SuperFetch.”
There’s been a lot of talking among Windows users about Service Host Superfetch in windows 10. Some users express genuine concern about Service Host SuperFetch, asking questions such as what is Service Host SuperFetch? What does service host SuperFetch do? How do you fix Service Host SuperFetch high disk? And so on.
In this article, you’ll find all the answers to all the questions you have about Service Host SuperFetch.

Table of Contents
- What is Service Host SuperFetch on Windows 10?
- What does Service Host SuperFetch do?
- Why is Service Host Superfetch on my Task Manager?
- Service Host SuperFetch high disk Usage
- Should I Disable SuperFetch?
- How to Fix Service Host SuperFetch high disk usage (How to disable Service Host Superfetch)
- Method #1: Disable SuperFetch in Windows Services
- Method #2: Disable SuperFetch in the registry
- Method #3: Disable Superfetch with Command Prompt
- Wrapping Up
What is Service Host SuperFetch on Windows 10?
Unknown to many, Service Host SuperFetch was initially introduced in Windows Vista and has since been carried onwards in every Windows Operating System version up to Windows 10.
Service Host SuperFetch is an essential Windows process that ensures that users don’t get into trouble while using their PC. The key goal of SuperFetch is to optimize system performance by managing random memory (RAM) to enable apps to perform efficiently.
Some computer analysis can say that SuperFetch has a generic purpose. Basically, it allows Windows Operating System to run efficiently and take care of regular applications, programs, and downloads from crashing while enabling them to work smoothly.
What does Service Host SuperFetch do?
As mentioned above, the key goal of Service Host SuperFetch is system optimization. The SuperFetch process analyzes your system - particularly your RAM usage - and generates a profile of the applications and programs you frequently use or run.
As you continue using your system, SuperFetch gradually learns what you run frequently. It will then pre-emptively load these applications’ elements onto your RAM so that when you need those applications, they’ll load up much quicker than they might have otherwise done.
So, the basic things that SuperFetch does, in short, include;
- Cuts down the PC’s boot time
- Allows you to find your application easily
- It adds up to quick functioning on your application
- Easily loads regular apps
Note:
Mainly, Service Host SuperFetch speeds up application load times for users that are running hard drives (HDD) - especially older HDDs. Those running a Solid State Drive (SSD) may not see much improvement from SuperFetch. This is because, by default, SuperFetch doesn’t load applications into an SSD memory on your system.
However, suppose you’re running a mixed drive system, for instance, using the SSD to run the OS and the HDD for storage purposes. In that case, SuperFetch will be able to improve your system’s performance without interfering with the SSD’s operation.
Why is Service Host Superfetch on my Task Manager?
It starts with knowing that Service Host Superfetch is a background process. You may not recognize the work of Service Host SperFetch until you check the task manager. It is not a virus like some users may think.
You’ll find Superfetch on the Task Manager because, like a number of other Windows 10 services, SuperFetch doesn’t run on its own. It is not a listed process but is collected under the generic “Service Host” processes.
It is a .dll process that Microsoft has preferred lately as it moves away from the powerful but vulnerable and problematic .exe files.
To find Superfetch in the Task Manager, scroll through the list of “Service Host” processes operating in the background of your PC, and locate the one listed as Service Host: SuperFetch.
Read Also: How to Fix Sedlauncher.exe Full Disk Usage on Windows 10
Service Host SuperFetch high disk Usage

Service Host Superfetch is usually a good process until you see it with high disk usage issue characters. Once your applications are running smoothly, SuperFetch will completely take away that happiness.
If, for instance, you’re using Windows 10 and you find that Service Host: SuperFetch is taking much of your Memory, CPU, or Disk usage, you’re not alone. Sometimes Superfetch uses up to 100% of memory. This problem has been reported by many Windows users.
Although usually alarming, service host Superfetch high disk usage is seldom a dangerous sign.
Superfetch high disk usage usually occurs because this service often makes your PC use its maximum ability and resources to respond to I/O requests. Normally, it cleans up the RAM and copies the frequently used and new files that you’ve recently accessed.

Once Superfetch service completes overhauling your PC’s RAM, the disk usage will automatically reduce. However, it should be a concern to you if the disk usage doesn’t reduce.
Should I Disable SuperFetch?
That depends. Has Service Host: SuperFetch caused you trouble? Superfetch high disk usage is part of the process and, as mentioned earlier, isn’t something to worry about.
However, if the Superfetch high disk usage continues, that’s when it becomes a problem. When you experience Service Host Superfetch always causing high disk usage, you may need to disable it.
Disabling Superfetch won’t cause your system any instability or glitch. However, as you use your system, you may notice some lag when accessing the commonly-used apps that would otherwise load faster when Superfetch is enabled.
How to Fix Service Host SuperFetch high disk usage (How to disable Service Host Superfetch)

To fix Superfetch high disk usage, you’ll need to disable Service Host SuperFetch. There are three easy ways to disable Superfetch:
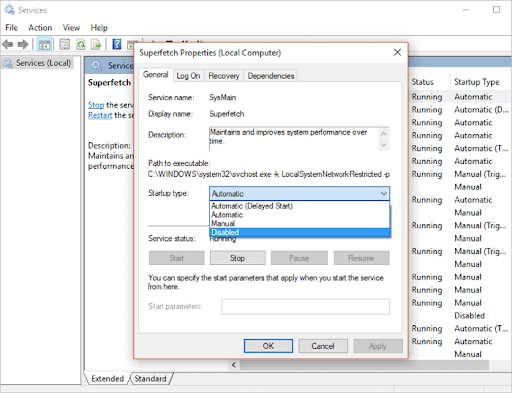
Method #1: Disable SuperFetch in Windows Services
To disable Superfetch in Windows services:
- Press Wins Key + R to open the Run dialog box
- Type services.msc > press Enter
- In the list of items, locate Superfetch > right-click on it > select properties
- On the pop-up window, go to the General tab
- Got to the dropdown menu next to Startup type > select Disable
-
On the Service status > click Stop
Method #2: Disable SuperFetch in the registry
You can also disable the Superfetch process using the Windows registry. Be careful because the Windows registry is delicate, and any simple mistake can render your PC non-functional.
- Press Wins Key + R to open the run dialog box
- Type Regedit > Press Enter
- If prompted to allow the app to operate, click Yes
- When the Windows Registry Opens, go to this folder HKEY_LOCAL_MACHINE > Expand it
-
In the expanded version navigate to the following path:
HKEY_LOCAL_MACHINE > System > CurrentControlSet > Control > Session Manager > MemoryManagement > PrefetchParameters - On the right pane, double-click on the ‘Enable Superfetch’ (in some computers its written ‘Disable Superfetch’)
-
Change the value to 0 to disable Superfetch > then click Ok
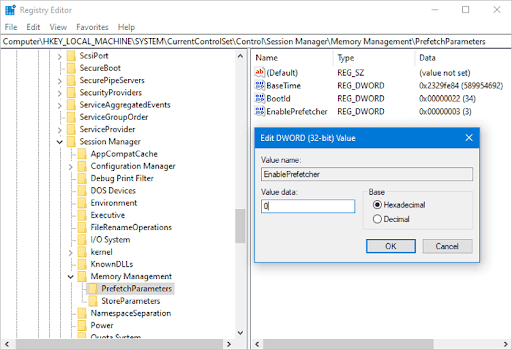
Once done, close the Registry Editor and restart your system, then go to the Task Manager and see if the service host Superfetch is still available and showing disk usage.
Method #3: Disable Superfetch with Command Prompt
- Click Windows Start > search for Command Prompt.
- On Windows 10 click “Run as administrator” (on other Windows OS, right-click the command prompt and select ‘Run as administrator)
- In the Command Prompt, type net.exe stop Superfetch > then press Enter.
- If the PC says the command above isn’t valid, type net.exe stop sysmain instead > and press Enter.
Wait a few minutes for the command to run and check your computer’s disk usage in Task Manager. The Superfetch high disk usage should be fixed.
Wrapping Up
We believe this tutorial has given you enough information about service host Superfetch and how to fix service host Superfetch's high disk usage, including how to disable Superfetch.
If you enjoyed reading this article, share it with your friends, colleagues, and family. Return to us for more informative articles all related to productivity and modern-day technology!
If you need any further help, just reach out to our customer service team, available 24/7 to assist you.
We also have promotions, deals, and discounts on our products for the best price. Would you like to receive these great deals? Please subscribe to our newsletter by entering your email address below! Receive the latest technology news in your inbox and be the first to read our tips to become more productive.
You may also like
> How to Check for Affected Programs & Drivers When You System Restore
> What's system interrupts and how to fix it
> Fix: Cortana Won't Close In Windows 10