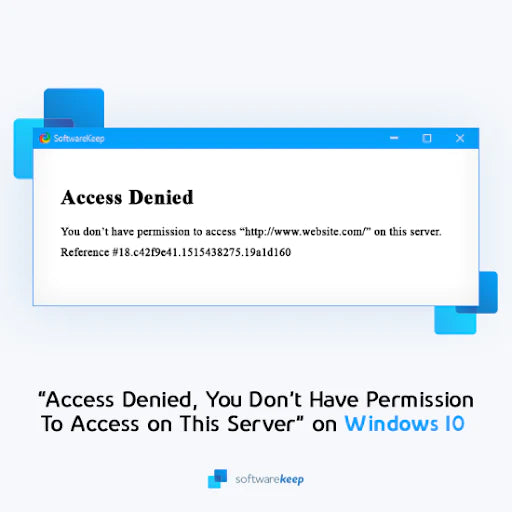
The “Access Denied” error appears when your browser uses different proxy settings or VPN instead of what's really set on your Windows 10 PC. Thus, when a website detects that there is something wrong with your browser cookies or your network, it blocks you and this is why you can't open it.
Windows 10 users – we’ve all been there. You’re working on your computer and suddenly you get an error message that says “Access Denied, You don’t have permission to access this server”. There could be a number of reasons this is happening including the server was taken down, the URL has changed, or the host may have disabled access from a VPN.
No matter what the reason is, it can be frustrating not being able to access certain websites when you need them most. Here are some tips on how to fix this issue so you can get back to work with ease.
Table of Contents
- Solved: Access Denied, You Don’t Have Permission To Access on This Server
- Method 1. Forget the Website in Firefox
- Method 2. Delete the Site Data of a Specific Website in Chrome
- Method 3. Turn Off Your VPN Extension
- Method 4. Disable Proxy Server in Windows 10
- Method 5. Download a Premium VPN
-
Method 6.
Use a Residential Proxy (if VPNs are blocked)
- Method 7. Reset the Browser
- Final Thoughts
Solved: Access Denied, You Don’t Have Permission To Access on This Server
There are a number of things you can try to recover from this pesky error. The solution that’ll work for you is mainly dependent on what caused the error in the first place. For example, when using the Firefox browser, a website might block you when you have a VPN activated. This happens because the site thinks something is wrong with your proxy or browser cookies.
So, what can you do to restore a website affected by the “Access Denied” error? Let’s review our options, and then jump right into troubleshooting. You can try:
- Clearing your browser cookies and history
- Turning off VPN and VPN extensions
- Disabling your proxy
- Switching to a premium VPN service
- Resetting your browser data
The step-by-step guides below will help you get past whatever might stand between you and your favorite website!
Method 1. Forget the Website in Firefox
It appears that this error is the most common in Mozilla Firefox. If you’re using this browser, there’s a handy button to forget a single website, which may help solve your issues without having to clear other data.
- Open Mozilla Firefox, and then use the Ctrl + H keyboard shortcut to open the History tab.
-
Find the website causing the “Access Denied” error from your browsing history. Select it by clicking on it once, and then choose to Forget About This Site from the context menu.
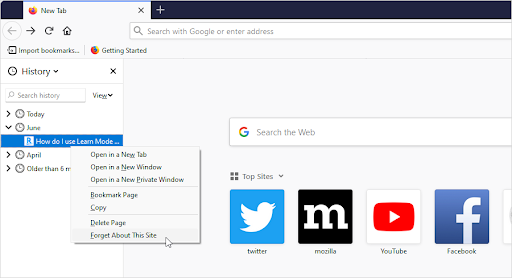
- Refresh the website, or navigate to it again and see if you’re still getting the error message.
Method 2. Delete the Site Data of a Specific Website in Chrome
Google Chrome has a similar option to Firefox, which allows you to clear cookies from just a single website. If you’re not having other issues, it might be best to perform this method before deleting all of your browsing data in one sweep.
-
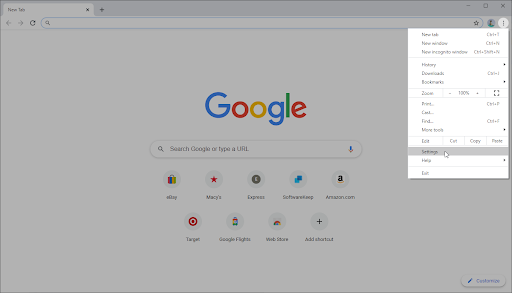
In Google Chrome, click on the More icon (displayed by three dots arranged vertically) and choose Settings.
-
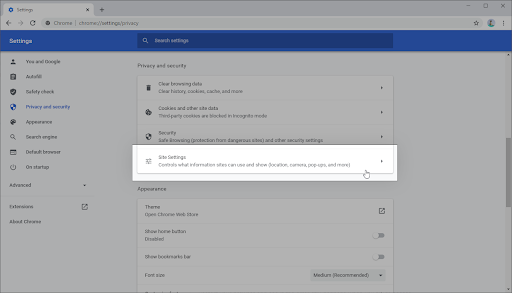
Click on Privacy and security from the menu on the left, and then click on Site settings.
-
Click on Cookies and site data, and then select the See all cookies and site data option. You’ll see a list of all of your cookies appear shortly after.

-
Search for the domain of the problematic website. Click on the Delete button next to the shown cookies.
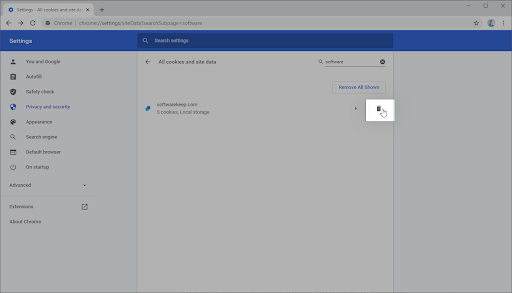
- Restart your browser and see if the error still happens when you try to access the website.
Method 3. Turn Off Your VPN Extension
VPNs can cause some unexpected issues despite being extremely useful in other areas. Things can happen whether you’re using a VPN on your computer itself, or a VPN extension in your browser. To ensure your VPN isn’t causing the “Access Denied” error, temporarily disable it.
Disable VPN Extensions in Google Chrome
- In Google Chrome, click on the More icon (displayed by three dots arranged vertically) and choose More tools → Extensions.
- Alternatively, you can get to the Extensions page by typing chrome://extensions into your address bar.
-
Find your VPN extension. In the bottom-right corner of the extension box, you’ll see a toggle. Make sure that the VPN is toggled off.
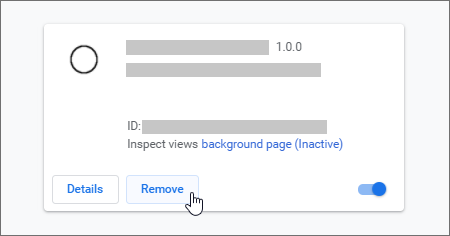
- To entirely uninstall your VPN extension, you can also click on the Remove button. Keep in mind that you’ll have to re-install the extension to use it again.
Disable VPN Extensions in Firefox
- In Mozilla Firefox, click on the menu button, and then select Add-ons and Themes from the context-menu.
-
Switch to the Extensions tab. Locate your VPN extension, and then use the toggle to turn it off temporarily.
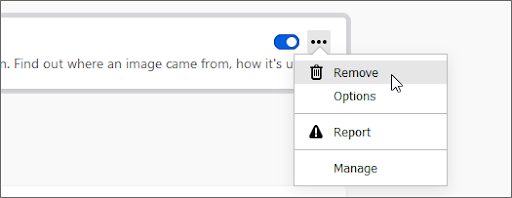
- To uninstall a VPN extension you don’t want to keep on your device, click the More actions button and select Remove from the context-menu.
Disable VPN Extensions in Microsoft Edge
- In Microsoft Edge, type the following link into your address bar: edge://extensions/
-
Find any VPN extension you want to turn off, and then click on the toggle so it’s greyed out and disabled.
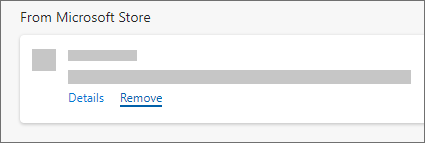
- You can uninstall a VPN extension from Edge by clicking on the Remove link underneath the extension’s name and details.
Disable VPN Extensions in Opera
-
In Opera, click on the Main menu near the top-left corner, and then navigate to Extensions → Extensions.

- Find your VPN extension and disable it with the toggle button. Alternatively, click the X button near the top-right corner to uninstall it.
Method 4. Disable Proxy Server in Windows 10
You might be using a proxy server for your LAN. In this case, we recommend turning the feature off to test whether or not the issue was caused by the configuration.
- Open the search bar in your taskbar by clicking on the magnifying glass icon. You can also bring it up with the Windows + S keyboard shortcut.
- Type in Internet Options and click on the first search result. Switch to the Connections tab once the pop-up window shows up, and then click on LAN Settings.
- Once in the Local Area Network (LAN) Settings window, deselect the Use a proxy server for your LAN option if it’s currently turned on. If the option is not ticked, your issue is not related to the proxy server.
- Check if the website will load after disabling this option. If the error was caused by network traffic filtered by a proxy, you might be able to get on now.
Method 5. Download a Premium VPN
Users with a freeware VPN may experience poor connection and limited features. However, premium VPN services get around these problems with ease. While it will cost you some money to get started, it’s definitely worth switching to a well-endorsed VPN for your own comfort and safety.
It might be hard to find the perfect, most suitable VPN for you and your personal browsing needs. Here are some of the top-selling services we recommend using:
- Surfshark VPN
- NordVPN
- ExpressVPN
After making your purchase and installing the VPN, try and access the website you’re getting the “Access Denied” error on. The best VPNs are definitely worth the investment. Premium services come with a lot of benefits, like unlimited bandwidth and more robust security features that will keep you safe when browsing on public WiFi hotspots or video chatting!
Method 6. Use a Residential Proxy (if VPNs are blocked)
If a site is still showing “Access Denied” even after you’ve tried a VPN, a residential proxy can help. Unlike datacenter proxies or many VPN IPs that are easy for websites to fingerprint and block, residential proxies route your traffic through IP addresses supplied by real Internet Service Providers (ISPs). Because these look like ordinary home connections, they’re less likely to trigger automated blocks caused by suspected VPNs, shared IPs, or unusual geolocation.
Recommended providers
- Webshare
- Oxylabs
Like a VPN, residential proxies help with region matching and reducing “Access Denied” errors. Unlike a VPN, they don’t encrypt all your traffic by default, can be slower than direct connections, and often charge per GB. Use them responsibly, match the site’s region, and always follow the site’s Terms of Service.
Method 7. Clear Your Browser Data
Try to clear your browser data before moving on to more drastic steps. Clearing browser data will allow you to keep custom settings intact, but will remove your cookies and history.
Clear Browser Data in Google Chrome
-
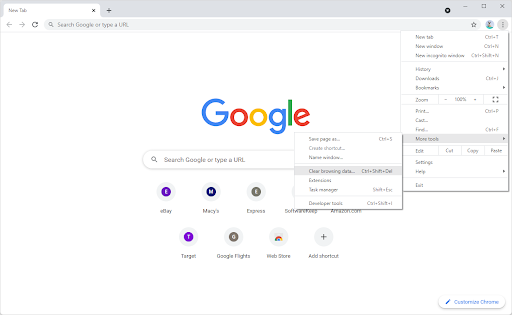
Open Google Chrome, then click on the More icon, displayed by three dots arranged vertically. Hover over More Tools, and then select Clear browsing data.
-
Make sure the Time range is set to All time. Tick the following options: Browsing history, Cookies, and other site data, and Cached images and files.
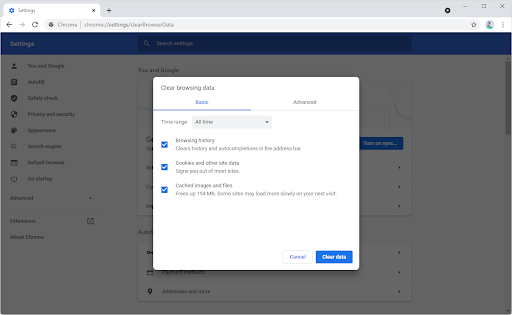
- Click on the Clear data button.
- After the process is over, restart Google Chrome and see if the error is still appearing when you try to access the website.
Clear Browser Data in Mozilla Firefox
-
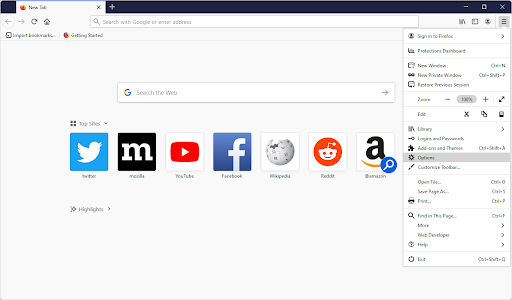
Open Firefox. In the upper right-hand corner of the browser, click the menu and click the Options setting. Alternatively, you can type about: preferences into the address bar and hit Enter.
-
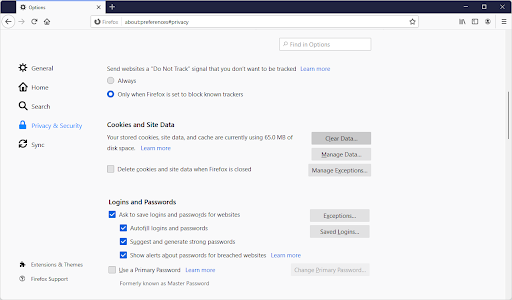
Switch to the Privacy & Security tab. Scroll down until you reach the cookies and site data section. Here, click on the Clear Data… button.
-
Select Cookies and Site Data. You can also delete the cache if you want to make some space on your computer, but this option is not necessary for troubleshooting.
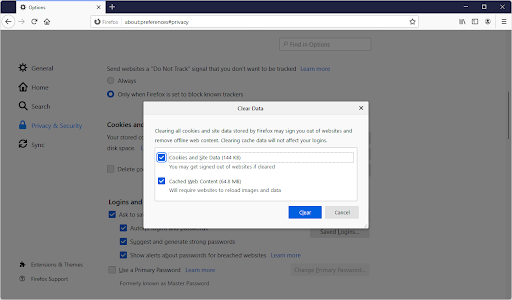
- Click on the Clear button. Once the clearing is complete, try to access the problematic website again. The error might’ve been solved by this process.
Clear Browser Data in Microsoft Edge
-
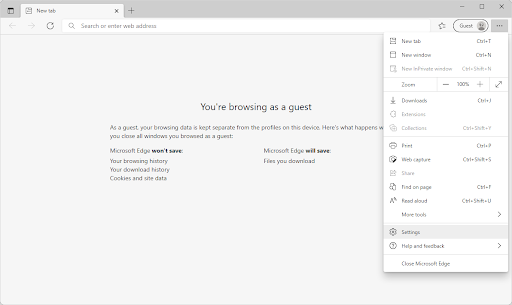
Launch Microsoft Edge. Click on the menu icon in the top-right, and then click on Settings. You can also type edge://settings into the address bar, and press the Enter key.
-
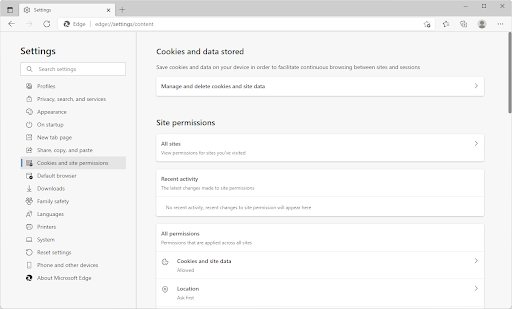
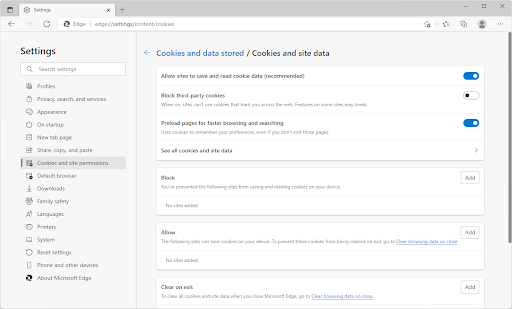
Switch to the Cookies and site permissions tab. Here, click on the Manage and delete cookies and site data button on the top of the page.
-
Click on the See all cookies and site data button. You’ll once again be redirected to a new page.
-
Click on the Remove all button. A pop-up message will show up on the screen. Read the warning, and then proceed by clicking on the Clear button.
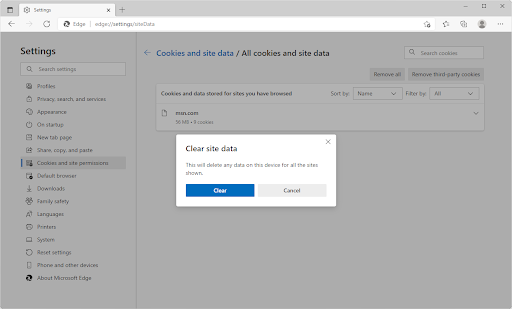
- Check if you’re able to access the website giving you the “Access Denied” error previously.
Method 8. Reset the Browser
If nothing else has worked, try to reset your browser to its default settings.
How to Reset Google Chrome
-
Open Google Chrome, then click on the More icon, displayed by three dots arranged vertically. Click on Settings.
-
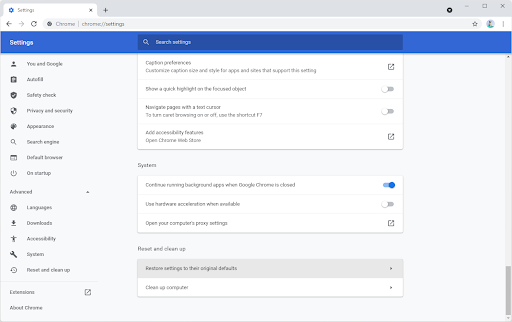
Scroll down to the bottom of the page, and expand the Advanced settings. Scroll down to the bottom again, and then click Restore settings to their original defaults.
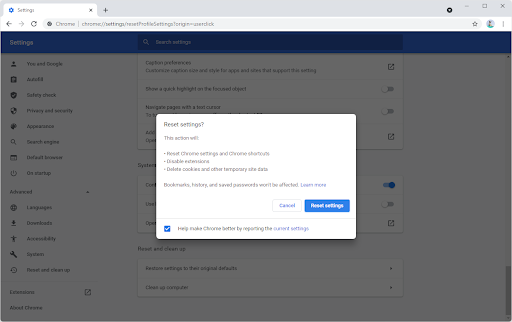
- Read the warning, and then click the Reset settings button if you agree to have your browser restored to the default configuration.
How to Reset Mozilla Firefox
-
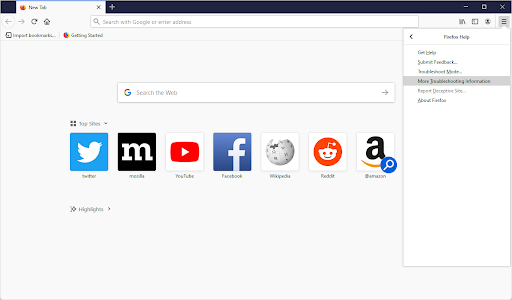
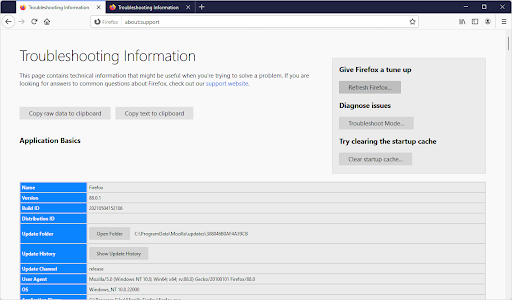
Open the Firefox menu with the icon in the upper right corner, and then click on Help. Next, click on More Troubleshoot Information. Alternatively, you can type about: support into the address bar and press Enter to be redirected.
-
Click on the Refresh Firefox button.
-
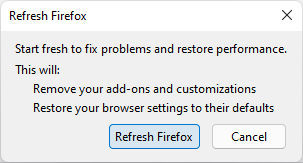
Read the pop-up warning, and then press Refresh Firefox again if you wish to proceed. After the process has concluded, try and see if you’re able to access the website.
How to Reset Microsoft Edge
- Press the three dots in the top-right corner to open the menu, and then click on Settings from the available options.
-
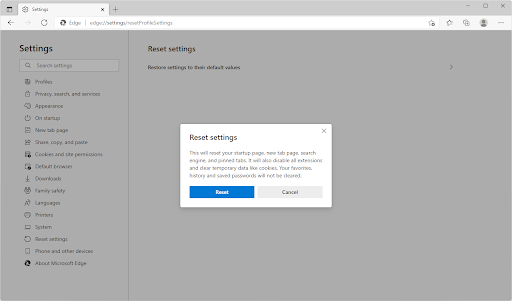
Switch to the Reset Settings tab. Here, click on the button that says Restore settings to their default values. In the pop-up window, confirm your choice after reading the information.
- Allow some time for Edge to reset. When it’s done, navigate to the website with the “Access Denied” error to see if it’s been resolved.
Final Thoughts
As we’ve discussed, there are a number of reasons you might be receiving an Access Denied error. Thankfully, you can remedy most of them with minimal effort on your part. In the event that they cannot, our experts will help to find a solution for you — so don’t hesitate to reach out! We hope these tips have been helpful and would love to hear from you if something here has helped solve your problem.
Have any other trouble accessing websites? Let us know! Our Help Center and Blog offer plenty of tips and tricks like the ones above, which will help make sure you never have an issue again when trying to access certain sites online.
If you want more information about this issue or other computer problems, sign up for our newsletter. Get promotions, deals and discounts from us right in your inbox. Subscribe with your email address below.
You May Also Like
» What Is the “A Web Page Is Slowing Down Your Browser” Warning in Firefox?
» Which Web Browser Should You Be Using in 2021?
» Save Hundreds of Dollars With These Google Chrome Extensions
