Fallout 4 is one of the most popular games around, and it’s easy to understand why. From its intense post-apocalyptic setting to its gripping story and characters, Fallout 4 offers a truly unique gaming experience that millions of gamers have enjoyed since its release in 2015.
Unfortunately, some players have experienced an issue where Fallout 4 crashes on startup. This can be incredibly frustrating as you attempt to play the game only for it to crash immediately after launching. Fortunately, there are several solutions available that you can use to fix this issue so that you can get back into your game quickly and easily.
In this article, we will discuss what causes Fallout 4 to crash on startup and provide instructions for fixing them. We will also offer tips and tricks for avoiding future crashes so that you can enjoy a smooth gaming experience with no interruptions or frustrations!
Table of Contents
- What Causes Fallout 4 to Crash on Startup?
- How to Fix Fallout 4 Crashing on Startup
- Check the System Requirements
- Remove Your Mods
- Verify the Integrity of Game Files
- Launch Fallout 4 As Administrator
- Restore Fallout 4 .INI File
- Change Display Mode to Borderless Windowed
- Update Your Drivers
- Change Your DNS Settings
- Reinstall Fallout 4
What Causes Fallout 4 to Crash on Startup?
There are several reasons why Fallout 4 might crash on startup. This includes common issues such as outdated drivers, compatibility problems, and hardware conflicts. We will discuss each of these causes in more detail below.
- System requirements - If your computer does not meet the minimum system requirements for Fallout 4, the game will likely crash on startup.
- Outdated drivers - Outdated drivers can cause compatibility problems and lead to the game crashing on startup.
- Mods - If you installed any mods before launching the game, it could lead to Fallout 4 crashing on startup. Mods modify the game and can lead to unexpected issues and conflicts.
- Corrupted game files - If any of the game files are damaged, it can cause the game to crash on startup. You can try verifying the integrity of the game files through your Steam to fix the issue.
Using the list above, you can identify a possible cause of your issue and take steps to fix it. With the instructions below, you’ll be able to get back into Fallout 4 in no time!
How to Fix Fallout 4 Crashing on Startup
Now that we’ve discussed the causes of this issue, let’s look at how you can fix it. Make sure to create a backup of your save data, so that you don’t lose any progress if the issue persists. Here are some of the steps that you can take to solve this problem:
1. Check the System Requirements
Games like Fallout 4 require specific hardware and software to run properly. Make sure that your computer meets the minimum system requirements for the game so that it can run without any issues. You can use a service such as Can You RUN It to automatically detect if your PC meets the minimum requirements.
Alternatively, you can check and verify the requirements manually. Here are the recommended system requirements for Fallout 4:
- OS: Windows 7/8/10/11 (64-bit)
- Processor: Intel Core i5-2300 2.8 GHz/AMD Phenom II X4 945 3.0 GHz or equivalent. Requires a 64-bit processor.
- Memory: 8 GB RAM
- Graphics: NVIDIA GTX 550 Ti 2GB/AMD Radeon HD 7870 2GB or equivalent
- Storage: 30 GB available space
These system requirements are necessary for the game to run smoothly, so make sure that your computer meets all of them. If you don’t meet the minimum requirements, you will need to upgrade your hardware or find a cloud gaming provider in order to run Fallout 4.
2. Remove Your Mods
Mods are popular in the Fallout 4 community as they aim to improve the game or add new features. However, mods can cause unexpected issues and conflicts that can lead to the game crashing on startup. If you installed any mods before launching the game, we recommend removing them as they could be causing this issue.
Fallout 4 mods are stored in the “C:\Program Files\Steam\steamapps\Common\Fallout 4\Data” folder by default. To remove the mods entirely, delete this folder and launch Fallout 4 again. It should run without any issues.
Alternatively, you can move all of your mods out of the folder and place them back in one by one, then try launching the game before adding the next mod. This will help you identify which mod is causing the issue and you can remove it accordingly.
3. Verify the Integrity of Game Files
Steam allows you to verify the integrity of your game files to check if any of them are damaged or corrupted. This includes all of the core files and assets that Fallout 4 needs to run properly. If any of these files are damaged, you will need to replace them through Steam in order to fix this issue.
To do this, follow the steps outlined here:
-
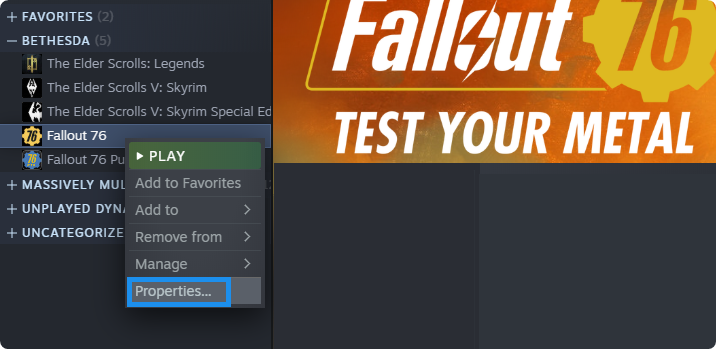
Launch Steam and go to the “Library” tab. Here, right-click on Fallout 4 and select “Properties” from the context menu.
-
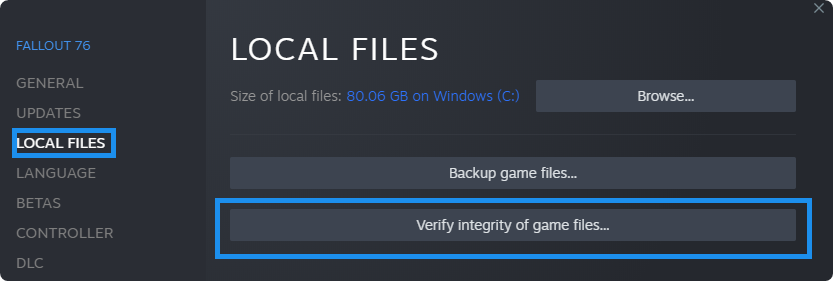
Switch to the “Local Files” tab in the new window, and then click the “Verify integrity of game files” button.
- Wait for Steam to verify your files. This may take up to several minutes. When Steam finishes the process, try and launch Fallout 4 and see if the game crashes again.
4. Launch Fallout 4 As Administrator
In some cases, users have reported that launching Fallout 4 as an administrator helps to fix startup crashes. To do this, right-click on the game’s executable and select “Run as Administrator”. Keep in mind that you need to have access to an administrator account in order to do this.
Once you’ve done that, the game should launch without any issues. If none of these steps have worked for you, you may need to try reinstalling the game or performing a clean boot on your PC.
5. Restore Fallout 4 .INI File
If you're experiencing issues with Fallout 4, try restoring the game's .INI file to its default state. This is a common solution to many problems, including file corruption and conflicts with your settings. Here's how to restore your Fallout 4 .INI files to their defaults:
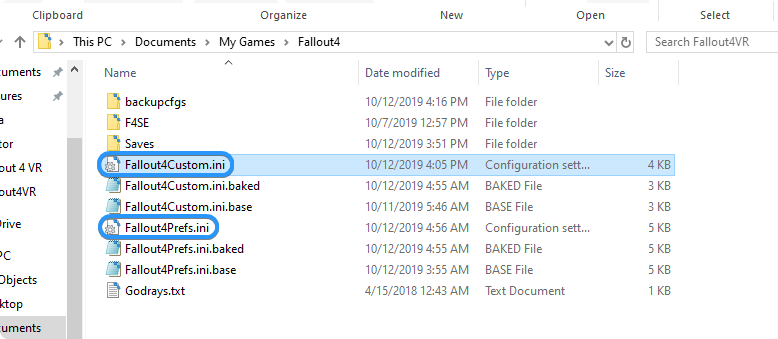
- Open File Explorer and go to the folder you installed Fallout 4 into. By default, the location should be “C:\Users\Username\Documents\my games\Fallout4” (replace Username with your local user.)
-
Look for the following files: “Fallout4.ini,” “Fallout4Custom.ini,” and “Fallout4Prefs.ini.” Select all of them by clicking on them while holding the Alt key on your keyboard.
- Delete these files by right-clicking on them and selecting “Delete” from the context menu. This will remove all of your game settings.
- Start Fallout 4 and wait for Steam to replace the files, or verify the game's integrity using the solution above. See if the issue has been resolved.
By resetting your game settings and restoring the default .INI files, you can often solve many problems with Fallout 4. Keep in mind that this will remove any custom settings you may have added, so be sure to back up your files before deleting them.
6. Change Display Mode to Borderless Windowed
A few users have found a workaround for this issue by running Fallout 4 in Borderless Windowed mode, instead of Fullscreen or Windowed. To change the display mode without having to launch the game itself, follow these steps:
- Open the Fallout 4 launcher. You can do this by double-clicking the game icon on your desktop or through your gaming platform.
- Once the launcher is open, click on the "Options" button in the lower right corner.
-
Check both the "Windowed Mode" and "Borderless" checkboxes. Click "OK" to save your changes.
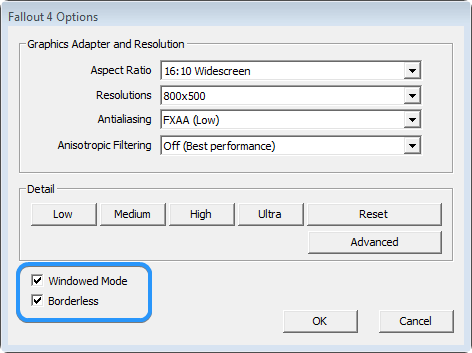
- Launch the game and see if the crash still persists with the new settings.
7. Update Your Drivers
Outdated drivers can cause more issues than many gamers realize. For example, if your GPU drivers are outdated, Fallout 4 will struggle to run at its best and may even crash on startup. To make sure that this isn't the issue, you need to update your GPU drivers.
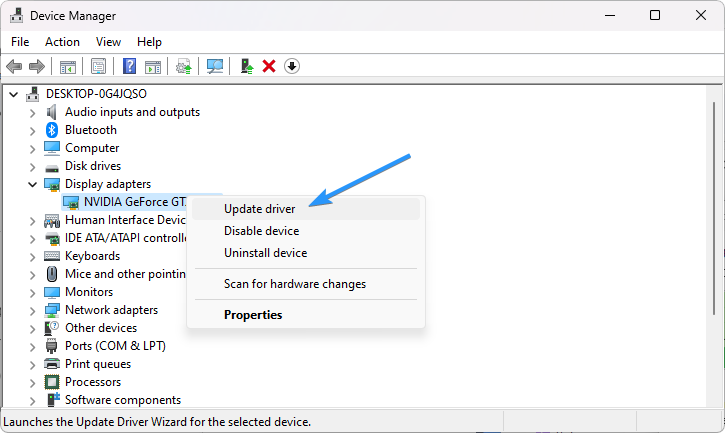
Update drivers in Device Manager
The Device Manager includes a quick and easy way to automatically update your drivers. This method may not work for every driver out there, but you can update a vast majority of your driver software using these steps:
-
Press the Win + X keys on your keyboard, and then select "Device Manager" from the menu.
-
Expand the “Display adapters” to see your graphics card. Locate the device that you want to update the driver for, and then right-click on it, and select "Update driver" from the context menu.
-
Select "Search automatically for updated driver software."
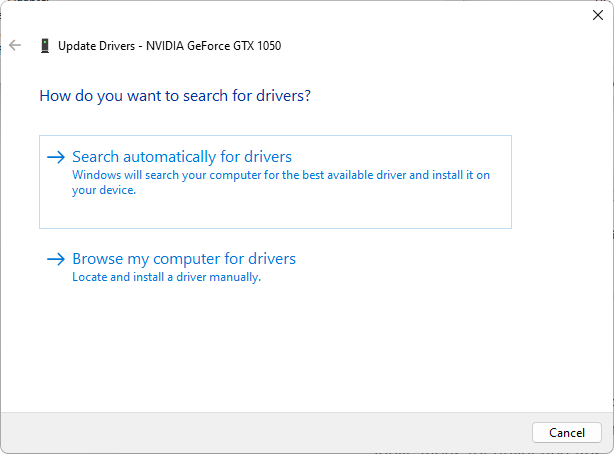
- Windows will now search for an updated driver for your device. If it finds one, it will automatically download and install it.
Update drivers manually
Typically, your graphics card (GPU) drivers will need to be updated manually by going to the manufacturer’s website. Some major brands like Intel and Nvidia create their own applications for driver updates, such as the Intel Driver & Support Assistant and the Nvidia GeForce Experience apps.
These apps are safe to download and install, and won’t slow down your computer at all. Download the right software for your graphics card and allow it to update your drivers automatically!
Update drivers with Windows Update
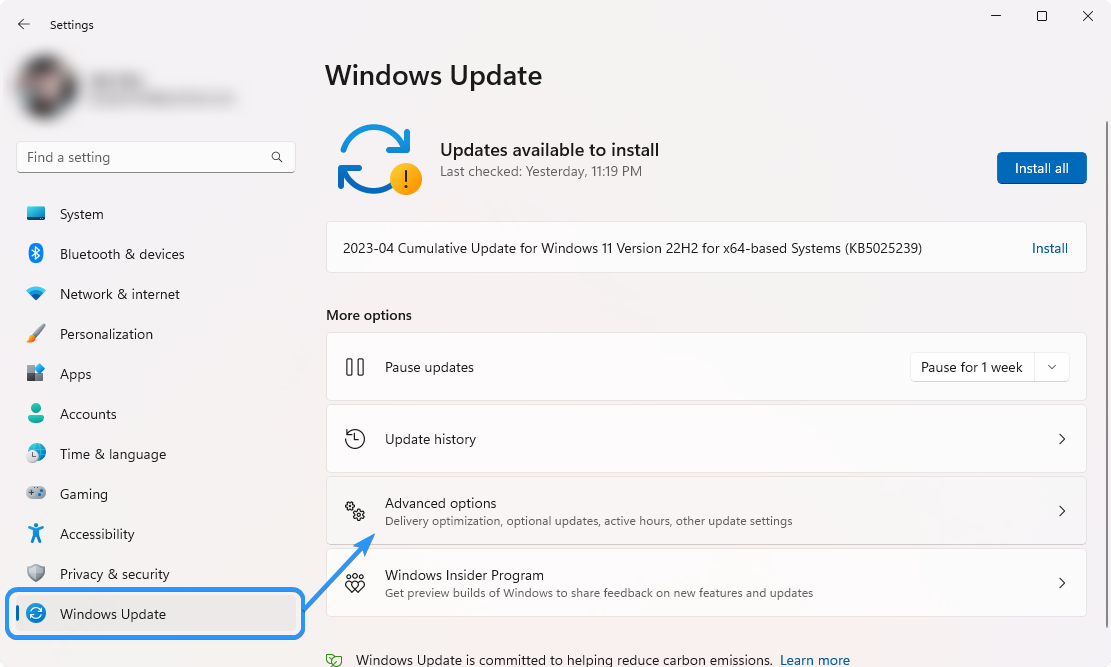
In Windows 11, you have the option to update your drivers through Windows Update. This makes it so you don't have to search for and download driver updates manually. To do this, follow these steps:
- Open the Start menu and select Settings. You can also press the Win + I shortcut on your keyboard to open the Settings app.
-
Select “Windows Update” using the menu on the left, and then click on “Advanced Options.”
-
Scroll down, and then click on “Optional Updates.”

-
Next, expand the available “Driver updates” by clicking on the arrow icon to the right. Select all of the available updates for your drivers, and then click on the “Download & install” button.
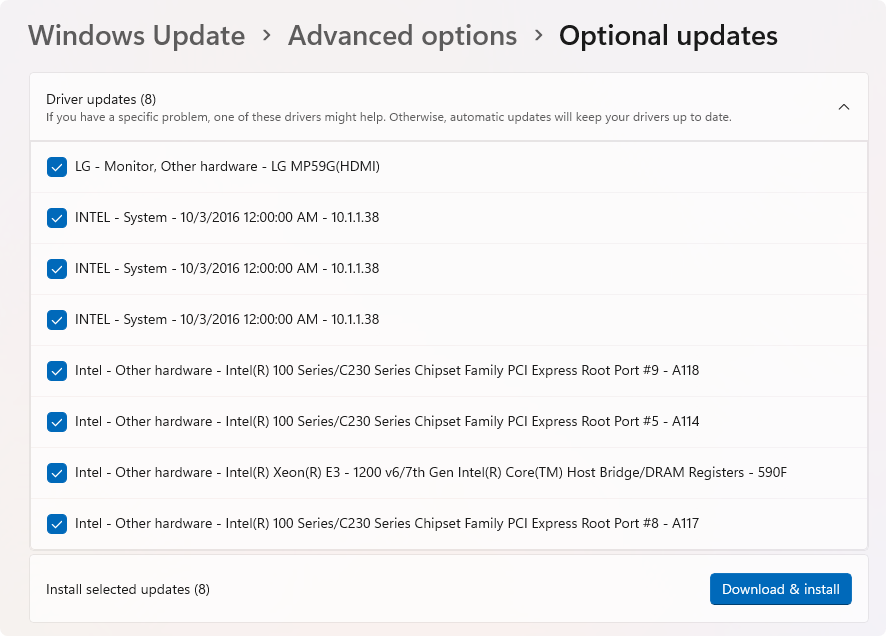
Windows will automatically download and install the updates for you. Once the installation is complete, you may be prompted to reboot your computer.
8. Change Your DNS Settings
In some cases, Fallout 4 crashing on startup is tied to a server issue. If this happens to you, changing your DNS settings is an easy solution. To do this, follow these steps:
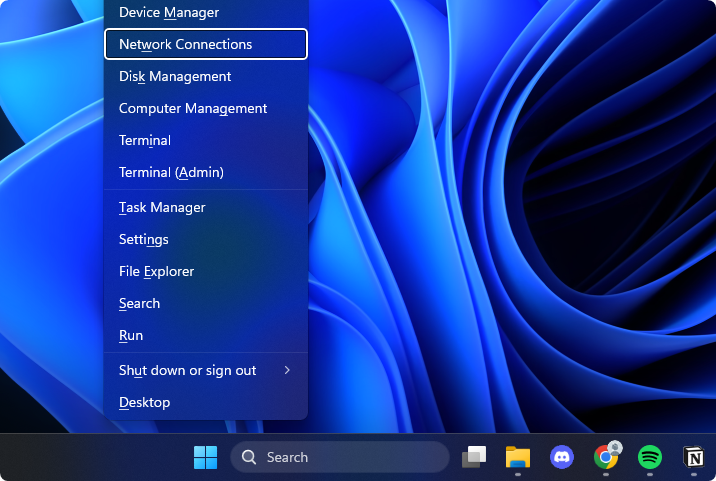
-
Press the Windows + X keys on your keyboard, and then click “Network Connections” from the context menu.
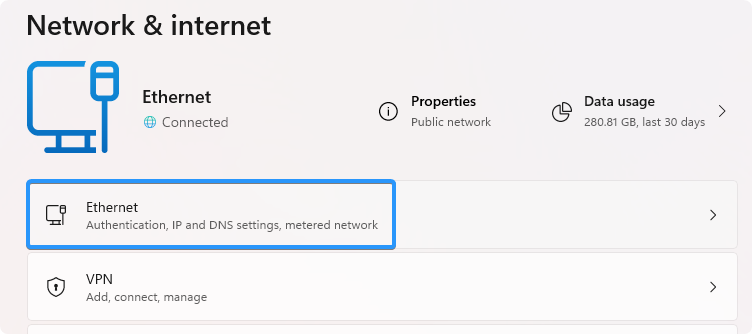
-
First, you need to select your current internet connection. For example, you’ll see something like “Wi-Fi” or “Ethernet” depending on whether you’re using a wired or wireless connection.
-
Find the DNS server settings, and click on the “Edit” button. This will bring up a new window.

-
Select “Manual” from the first drop-down menu. Doing so will allow you to make changes to your DNS settings.
-
Next, toggle the “IPv4” option to the “On” position. You have some choices for what DNS server you want to use:
- To use Google’s DNS server, type “8.8.8.8” as the Preferred DNS server and “8.8.4.4” as the Alternate DNS server.
- Alternatively, type “1.1.1.1” into the first row, then “1.0.0.1” into the second row. This will change your DNS to the popular Cloudflare DNS server.
- You can also use OpenDNS if you type “208.67.222.123” and “208.67.220.123” into their respective fields.
- Click the “Save” button and see if this resolved the issue.
9. Reinstall Fallout 4
If none of the solutions above have managed to fix the issue for you, your last resort is to reinstall Fallout 4. This will remove any corrupted files or settings that might be causing your game to crash on startup. Make sure to create a backup of any important files from the game's directory, such as your save data, screenshots, and mods. If you don't back these up, they will be lost when you uninstall the game.
Once you have created a backup, you can proceed to reinstall Fallout 4. To do this, follow the steps outlined below:
- Launch your Steam client, and switch to the “Library” tab.
-
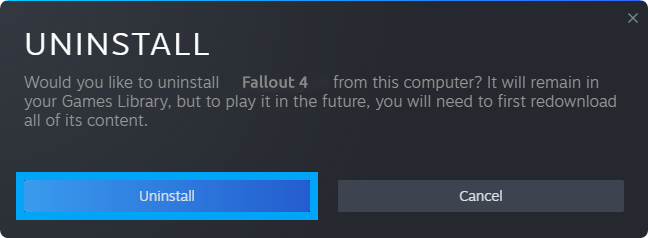
Find Fallout 4 from your list of installed games, and right-click on it once. Select “Manage” > “Uninstall” from the context menu and follow the on-screen instructions to remove it.
- After the game is removed from your system, click the “Install” button in Steam. This will download and install a completely fresh copy of the game.
Conclusion
Fallout 4 remains one of the best open-world role-playing games ever made, but it can be prone to crashing on startup. This can be incredibly frustrating for gamers, but luckily there are some solutions available that may help you fix the issue. In this article, we've provided several solutions to fixing Fallout 4 crashing on startup.
We hope you've found these tips helpful and that your game is now running smoothly. Enjoy exploring the wasteland of Fallout 4!
One More Thing
We’re glad you’ve read this article. :) Thank you for reading.
If you have a second, please share this article on your socials; someone else may benefit too.
Subscribe to our newsletter and be the first to read our future articles, reviews, and blog post right from your inbox. We also offer deals, promotions, and updates on our products and share them via email. You won’t miss one.
Related Articles
» Minecraft Won’t Launch on Windows? Here’s How To Fix It!
» How To Fix “Missing File Privileges” Error in Steam
» How to Optimize Windows 10 for Gaming and Performance