Microsoft Excel is regarded as the world’s most advanced and accessible spreadsheet app. With hundreds of features, incredible capabilities, and regular updates, learning all about Excel is definitely worth your time.

Jump to Tips to Become an Excel Mastermind
- 1. Learn to navigate the interface
- 2. Learn useful shortcuts
- 3. Study Excel’s formulas
- 4. Visualize key data
- 5. Freeze panes
- 6. Create charts and graphs
- 7. Make use of Macros
In this article, we broke down the 7 most important tips you need to focus on in order to become an Excel mastermind.
1. Learn to navigate the interface
What we love most about Excel is it’s easy to navigate interface. Just like other Office apps, Excel uses a ribbon header, broken down to different tabs that house functions in groups. This makes it easy to find just about any feature you’re looking for; and if you can’t locate something, just type in the “Tell me what to do” bar.

There are quite a few tips and tricks you can use when navigating around a spreadsheet as well. For example, pressing the Tab key on your keyboard will move your selection to the next cell in the column. Similarly, using the Enter key moves your selection down the row. If you want to get back to where you started, press the Ctrl and Home keys together.
2. Learn useful shortcuts
Excel has tons of keyboard shortcuts for you to take advantage of. If you want to become a true Excel master, you definitely need to start memorizing some of these — they will make your life a lot easier.
Check out our The Most Useful Excel Keyboard Shortcuts article to get started with Excel’s keyboard shortcuts.
3. Study Excel’s formulas
Formulas make Excel appealing to millions of users. Having the software do complex calculations allows you to automate just about all tasks regarding spreadsheets and data.
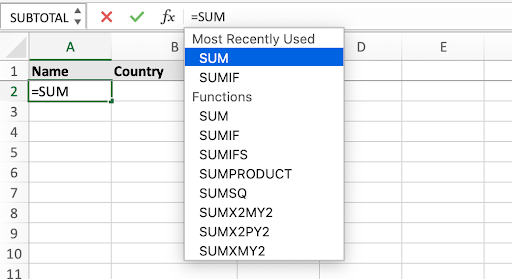
Formulas allow you to perform anything from basic calculations that add, subtract, multiply, and divide values to SUM, IF, VLOOKUP, COUNTIF, and CONCATENATE statements.
Once you get comfortable writing formulas, you’ll be miles ahead of what a beginner is capable of. We recommend looking into Microsoft’s official Overview of formulas in Excel page.
4. Visualize key data
Use conditional formatting to visualize key data, trends, and spot critical information at a glance. You’re able to create many different rules for conditional formatting that work in different situations.
Experts use conditional formatting to quickly spot valuable info at a glance. For example, you can set up a rule that turns a cell red once its value increases below a certain number, implying that sales are too low or a deadline has passed. There are countless possibilities for you to set up in conditional formatting, making it one of the most valuable tools in Excel.

To use conditional formatting, all you have to do is select the range of cells Excel should watch, then navigate to Home → Conditional Formatting. Here, select whichever option you want to use to begin the setup process.
5. Freeze panes
It’s easy to get lost in spreadsheets, especially large ones. To make things easier for yourself and your viewers, use the freeze panes feature. This allows you to lock headers and other labels on the screen, even if you scroll past them.
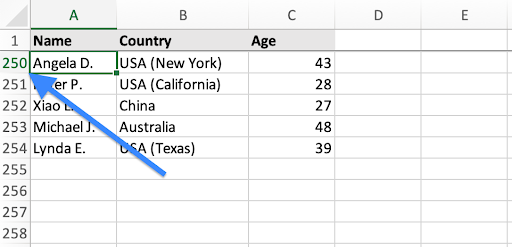
As seen in the image above, even on the 250th row, the headers are still visible. This is done via freezing the first row of panes. To freeze panes, go to View → Freeze Top Row. or Freeze First Column. If needed, you can combine both.
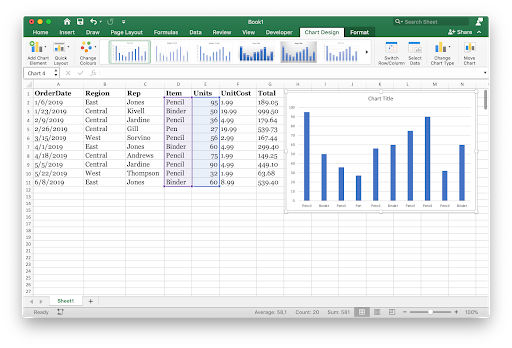
6. Create charts and graphs
Besides simple conditional formatting, you can create entire charts dedicated to showcasing your data in a visual medium. Excel comes equipped with many different types of charts, ranging from pie charts all the way to line charts. Just select the data you want to work with, click Insert in the ribbon, and choose the type you want to work with.
Excel offers more complex Pivot charts as well. If you want to learn how to make a Pivot chart, make sure to check out our 10 Steps to Make a Pivot Chart in Excel article.
7. Make use of Macros
Macros further automate tasks that otherwise require a lot of time just repeating the same things over and over again. Speed up your workflow by learning more about macros in Excel.
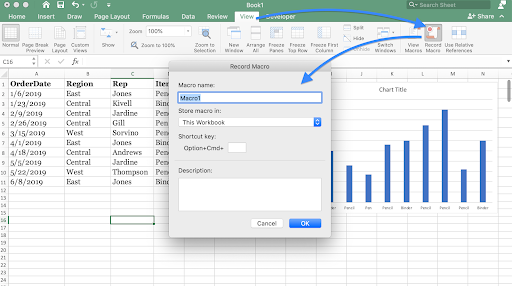
To get started with macros, record yourself performing Excel tasks by going to View → Macros → Record Macro in the ribbon. This will generate a “VBA” code and produce a macro. You can also download macro codes online, from websites such as Chandoo and ExcelChamps.
Final thoughts
Would you like to receive promotions, deals, and discounts to get our products for the best price? Don’t forget to subscribe to our newsletter by entering your email address below! Receive the latest technology news in your inbox and be the first to read our tips to become more productive.
Recommended Articles