
All Windows 10 users should be familiar with the login screen. It allows you to access your own personal user account or accounts, making even a shared computer feel like it’s yours. However, it can cause a lot of issues when the login screen doesn’t appear upon startup.
If you have no login screen, you may get locked out of your computer almost entirely. Don’t panic — we’re here to help. In this article, you can find out how to restore the login screen if it disappears from your Windows 10 device.
Tip: All of the methods in this article can be performed by anybody, as our guides are easy to follow and don’t require any previous Windows 10 experience. If you know anyone who’s experiencing issues with their system, don’t forget to recommend us!
Jump to:
- Guide to fixing the no login screen error
- Method 1: Restart your computer
- Method 2: Try Ctrl + Alt + Delete keyboard shortcut
- Method 3: Boot in Safe Mode
- Method 4: Disable fast startup
- Method 5: Turn off “Users must enter a username and password to use this computer”
- Method 6: Create a fresh user account
- Method 7: Rebuild MBR
- Method 8: Run the System File Checker
Guide to fixing the no login screen error
Just like most of Windows 10’s issues, there are many possible causes for your login screen to disappear. This also leads to many possible solutions, some more complex than others.
Note: You might be required to use an administrator account to be able to perform all of the steps described below. Don’t have access to an administrator account? Watch Global IT Resolution’s video titled “How to Create a New Administrator User Account in Windows 10.”
Below are several methods to try when your login screen doesn’t appear on Windows 10. You can find both general troubleshooting tips and guides written specifically for this issue.
Let’s get right into it!
Method 1: Restart your computer
Despite being one of the most used operating systems, Windows 10 still runs into mishaps that can be one-time problems. In these cases, the simplest action can go a long way.
If you don’t have a login screen when launching your computer, the first thing you should try is restarting the device. This method seems to work best when no file corruption is present and your system is in good condition.
While this may not work as effectively as other methods, there’s a possibility that this is a fast and easy solution for you. If you still have no login screen when your computer boots up, make sure to continue reading and testing a different method.
Method 2: Try Ctrl + Alt + Delete keyboard shortcut
Another solution that people have reported to work in a large number of cases is simply using the Ctrl + Alt + Delete keyboard shortcut. Many users have confirmed that pressing these keys simultaneously brings the login screen back.
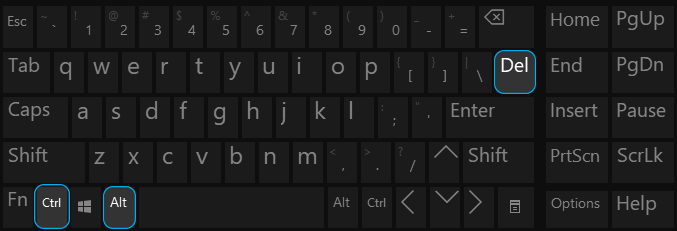
Once the login screen appears, you can input your password and begin using your device as if nothing happened. However, if you don’t see the login screen even after pressing those buttons, proceed to the next section.
Method 3: Boot in Safe Mode
The fundamental key to fixing this issue is accessing your computer. To do this, you can try to boot Windows 10 in Safe Mode, which gives you access to your core system.
Here’s what you need to do to boot Windows 10 in Safe Mode.
- Turn off your device, then press the power button to turn it back on. As soon as you see that Windows 10 is starting, hold the power button until your device shuts down again. Repeat this process until you enter winRE.
-
When in the winRE interface, you should see the “Choose an option” page. Here, navigate through Troubleshoot → Advanced options → Startup Settings → Restart.
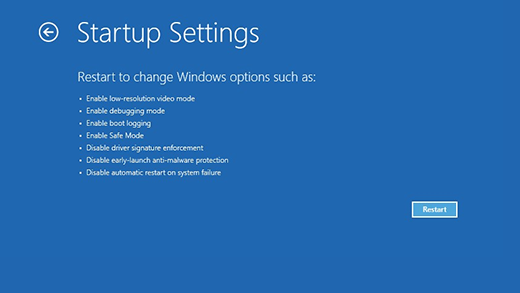
- Your device should automatically restart itself. The next time it boots up, you’ll see a list of options. Choose option 5 from the list for Safe Mode.
Method 4: Disable fast startup
While the fast startup is generally a good feature of Windows 10, it may cause issues on your device. This is due to the fact that Windows 10 essentially skips over some things in order to boost your boot speed.
You can easily disable this from the Settings. Here’s what you need to do:
- Boot Windows 10 in Safe Mode. You can find the detailed steps in Method 3.
-
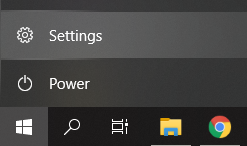
Click on the Windows icon in your taskbar to bring up the Start menu. Here, choose “Settings”. You can also use the Windows + I keyboard shortcut.
-
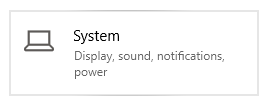
Click on the “System” tile.
-
Switch over to the “Power & sleep” section using the menu on the left pane.

-
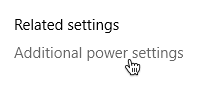
Click on the “Additional power settings” link. This should either be located at the bottom of the page, or in the right-side panel.
-
Next, click on the “Choose what the power button does” or “Choose what the power buttons do” link, depending on how many power buttons your computer has.

-
Click on the “Change settings that are currently unavailable” link. This will allow you to make adjustments to your power settings.

-
Make sure to remove the checkmark from “Turn on fast start-up (recommended).” When this option is unchecked, your device will boot up normally.

- Click the “Save changes” button to finalize the modification, then attempt to restart your computer. You should immediately be able to see whether or not your login screen is restored.
Method 5: Turn off “Users must enter a username and password to use this computer”
Many users have reported that simply removing the need to log into your account with a password can save their computer from total destruction. This solution mostly works for private computers, as it could cause issues to allow multiple users to log in to any local account.
- Boot Windows 10 in Safe Mode. You can find the detailed steps in Method 3.
-
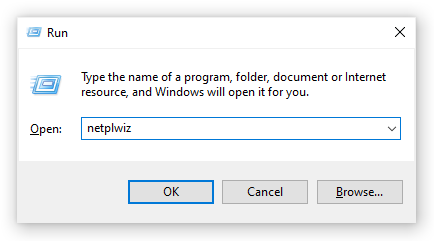
Press the Windows + R keys on your keyboard simultaneously to bring up the Run application. Click into the input field and type in the word “netplwiz” then press the OK button.
-
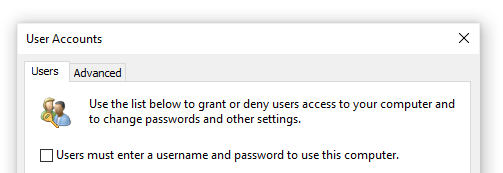
Uncheck the “Users must enter a username and password to use this computer” option.
- Click OK then restart your computer. You should immediately be able to see whether or not your login screen is restored.
Method 6: Create a fresh user account
It’s a possibility that your current user account was corrupted. This means that you need to migrate to a new, fresh account in order to restore the login screen. Whenever you create a new account on your local machine, it starts with new and untouched settings, allowing you to test issues related to user accounts.
Here’s how you can create a new user on Windows 10.
- Boot Windows 10 in Safe Mode. You can find the detailed steps in Method 3.
- Click on the Windows icon in your taskbar to bring up the Start menu. Here, choose “Settings”. You can also use the Windows + I keyboard shortcut.
-
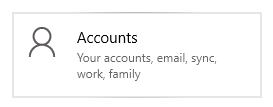
Click on the “Accounts” tile.
-
From the left side menu, choose “Family & other users.” Here’s where you can see all of the users' accounts on a computer.

-
Scroll down until you see “Other users.” Here, click on the “Add someone else to this PC” button.

-
The quickest way of creating a new account is doing it offline. For this, select the “I don’t have this person’s sign-in information” link.

-
Now, click “Add a user without a Microsoft account”.

-
Input all the required information, such as a name, password, and security questions. When done, click the Next button to finish adding a new user.

Method 7: Rebuild MBR
- Turn off your device, then press the power button to turn it back on. As soon as you see that Windows 10 is starting, hold the power button until your device shuts down again. Repeat this process until you enter winRE.
-
Navigate to Troubleshoot → Advanced options → Command Prompt.
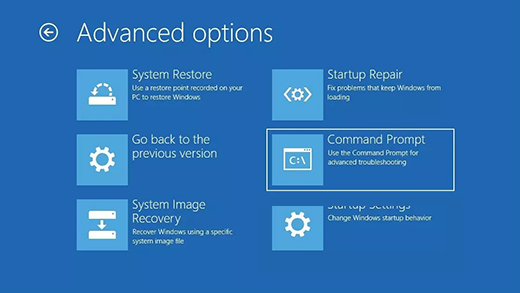
- Execute the following 3 commands, pressing the Enter key in-between each one:
- bootrec /fixmbr
- bootrec /fixboot
- bootrec /rebuildbcd
- Restart your computer. You should immediately be able to see whether or not your login screen is restored.
Method 8: Run the System File Checker
The System File Checker is a tool available in Windows 10 by default. It’s also called an “SFC scan,” and it’s your quickest way to automatically fix corrupted system files and other issues.
Here’s how to run it.
- Boot Windows 10 in Safe Mode. You can find the detailed steps in Method 3.
-
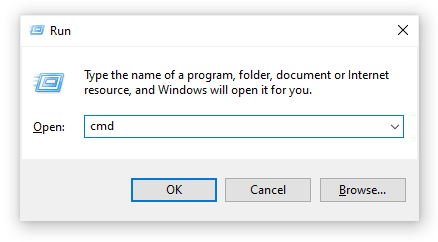
Press the Windows + R keys on your keyboard to launch the Run utility. Type in “cmd” and press Ctrl + Shift + Enter. This is going to open the Command Prompt with administrative permissions.
- If prompted, make sure to allow the Command Prompt to make changes on your device. This means that you might need an administrator account.
-
Type in the following command and press Enter: sfc /scannow.

- Wait for the System File Checker to finish scanning your computer. If it finds any errors, you’ll be able to fix them automatically through the SFC command itself, which may also fix related errors.
We hope that this article was able to help you restore your login screen in Windows 10. You should be able to use all of your local accounts now. If you notice that the login screen goes missing again, feel free to return to our article and try out some different methods!
Are you interested in learning more about Windows 10? You can browse our dedicated Help Center section for related articles.
If you’re looking for a software company you can trust for its integrity and honest business practices, look no further than SoftwareKeep. We are a Microsoft Certified Partner and a BBB Accredited Business that cares about bringing our customers a reliable, satisfying experience on the software products they need. We will be with you before, during, and after all the sales.