Knowing how to screenshot on Mac isn’t something to ignore. You’ll need the knowledge every so often. And it’s easy, just hidden.
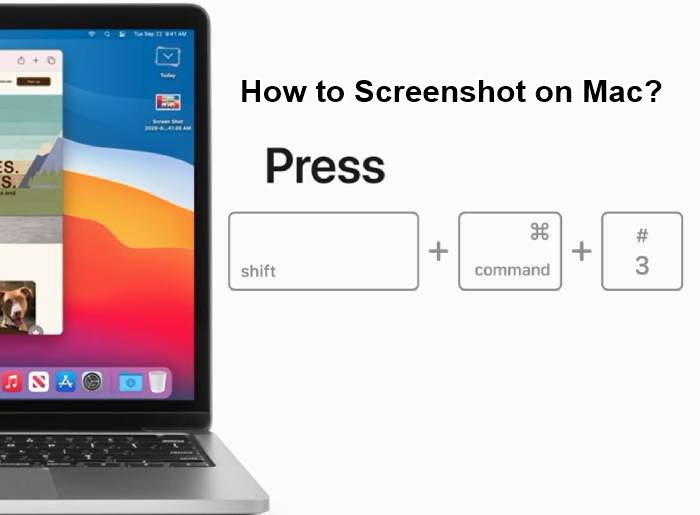
The most basic way to take a screenshot on Mac is to press and hold three keys together: Shift, Command, and 3. Your screenshot will have been taken. If you want to edit the screenshot, spot a thumbnail in the corner of your screen, then click it to edit the screenshot.
Apple may have different MacBook types, but the methods to take a screenshot on Mac are the same across these different MacBook types - MacBook Pro, MacBook Air, or iMac.
So, in this article, you’ll learn how to screenshot on Mac. We’ll also talk about how to capture a portion of the Mac screen and edit Mac screenshots.
Let’s dive in.
What is a Screenshot on Mac?
A screenshot is a photo of what is on your computer’s screen.
The screenshot is usually saved to your Desktop folder unless you have changed the default setting.
How to take screenshot on Mac Summary:
- Press and hold these three keys together: Shift + Command + 3.
- If you see a thumbnail in the corner of your screen, click it to edit the screenshot. Or wait for the screenshot to save to your desktop.
Let's discuss this in detail below.
Taking a screenshot is not as straightforward on Mac computers as it is on a standard PC. But knowing how to take a screenshot on mac is an essential skill if you want to capture your Mac's screen, window, or menu - whether it's tickets to an event, an email you've just received, or simply a snapshot of your desktop.
Apple gives users a fair number of options to take screenshots on Mac, save, delete, and open the screenshot for markup.
Jump to Section:
- How to take screenshot on Mac Summary:
- How to take a screenshot on your Mac
- #1. How to screenshot on Mac: capture the entire screen
- #2. How to screenshot on Mac: Capture a portion of the screen
- #3. How to screenshot on Mac: Capture a single window
- #4. How to take a screenshot on Mac: Cmd-Shift-5 Screen capture panel options
- #5. How to take screenshot on Mac: Mac Touch Bar screenshot Shift + Command + 6
- #6. How to take a screenshot on Mac with the Mac screenshot app
- How to screenshot on a mac: Where is the Mac screenshot app?
- How to use the Mac screenshot app
- How to screenshot on a mac: Where to find Mac screenshots
- How to add annotations on Mac Screenshots
- How to edit a screenshot taken on Mac
- Third-party applications to take screenshots on Mac
- Final Word
How to take a screenshot on your Mac
If you’re using any kind of modern Mac, there are three ways to take a screenshot on Mac with keyboard shortcuts. You can decide to capture the entire mac screen, a window, or just a portion of the screen.
And if you’re using a MacBook Pro with a Touch Bar, you have a fourth method to take screenshots:
- Cmd-Shift-3 (or Shift + Command + 3): capture a screenshot of your entire screen
- Cmd-Shift-4 (or Shift + Command + 4): capture a portion of the screen
- Cmd-shift-4-space bar (Shift + Command + 4 + Space bar): capture a window or menu
- Cmd-Shift-5 (or Shift + Command + 5): Choose how to capture the screen
- Cmd-Shift-6 (or Shift + Command + 6): take a screenshot of what's currently showing on the Touch Bar.
- Take screenshots on Mac with the Mac screenshot app
Apple's macOS software also gives you a fair number of options to save, delete and open the screenshot for markup easily.
Let’s discuss how to take a screenshot on a mac methods in detail below:
#1. How to screenshot on Mac: capture the entire screen
To take a screenshot on Mac, Press and hold these three keys together: Shift + Command + 3.

When you use this keyboard shortcut, you’ll capture a screenshot of your entire screen on Mac.
After pressing Shift + Command + 3 together, you can then proceeed and edit the screenshot. How?
Note: If you spot a thumbnail in the corner of your Mac screen, click it to edit the Mac screenshot. Or, you can wait for the screenshot you’ve taken to save to your desktop, then locate and edit it.
Summary: Full screen on a Mac
- Pressing the ‘Command’, ‘Shift’ and ‘3’ keys (all at the same time) will capture the entire screen.
- You should see the screen flash or change before it goes back to normal.
- The screenshot usually gets saved to the Mac desktop.
#2. How to screenshot on Mac: Capture a portion of the screen
To capture a portion of the screen, use the keyboard shortcut: Shift + command + 4. This keyboard shortcut combo turns your cursor into a crosshair, which you can drag to select a portion of your screen to capture.

Here are the steps:
- Press and hold these 3 keys together: Shift + Command + 4.
- Drag the crosshair (cursor) to select the portion of the screen you want to capture.
- To move the area selection, press and hold your Space bar while dragging. Press the Esc (Escape) key to cancel taking the mac screenshot.
- Now, to take the mac screenshot, release your mouse or trackpad button. The screenshot saves to your desktop when you let go of the mouse button (or trackpad).
A mac screenshot captured by this method will feature a white border around the window with some drop shadow.
Note: If you want to edit the screenshot, spot the thumbnail in the corner of your screen and click it to edit the screenshot. Alternatively, you can wait for the screenshot to be saved to your desktop, then locate and edit it.
#3. How to screenshot on Mac: Capture a single window
To capture a screenshot of a window on mac, press these 4 keys together: Shift + Command + 4 + Space bar ( Cmd-shift-4-space bar). It’s almost similar to how you capture a screen portion.

To capture a window, follow these steps:
- Once you open the window or menu you want to capture, press and hold these keys together: Shift + Command + 4 (or Command + Shift + 4). Your pointer becomes a crosshair.
- While holding the three keys together, press the space bar. Now you’ll be pressing Shift + Command + 4 + Space bar together, and the pointer changes to a camera icon. (To cancel taking the screenshot, press the Esc (Escape) key.)
- Now any window (or menu) you hover over will be highlighted with a light blue overlay.
- Click on the window or menu to capture it. To exclude a shadow from the screenshot, press and hold the Option key while you click.
- The image saves to your desktop.
Again: If you want to edit the screenshot, spot a thumbnail in the corner of your screen, and click on it to edit the screenshot. Alternatively, you can wait for the screenshot to save to your desktop, then access and edit it.
This Mac screenshot method doesn’t just capture windows/manus. You can save the desktop, the menu bar, the dock, or even an open menu by itself.
Also, the image you capture has the window and its shadow against a transparent background (PNG). that’s why we said earlier that if you don’t want the shadow, you press and hold the Option key (or Alt) as you click to save the image.
#4. How to take a screenshot on Mac: Cmd-Shift-5 Screen capture panel options
You can also use the shortcut shift + command + 5 to choose how to capture your screen. This shortcut command was introduced in macOS Mojave in 2018.
When you press the three keys together (shift + command + 5), it calls up a small screenshot panel at the bottom of your display with your screen capture options.
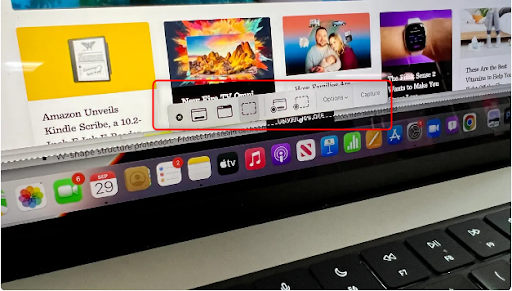
Three screenshot buttons will appear. You can choose to:
- Capture the entire screen,
- a window or
- a selection of your screen.
You’ll also see two video capture buttons that you can choose to:
- Record your entire screen, or
- Record a selection of the screen.
On the far left, you’ll see an X button to close the screenshot panel. But to close the screenshot panel, you can press the Escape key to exit.
Also, on the right side is an Options button that lets you choose where to save your screenshot. You cna choose to save the screenshots on the Desktop, Documents, Mail, Clipboard, Messages, Preview, etc. It also lets you set a 5- or 10-second delay to line up items that might disappear when you engage your screenshot tool.
#5. How to take screenshot on Mac: Mac Touch Bar screenshot Shift + Command + 6
You can use this method only if you have an older 15- or 16-inch MacBook Pro or a current 13-inch MacBook Pro - the last model with the Touch Bar.
This method allows you to take a mac screenshot of what's currently showing on the Touch Bar.
Just hit Shift + Cmd + 6 to take a very wide and skinny screenshot of your Touch Bar.

Note that these options appear on the OLED strip if you have a MacBook Pro with a Touch Bar.
Longtime Mac screenshotters (people who’ve been using Mac screenshots for a while) may be slow to adopt the Cmd-Shift-5 shortcut.
But it's a good way to take screenshots on Mac because of the ability to annotate screenshots without needing to open Preview and quickly delete screenshots when you know you’ve messed up. Also, the 5- and 10-second delay options are useful additions.
#6. How to take a screenshot on Mac with the Mac screenshot app
The first five methods described above involve taking screenshots on Mac using keyboard shortcuts.
Keyboard shortcuts work easily and well, especially for programmers, but everyone else can use a point-and-click user interface.
So, Apple also includes a Screenshot app on Mac, which gives you more control over screenshots on Mac.
With the Mac screenshot app, you can take screenshots after a 5-second or 10-second delay, giving you time to open a menu or carry out another setup before capturing an image. This might not be possible with keyboard shortcuts.
How to screenshot on a mac: Where is the Mac screenshot app?
There are three ways to find the Mac Screenshot app:
-
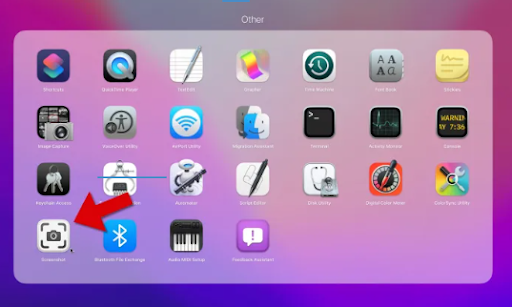
Find Mac screenshot app through Launchpad
Open your Mac's Launchpad and scroll through until you see the screenshot app. Or type in the search box at the top to locate the Screenshot app, then double-click to open it. -
Find Mac screenshot app through Spotlight search.
Hold Command + Spacebar to start a Spotlight Search.
Then type "Screenshot," and the Mac screenshot app will appear in the results.
When you see it, select Screenshot from the top section of the search results to open the app.
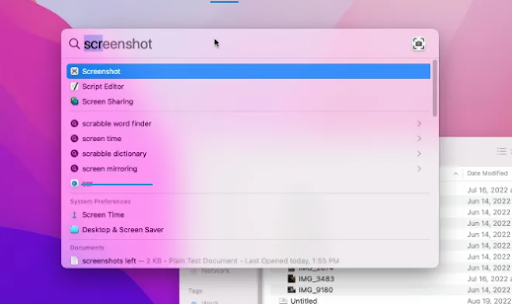
If you see a Screenshot lower in the search results, clicking on it will start a web search for "screenshot" as a search term. So, just choose a result near the top.
-
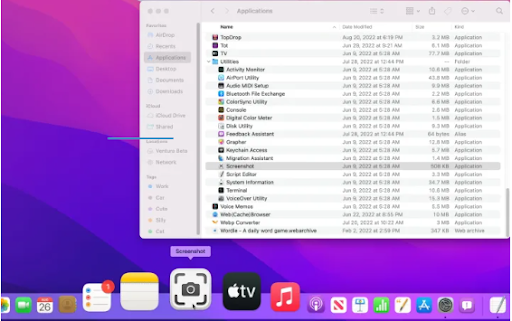
Mac Screenshot app on Finder
The screenshot app might be on the Finder, so check to ensure.
Open the Finder (the smiling, blue face icon at the bottom-left of the Dock), then select Applications.
Next, open the Utility folder, then scroll down to find the Screenshot app, and open it.
If you think you'll use the Screenshot app frequently, keep it in the Dock. Just right-click the app icon and select Keep in dock from the Options menu.
How to use the Mac screenshot app
When you open the Mac Screenshot app, you’ll see the same thing as when you open the Mac Touch Bar screenshot with the keyboard shortcut: Shift + Command + 6.
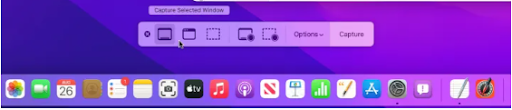
It’s a floating toolbar near the bottom of the screen with buttons suggesting the type of screenshot that they capture:
- Far left is full-screen capture
- Window capture
- Partial screen capture
In the next section, you’ll see:
- Full- and partial-screen recording buttons appear.
- Options menu.
- Capture button.
Here’s how to use it:
- Choose one of the screenshot buttons based on the type of screenshot you want to grab. Then Capture to grab a save of what's on the screen. The capture won’t include the Screenshot toolbar.
-
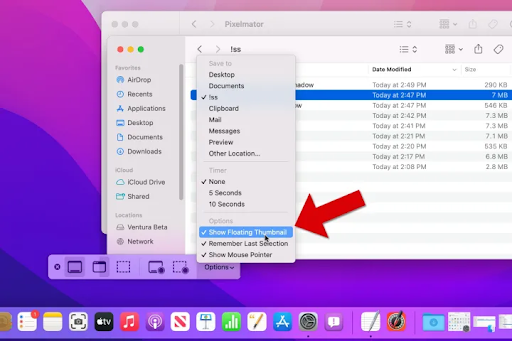
If there’s anything to be set up, such as a menu opened to show its contents in the screenshot, go to the Options menu and select the 5 seconds or 10 seconds delay.
This will also allow you to pick a different default save location for your screenshots. You can also send screenshots to another app like Messages or Mail.
And, if you want to see the mouse pointer arrow in the screenshot, just enable Show mouse pointer in the same Options menu.
- Apple enables the Floating Thumbnail option by default. But when you take multiple screenshots in a row, some images might capture the thumbnail since it appears on-screen. So, you might consider switching off the Floating thumbnail in the Options menu, especially when you want to take quick screenshots.
How to screenshot on a mac: Where to find Mac screenshots
By default, Mac screenshots save to your desktop. They save with the name ”Screen Shot [date] at [time].png.”
But in macOS Mojave or later, Apple allows you to change the default location of saved screenshots.
- You can change the Mac screenshot location from the Options menu in the Screenshot app.
- You can also drag the thumbnail to a document or folder.
How to add annotations on Mac Screenshots
The Mac screenshot app or the Floating Thumbnail has built-in macOS' Markup capabilities, which you can use to annotate your screenshot.
You can use this to add highlight texts on your screenshot easily, make freehand sketches, draw arrows to point out details, add your signature, and more.
To see the screenshot Markup toolbar, select the thumbnail that appears in the bottom-right corner after taking a screenshot. Or Right-click the Floating Thumbnail then:
- Choose where to save the screenshot – - on your desktop, Documents folder, or clipboard.
- Choose where to open the screenshot - - in Mail, Messages, Photos, or Preview.
- Delete.
- Show in Finder.
- Open the screenshot in the Markup preview window (as described above).
- Close (and save).
How to edit a screenshot taken on Mac
You might have noticed that a little thumbnail preview shows up in the bottom-right corner of your screen every time you take a screenshot. If you wish to edit a screenshot quickly, click on this preview to open up the editor.
Here, you can make various edits to the capture, such as crop it, add text, add shapes, and much more. Everything is customizable, so don’t be afraid to change up the default colors or pick a new font. When editing is complete, click the Done button in the upper corner of the window to save. Do note that this will overwrite the original screenshot.
Third-party applications to take screenshots on Mac
While the built-in options to take screenshots on Mac are quite extensive, many people are looking for further ways to take screenshots. If you want extended functionality, make sure to check out the applications listed below and consider downloading them to make your screenshots appear just the way you want them to.
Some of these tools can also help you capture screen recordings.
1. CleanShot
CleanShot is an application all about manipulating your screenshots after taking them. It allows you to easily blur out parts of a screenshot to hide confidential or distracting information, provides quick shortcuts for sharing your screenshots, and much more. Messy desktop? No issue; simply check the “Hide Desktop Icons” option. Want to annotate something quickly on the screen? The built-in editor has got your back.
The application is free to download on this website. No hidden fees or additional costs, just clean and pleasing screenshots.
2. Lightshot
Lightshot is a popular application on Windows. However, it also has a macOS version free to use for all Apple fans. It’s lightweight and easy to use, providing you with options to screenshot sections or the entire screen. After making your selection, you can easily draw or put shapes on your screenshot. Saving and sharing is made easy via many options, such as uploading online, copying to a clipboard, or even printing.
You can download Lightshot for free on this website. If you’re interested in the Windows equivalent, you can find it on the same page.
3. Skitch
For those looking to take editing and annotating screenshots to the next level, Skitch is the way to go. The software offers many options, tools, and shapes to work with when marking screenshots. This makes it easy to highlight areas, place arrows, type text, and even blur out parts of screen capture.
Skitch is completely free of charge and available to download here. You can also find it in the App Store by simply searching for the application and hitting the Get button.
Now that you have learned how to take screenshots on Mac using different methods, do you know where they're saved?
Change Screenshot location on Mac
By default, your screenshots are saved to the desktop. This, in itself, may make your desktop look untidy. To save your shots to another location.
- Launch the Screenshot app.
- Next click Options.
- From the Save To Suggested Locations, select your preferred location.
- Now that you've got a new location, your shots will automatically be saved here.
How to delete screenshots on Mac
Screenshots, just like other files, might consume space. Although each file isn't large, they can take up a lot of space on your disk when they accumulate. Therefore, we recommend you regularly remove the one you're not using.
If you're unsure where you've saved your shots, we recommend using the Cleaner-App tool. Follow the steps below to get rid of the unwanted shots.
- Launch the cleaner-app
- Next, select the screenshot section and sort the sizes according to your liking; either by date, file size, or name. Choose the unwanted files, then click Review and Remove button.
- Skim through the files you want to delete. Once done, click Remove.
- Lastly, empty the trash bin to free up space.
Final Word
We hope this article was able to help you learn all about taking screenshots on the macOS system. If you need further assistance regarding technical questions, don’t hesitate to contact our support team. We’re always ready to help you out!
Thanks for reading up to here :)
One more thing
Please share this article on your socials and network. It may help another person.
Sign up for our newsletter to get our latest updates, product discounts, new articles, and blog posts anytime, anywhere. If you have time, visit our blog site or help center for articles like this and more.
Learn More
» How to Take Screenshots on Windows | screenshot on PC
» Fixed: MacBook Pro Booting Black screen
» hard drive not showing up
» How to Change DNS Settings on a Mac
» Mac Startup Disk is Almost Full: 10 Ways to Clear Space on Your Mac