
Flash Fill automatically fills your data when it senses a pattern. For example, you can use Flash Fill to separate first and last names from a single column, or combine first and last names from two different columns.
Speed up your workflow with Microsoft Excel’s Flash Fill feature. Learn how to use Flash Fill in Excel and become a pro with our guide.
Excel comes with a wide selection of features, each bringing something useful to the table. However, one of the most used and loved tools in Microsoft’s spreadsheeting app is Flash Fill. In this article, we’ll introduce what Flash Fill exactly is, and how to use it efficiently.
Flash Fill is a feature suitable for both beginners and experienced users. It’s helpful to utilize in all sorts of projects, as it allows you to streamline your workflow and take advantage of artificial intelligence.

What is the Flash Fill feature in Microsoft Excel?
Flash Fill allows you to quickly fill out the information in your sheets by using predictive technology. If you built your sheet well, Excel will be able to help you fill cells with information, sparing precious minutes you’d spend on manually typing everything.
In short, Flash Fill is able to:
- Identify patterns in data and predict the next element.
- Extract data and transform it to match case-sensitive patterns such as addresses, names, emails, and more.
- Combine extracted data with periods, @ symbols, and .com extensions to create the appropriate prediction.
Flash Fill recognizes patterns and predicts the next element in the chain. For example, you can use Flash Fill to quickly fill out first and last names, locations, item names, quantity, and much more. We recommend using Flash Fill in datasheets with a great number of entries.
Which Excel versions have Flash Fill?
Flash Fill was first introduced to the software in Excel 2013, and all following versions still support it. This means that Flash Fill is currently available in Excel 2013, Excel 2016, Excel 2019, and of course Excel for Microsoft 365.
Older releases such as Excel 2010 and below do not include the Flash Fill feature. If you’re unsure on which version to purchase, we recommend buying the latest Microsoft Office 2019 suite to stay up-to-date with the latest features available to users.
Microsoft also made Flash Fill available in the free online version of Excel, accessible through the Microsoft Office online website.
Where is Flash Fill in Excel?
Flash Fill is accessible from a number of different spots. Most prominently, you’ll find it in the Data tab of the Ribbon header, under the Data Tools section:

Simply open up your Excel software and go to Data → Flash Fill. Bear in mind that the location of the Ribbon button may be different in older versions of the application.
You can also find Flash Fill in the default Home tab. This is the first tab in the Ribbon interface, and the tab you automatically get redirected to when opening or creating an Excel document.

To access it, go to Home → Editing → Fill → Flash Fill. This should be the same throughout all Excel versions with Flash Fill available.
How to use Excel’s Flash Fill feature
Flash Fill requires you to set your data up correctly. This means that you must follow a set of rules in order to use the feature as intended:
- Flash Fill will take data from the columns to the immediate left. Ensure there are no empty columns between your Flash Fill location and the original data set.
- The examples provided must be in the column immediately to the right. Flash Fill will take the example on the same row as the data it’s based on.
When Excel recognizes a pattern, it will highlight the predicted result in light grey. If you wish to use the created Flash Fill result, just press the Enter key.
Use Flash Fill with the fill handle
The easiest way of using Flash Fill is probably the fill handle.
- Select the example cells you want to use for your Flash Fill. You can select multiple cells by holding the Shift key on your keyboard and clicking on 2 or more cells.
-
Position the mouse cursor in the bottom-right corner of the last selected cell. You should see the cursor transform into a + sign.
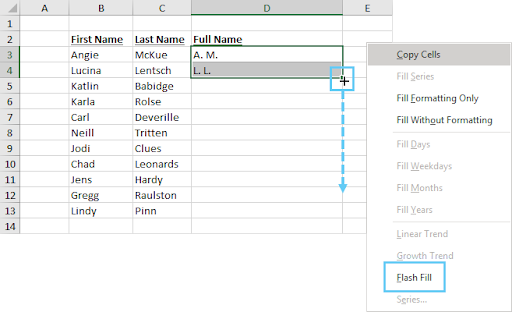
- Hold the right-click button on your mouse and drag the cursor down. Release the button when you want Flash Fill to stop.
- Select Flash Fill from the context menu.
Flash Fill keyboard shortcut
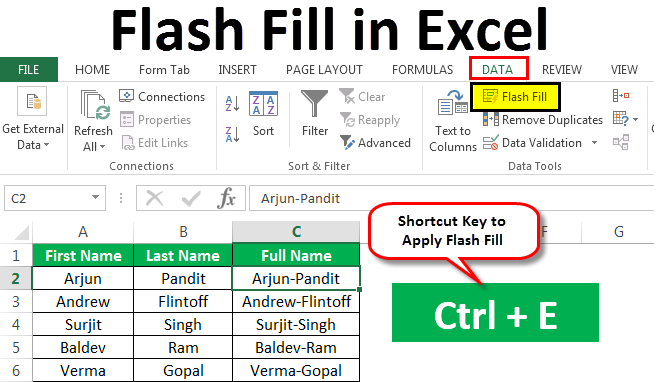
Don’t want to bother with handles and menus? Don’t worry. Flash Fill has a handy shortcut to quickly fill in your missing data for you. All you have to do is press the Ctrl + E keys on your keyboard if you’re on Windows, or command (⌘) + E on a Mac.
How to Flash Fill in Excel-Easy Tips
Final thoughts
If you need further help with Microsoft Excel, don’t hesitate to contact our customer service team, available 24/7 to assist you. Return to us for more informative articles all related to productivity and modern-day technology!
Would you like to receive promotions, deals, and discounts to get our products for the best price? Don’t forget to subscribe to our newsletter by entering your email address below! Receive the latest technology news in your inbox and be the first to read our tips to become more productive.
You may also like
» How to Create Excel Header Row
» How To Add and Remove Leading Zeros in Excel
» Everything You Need to Know About Excel’s Compatibility Mode