Windows 10 installs thousands of files as part of the system architecture. This will, on many occasions, lead to you running into a folder you don’t recognize. If you just found the rempl folder on your computer and don’t know what it does or how to remove it, this article is for you. We’ll be going over what the rempl folder is, why your system needs it, and how you can remove it if necessary.
What is rempl folder?
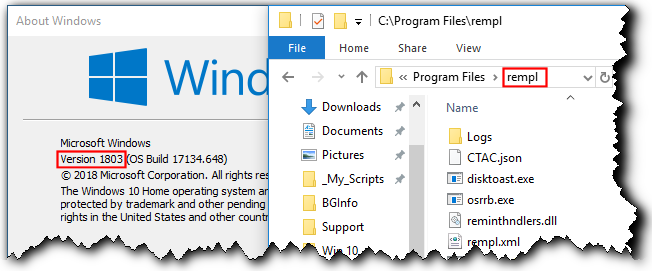
This folder is typically created during a Windows Update process, and its primary purpose is to contain files that make the update process smoother. rempl is located in your local Program Files folder and can be reached by following the C:\Program Files\rempl path.
The folder may contain executables such as disktoast.exe, rempl.exe, remsh.exe, WaaSMedic.exe, Sedlauncher.exe, Sedsvc.exe, and osrrsb, along with a Logs folder. These are all reliability improvements to Windows Update Service components in various versions of Windows 10.
Is rempl malware? Should I remove it?
The short answer is no, the rempl folder is not malware, and it is safe to keep on your computer as it’s created by Microsoft. Removing it will cause no harm to your operating system, but your Windows updates may be applied inefficiently.
While the legitimate rempl folder is safe, there are still risks involving it.
There is a chance that a malicious application or connection was able to modify your rempl folder or create a fake rempl folder somewhere on your system. This non-authentic folder may try to use the legitimacy of the original folder in order to trick you into keeping it on your device.
To ensure your rempl folder hasn’t been tampered with, we highly recommend purchasing a reliable antivirus app and scanning your computer.
How to delete the rempl folder
There may be some reasons why you want to remove the rempl folder, such as saving space on your disk or removing unnecessary files. While most system folders can’t be deleted, the rempl folder and its contents can be removed from Windows 10 relatively easily.
Note that you may require administrative permissions in order to perform the methods below.
Need help? Check out our How to make a local user an administrator in Windows 10 guide.
Jump to solutions
- What is rempl folder?
- Is rempl malware? Should I remove it?
- How to delete the rempl folder
- Method 1. Delete through the File Explorer
- Method 2. Use the Task Scheduler
- Method 3. Use the Command Prompt
- Final thoughts
Method 1. Delete through the File Explorer
- Open the File Explorer. This can be done by clicking on the Explorer icon in your taskbar, or by pressing the Windows + E keys on your keyboard.
-
Navigate to This PC → C: drive → Program Files. This folder should be in the drive you installed Windows 10 on. Scroll down and locate the rempl folder, then right-click on it and choose Delete.
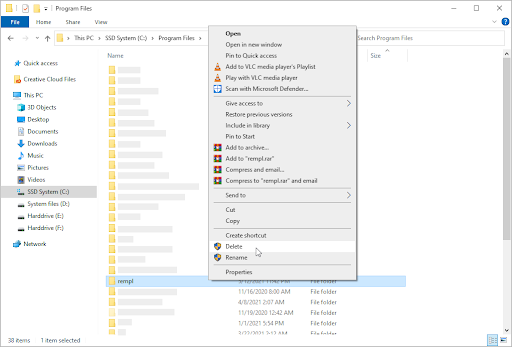
- If prompted by the User Account Control (UAC), click Yes to allow changes with administrative permissions. After this, the rempl folder should be gone from your computer.
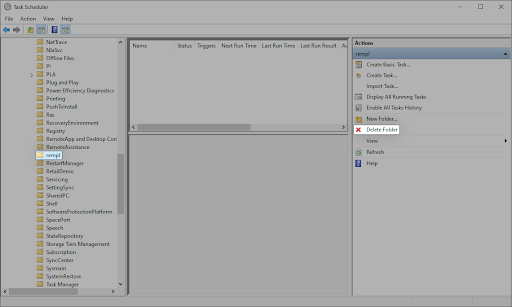
Method 2. Use the Task Scheduler
- Open the search bar in your taskbar by clicking on the magnifying glass icon. You can also bring it up with the Windows + S keyboard shortcut.
-
Type in Task Scheduler and click on the first search result to launch the application.

-
Use the menu in the left-side pane and navigate to Task Scheduler Library → Microsoft → Windows → rempl. Once you reach here, select Delete Folder from the right-side pane.
Method 3. Use the Command Prompt
-
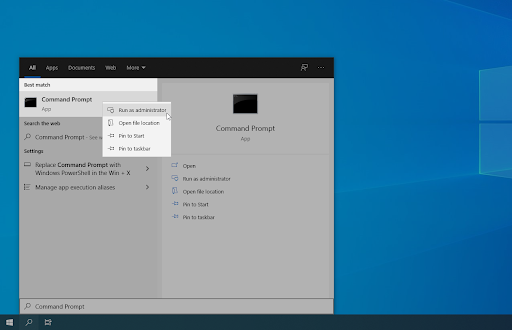
Open the Command Prompt in one of the following ways:
-
Open the Search function in your taskbar, or alternatively use the Ctrl + S keyboard shortcut to bring up the search bar and look up “Command Prompt”. When you see it in the results, right-click on it and choose Run as Administrator.
-
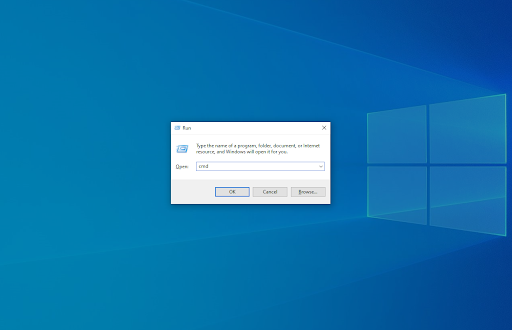
Press the Windows + R keys on your keyboard to bring up the Run utility. Type in “cmd” and press the Ctrl + Shift + Enter keys on your keyboard. By doing so, you’re launching the Command Prompt with administrative permissions.
-
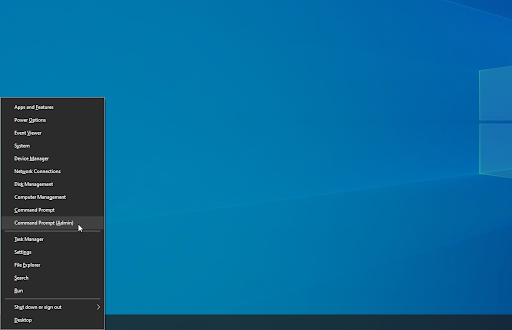
Press the Windows + X keyboard shortcut, then select Command Prompt (Admin).
-
Open the Search function in your taskbar, or alternatively use the Ctrl + S keyboard shortcut to bring up the search bar and look up “Command Prompt”. When you see it in the results, right-click on it and choose Run as Administrator.
- When prompted by the User Account Control (UAC), click Yes to allow the app to launch with administrative permissions.
-
Input the following command and then press the Enter key on your keyboard to execute it: rmdir C:\Program Files\rempl
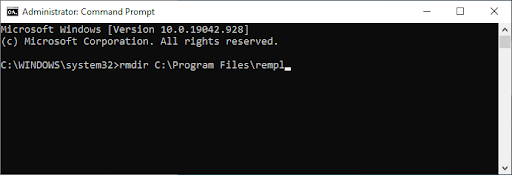
- After completing this method, the rempl folder will be deleted alongside its contents and subfolder(s).
Final thoughts
Our Help Center offers hundreds of guides to assist you if you’re in need of further help. Return to us for more informative articles, or get in touch with our experts for immediate assistance.
One more thing
Would you like to receive promotions, deals, and discounts to get our products for the best price? Don’t forget to subscribe to our newsletter by entering your email address below! Be the first to receive the latest news in your inbox.
You may also like
» What is YourPhone.Exe in Windows 10?
» What Is the Windows Shell Experience Host and Why Is It Using High Memory?
» What is the WSAPPX Service and How to Fix WSAPPX High Disk Usage