
Named ranges are a powerful tool in Microsoft Excel that can save time and increase accuracy when managing data. You can easily refer to that data in formulas, charts, and other parts of your spreadsheet by assigning a name to a:
- Cell
- Group of cells
- Range
In this article, we'll dive into the benefits of using named ranges and provide step-by-step instructions for creating and managing them in Excel.
By the end of this article, you'll have a solid understanding of named ranges and how to use them effectively in your own Excel spreadsheets. So let's get started!
Table of Contents
- The Power of Named Ranges in Excel
- Types of Names in Excel
- Creating Named Ranges in Excel using the Name Box
- Creating Named Ranges with Define Name in Excel
- Creating Named Ranges in Excel using Name Manager
- Naming Columns in Excel
- FAQs
- Final Thoughts
Summary: Create a named range from selected cells in a worksheet
- Select the range you want to name, including the row or column labels.
- Click Formulas > Create from Selection.
- In the Create Names from Selection dialog box, select the checkbox (es) depending on the location of your row/column header. ...
- Click OK.
The Power of Named Ranges in Excel
In Excel, a name is a label you can give to a cell or group of cells. Like how people refer to others or places, Excel uses names to help you easily refer to cells and ranges of cells in your spreadsheet.
This can be especially helpful when you have a large amount of data to work with, as using names can save you time and make your formulas easier to read.
For example:
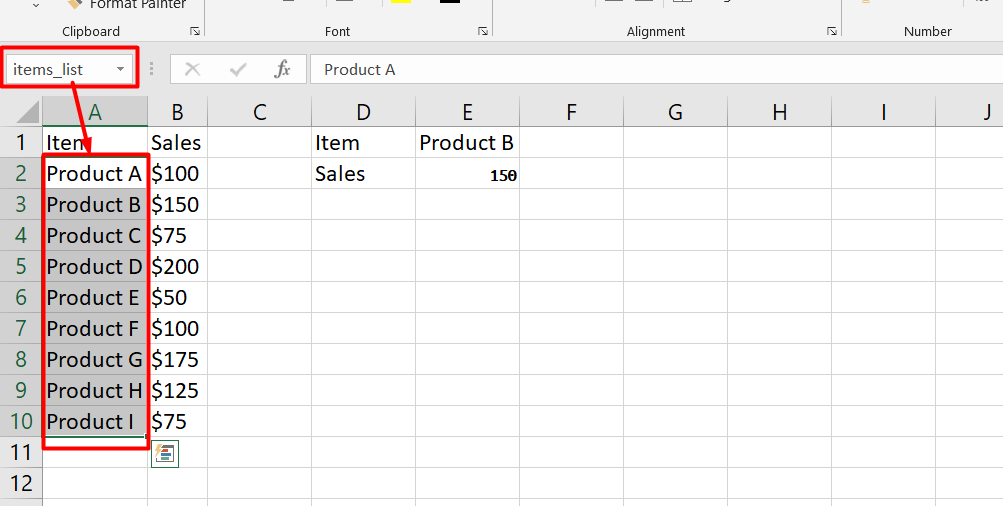
Let's say you have a spreadsheet listing items and their corresponding sales. Instead of referring to the sales column as "B2:B10", you could give it a name like "sales."
Then, when you want to calculate the total sales for a specific item, you can use the SUMIF formula and supply the names instead of cell references.

Using names, we could give the range of cells for the sales column the name "sales" and the range of cells for the item column the name "items_list." Then, to find the total sales for a specific item (let's say
Product B), we could use the following formula:
=SUMIF(items_list, "Product B", sales)
This formula would return the total sales for Product B, which would be $150. Using names instead of cell references makes the formula more readable and easier to understand, especially if you're working with a large amount of data.
Using names in Excel can also help you avoid errors and make your formulas more readable. If you have a large and complex formula that references multiple cells, it can be easy to make a mistake when typing in cell references.
However, if you use names, you can avoid these mistakes and clarify your formulas. Using names in Excel can be a powerful tool to help you manage your data and work more efficiently.
Types of Names in Excel
In Excel, you can use names to refer to cells and ranges of cells instead of using cell references. You can use two types of names: defined names and table names.
A defined name is a name you give to a single cell, range of cells, constant value, or formula.
For example:
If you have a list of numbers in cells A1 to A5, you can define a name for that range of cells, like "my_numbers". Then, you can use the name "my_numbers" in your formulas instead of using the cell references (A1:A5).
This can make your formulas easier to read and understand.
A table name is a name given to an Excel table automatically created when you insert a table in a worksheet. You can use the table name in formulas instead of using cell references.
Table names are helpful when working with a large amount of data, as they can make your formulas more readable and easier to maintain.
Creating Named Ranges in Excel using the Name Box
The Name Box in Excel is a quick and easy way to create a named range. To create a named range using the Name Box, follow these simple steps:
- Select the cell or range you want to name.
- Locate the Name Box at the top-left corner of the Excel window. It will display the cell reference of the selected cell(s).
-
Click on the Name Box and type a name for your range. Make sure to use a name that is easy to remember and describes the content of the range.
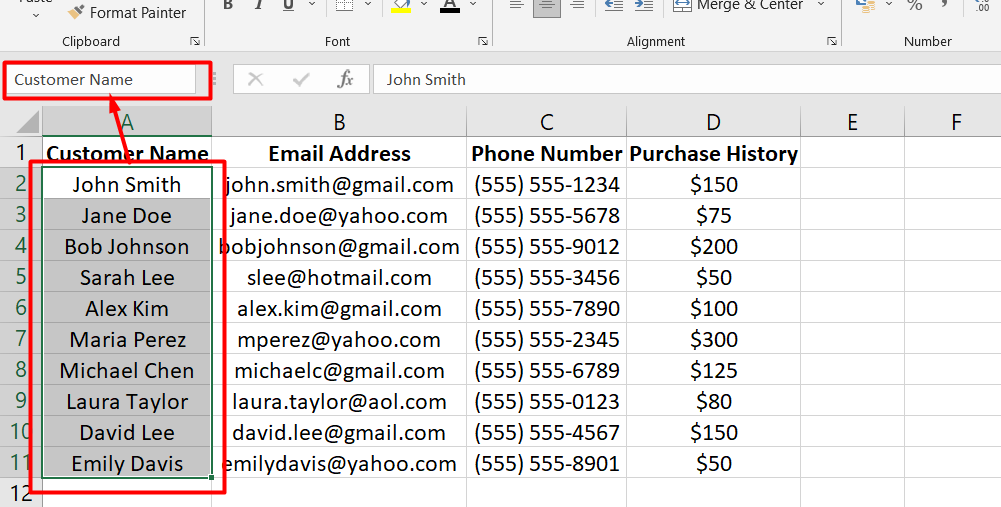
- Press Enter, and your new named range will be created.
That's it. Using named ranges in Excel can help make your formulas easier to read and understand.
Creating Named Ranges with Define Name in Excel
You can also create a named range in Excel using the Define Name option. This method is more advanced but offers more options for customization.
Here's how you can do it:
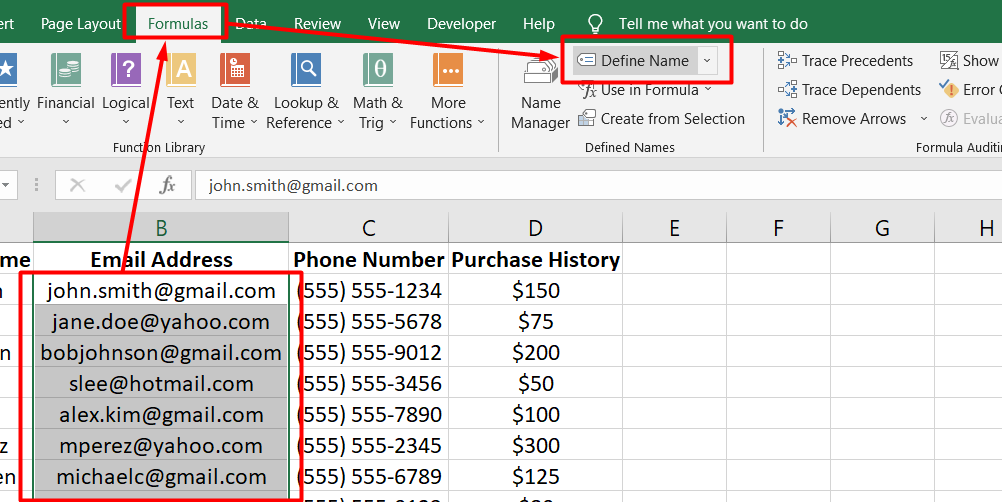
- Select the cell(s) that you want to name.
-
On the Formulas tab, click the Define Name button in the Define Names group.
-
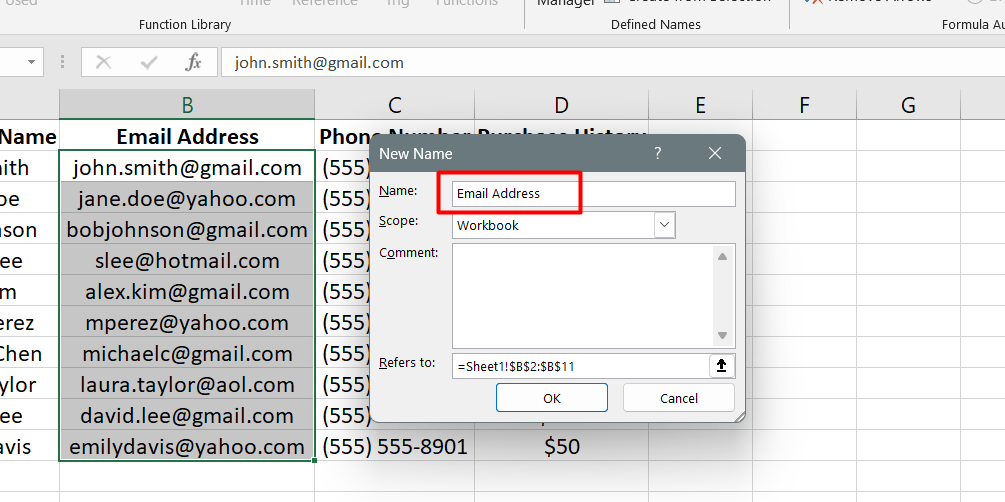
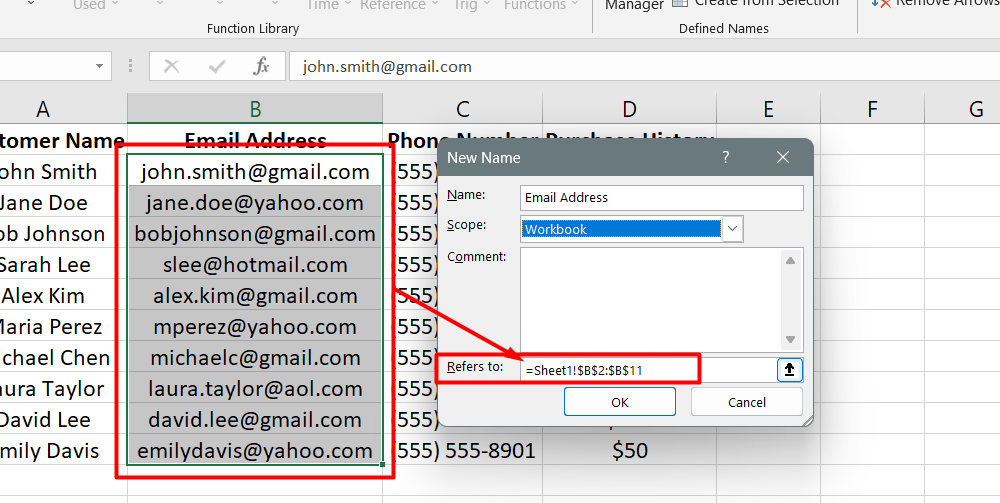
In the New Name dialog box, type a name for the range in the Name box.
-
Select the scope of the named range from the Scope dropdown. By default, it's set to Workbook, meaning the name will be available throughout the entire workbook.
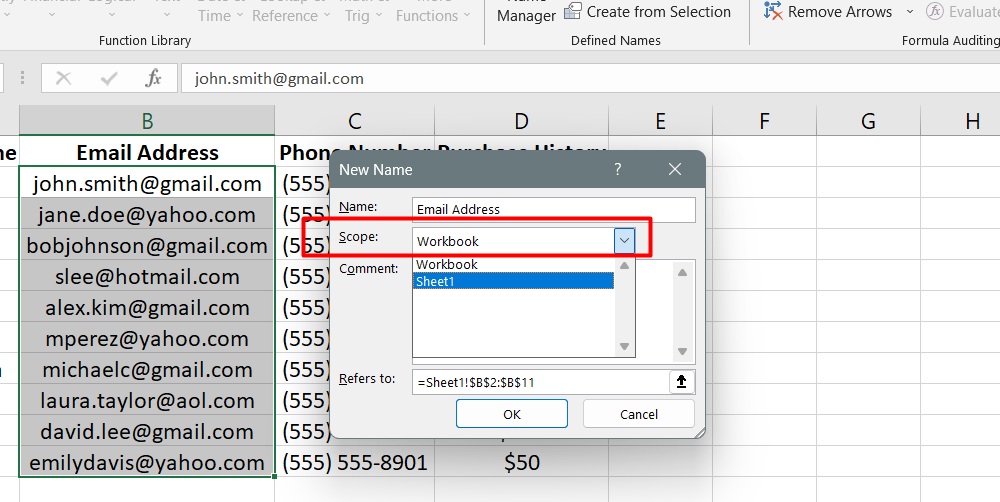
However, you can also limit the scope of the name to the current worksheet or table.
-
In the Refers to box, Excel will automatically fill in the cell reference or range that you have selected. Double-check that it's correct and make any necessary adjustments.
-
You can add a comment to help explain the purpose of the named range.

- Click OK to save the named range.
It's important to note that by default, Excel creates a named range with absolute references. This means that if you use the named range in a formula and then copy the formula to another cell, the named range will not change.
You can remove the "$" sign from the reference if you want the named range relative. However, it's important to understand how relative references work before doing this.
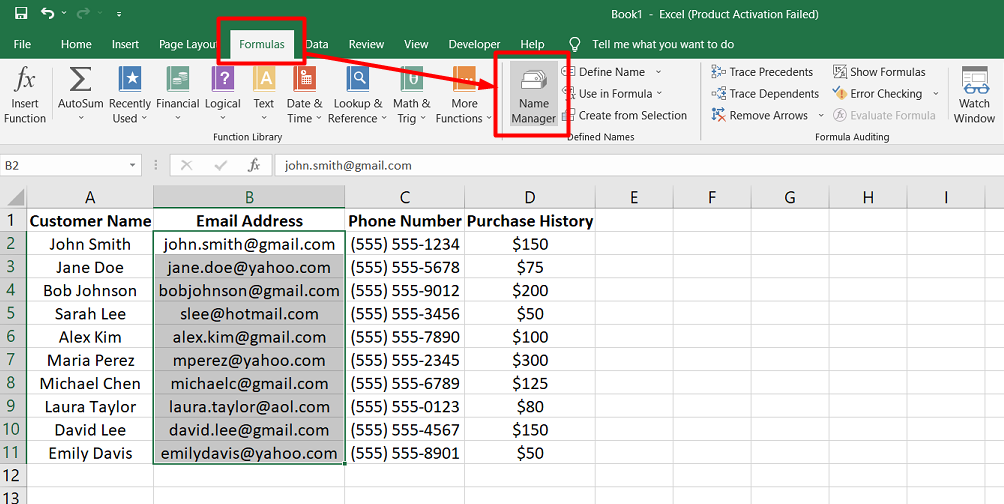
Creating Named Ranges in Excel using Name Manager
The Name Manager is a tool that lets you work with existing names but can also help you create new ones. Here's how:
- Go to the Formulas tab and click on the Defined Names group.
-
Click the Name Manager button, or press the shortcut key Ctrl + F3.
-
In the Name Manager window, click the New button in the top left corner.
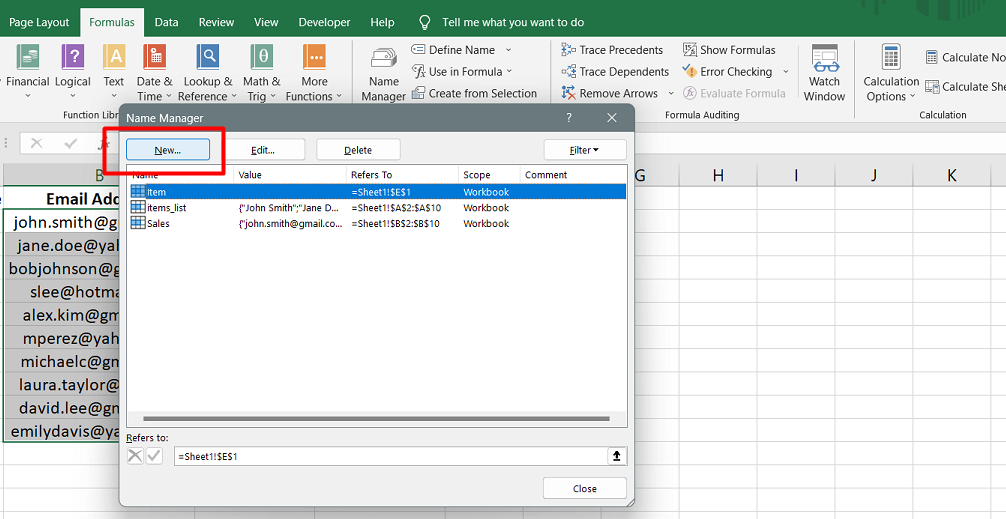
- This will open the New Name dialog box where you can give a name to the range, specify its scope and define its reference.
- After you have filled in the details, click OK to save the name.
Once you have created a named range using the Name Manager, you can easily select it by clicking on the dropdown list in the Name Box and selecting the name you just created. This will select the range on your worksheet.
Creating named ranges using the Name Manager may take longer than other methods, but it offers you more options and control over your named ranges. It is also useful for managing multiple names at once.
Naming Columns in Excel
If you have a data table in Excel, you can easily give each column and row a name based on their labels. Here are the steps to follow:
- Select the entire table, including the column and row headers.
- Go to the Formulas tab and click the "Define Names" group.
-
Click the "Create from Selection" button or use the Ctrl + Shift + F3 shortcut.

-
In the "Create Names from Selection" dialog box, select the options for the row and column headers that you want to use as names.
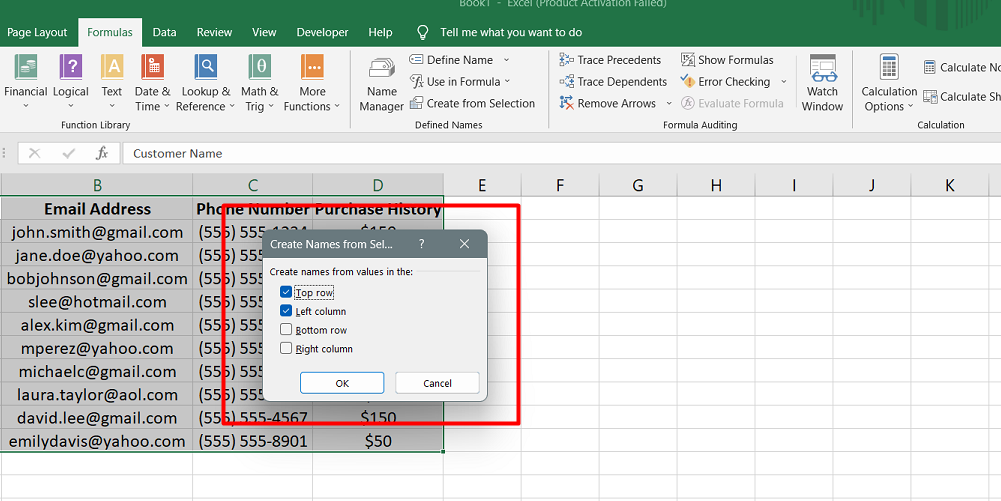
- Click OK to create the named ranges.
Once you've completed these steps, Excel will automatically create named ranges for each column and row based on their header labels.
This can be helpful when working with large data tables, as it allows you to easily reference specific columns or rows by name instead of cell references.
FAQs
What is the benefit of named ranges in Excel?
The benefit of named ranges in Excel is that they provide a descriptive and easily recognizable name for a specific range of cells, making formulas more understandable and easier to manage.
What are the benefits of using named ranges in formulas?
Using named ranges in formulas improves formula clarity, makes formulas easier to write and understand, enhances spreadsheet readability, and simplifies formula maintenance.
Are named ranges always absolute values in Excel?
No, named ranges can be defined as either absolute or relative references in Excel.
Are named ranges absolute or relative?
Named ranges in Excel can be defined as either absolute or relative references based on the cell references they represent.
Do named ranges increase file size?
No, named ranges themselves do not significantly increase the file size in Excel as they are just references to specific cell ranges, not actual data.
Final Thoughts
Named ranges in Excel can be incredibly useful for organizing and analyzing data. By assigning a descriptive name to a cell or range of cells, you can make your formulas and functions more readable and easier to understand.
Named ranges can also save you time by eliminating the need to reference specific cells or ranges in your formulas constantly. In addition, named ranges can be used to create dynamic charts and pivot tables that automatically update when new data is added.
Mastering the use of named ranges can greatly enhance your Excel skills and help you work more efficiently with data.
One more thing
If you have a second, please share this article on your socials; someone else may benefit too.
Subscribe to our newsletter and be the first to read our future articles, reviews, and blog post right in your email inbox. We also offer deals, promotions, and updates on our products and share them via email. You won’t miss one.
Related articles
» How to Limit Rows and Columns in an Excel Worksheet
» Troubleshooting "OLE Action Excel" Error in Microsoft Excel
» Ways To Alternate Row Colors in Excel [Guide/]