Are you having trouble with your computer randomly restarting? If so, you’re not alone. Many Windows 10 and 11 users have been struggling with this issue for a while now.
There are a few different reasons why your computer might be randomly restarting. It could be a problem with your power supply, a faulty component, or even a virus. Whatever the cause, it can be frustrating to deal with.
Check out our guide below if you’re sick of your computer randomly restarting. We’ll show you how to fix the issue in simple steps.
Windows 10 and Windows 11 Reboot Automatically, Random Restart
Windows 11 has the highest-grade software architecture of Microsoft Windows, but it's not perfect. Windows 11 may randomly restart without warnings or blue screen of death (BSOD) errors. The number of Windows 11 users who experience random restarts is relatively small, and the problem is more likely to occur on a computer with an older processor.
Nevertheless, there are many ways you can fix this issue. If you are experiencing random restarts on your Windows 10/11 computer, there are several things you can try to fix the problem:
- Update your drivers
- Check for hardware issues
- Run a virus scan
- Perform a clean boot
- Reset your PC
- Check your power supply
- And more!
Continue reading to find the detailed steps needed for restoring your Windows 10 or Windows 11 operating system and stop unexpected reboots.
What Should I Do if My Windows 10/11 PC Randomly Restarts?
You can try a few different things if your Windows 10 or 11 PC is randomly restarting. These issues have different solutions that we'll be discussing below. Here are some general troubleshooting tips to fix random restart, automatic restart, and similar problems on Windows 10 and Windows 11:
- Check for driver updates. Outdated drivers can cause all sorts of problems, including random restarts.
- Check for hardware issues. This is especially important if you recently installed new hardware or changed your computer’s components.
- Uninstall recently installed apps or undo recent deep system changes.
- Use the built-in troubleshooters and Windows Security to fix the error.
If you're unsure how to perform any of the steps above, continue reading for detailed instructions on each troubleshooting method! You can also reach out directly to our experts at SoftwareKeep to guide you through the steps needed to restore your Windows 10 or Windows 11 computer.
What Causes Random Restarts on Windows 10 and Windows 11?
Many different things can cause your computer randomly restarting issue. These range from simple issues like outdated drivers to more complex problems like hardware faults or viruses.
Some of the most common causes of random restart include:
- Outdated drivers
- Faulty hardware
- Power supply problems
- Viruses or malware
- Third-party applications
- System file corruptions
- Bugs in Windows Updates
If you're unsure of what's causing your computer to randomly restart, we recommend trying a few different troubleshooting methods until you find a solution that works for you.
How To Fix Windows 10 and Windows 11 Randomly Restarting
If you're experiencing random restarts on your Windows 10 or 11 computer, it's likely due to a problem with your power supply, drivers, or hardware. Here are some troubleshooting tips to help you fix the issue.
Method 1. Disable Automatic Restart
One of the first things you should do when your computer starts randomly restarting is to disable the automatic restart feature. Here's how to disable automatic restart in Windows 10 and Windows 11:
-
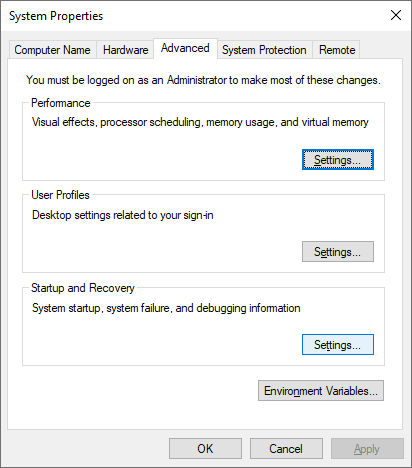
Type Advanced settings into the Windows Search bar, then click Advanced system settings from the list of results.

-
Switch to the Advanced tab, and then click the Settings button inside the Startup and Recovery section.
-
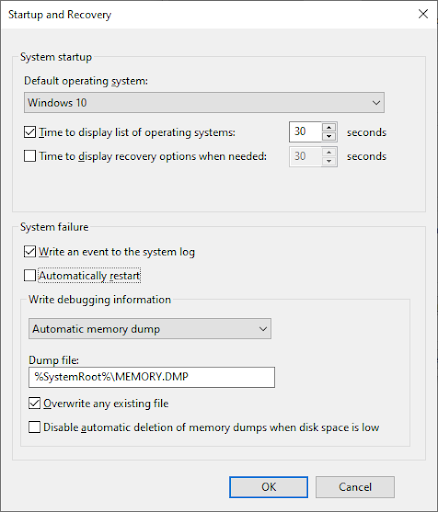
In the System failure section, make sure to uncheck the Automatically restart option. Click OK to finalize your changes.
To safeguard the system from additional corruption, you can also disable the automatic restart option, which shuts down the system in the event of a system failure.
Method 2. Disable the Fast Startup Feature
If you're using Windows 10, you may be able to fix the issue by disabling the Fast Startup feature. This is a power-saving mode that's enabled by default on most computers.
While it can help save energy, it can also cause problems like your device randomly restarting.
Here's how to disable Fast Startup in Windows 10 and Windows 11:
-
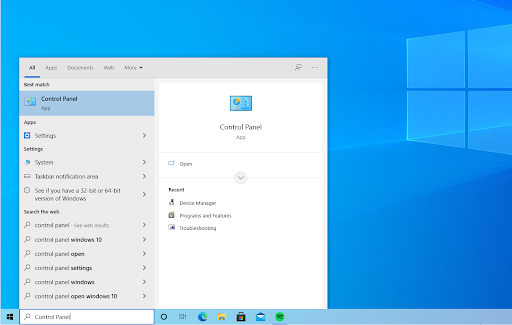
Click on the Windows icon in your taskbar, and then search for the Control Panel. Launch the application from the search results.
-
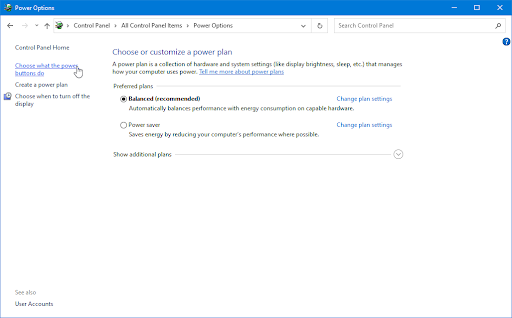
Click on Power Options. If you can’t see this, make sure to switch the view mode to either Large icons or Small icons.

-
Click on the Choose what the power button does link in the left-side pane. You’ll be redirected to a new page.
-
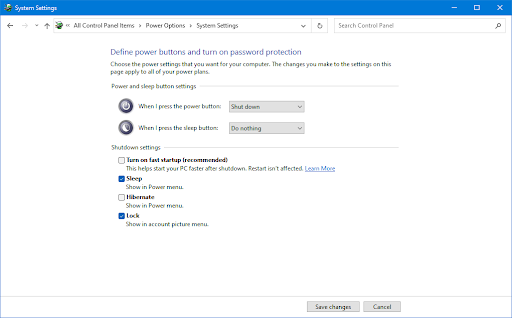
Before you can make changes, you need to click on the “Change settings that are currently unavailable” link. This will unlock your options.

-
Make sure to uncheck the Turn on fast startup (recommended) option. Make sure to click the Save changes button to apply the changes before restarting your computer.
Method 3. Change Your Power Settings
Your power settings may also be causing your computer to randomly restart. To fix the issue, try changing your power settings. Here's how:
-
Press Windows + R to bring up the Run utility, then type in “control” and click the OK button. This is going to open the Control Panel.

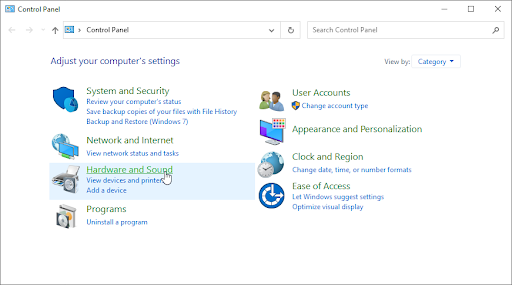
-
Make sure that your view mode is set to Category, and then click on the Hardware and Sound heading.
-
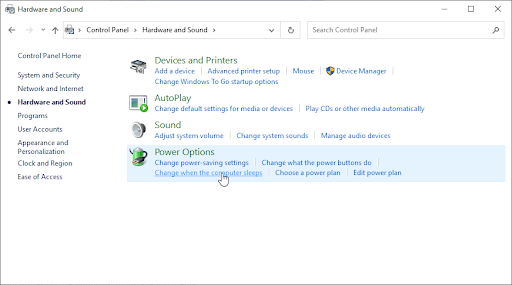
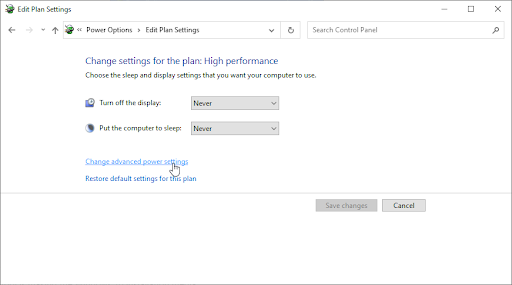
Click on the Change when the computer sleeps link from the Power Options section.
-
Click on the Change advanced power settings link. A new window should pop up on the screen.
-
Scroll down and expand the Processor power management section, then expand Minimum processor state.
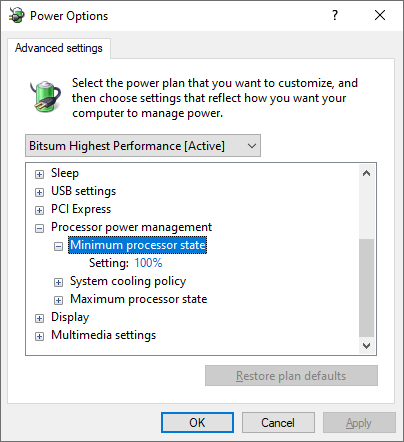
-
Click on the current percentage (for example, 100%) and change it to a number lower than 100. For example 80%. When you’re done, click the Apply button, then close the window.
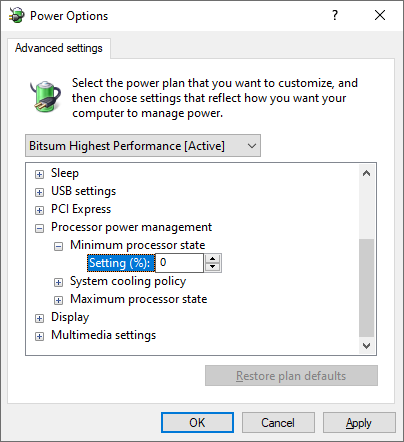
- Restart your computer and check if you’re still dealing with the automatic or unexpected reboots after making this modification.
Method 4. Update Your Drivers
Some of your drivers may be outdated, missing, or damaged. Many users have reported that the problem was fixed after updating drivers for display adapters, chipsets, sound cards, and other devices. Here's how you can update your drivers:
If you're not comfortable manually updating your drivers, you can use a driver updater tool like Driver Easy. This software will automatically scan your system and update all of your drivers with just a few clicks.
Update drivers using Windows Update
-
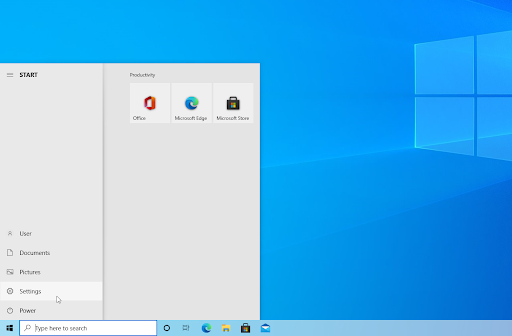
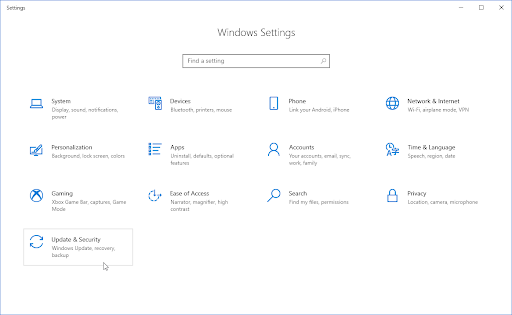
Click on the Windows icon in the bottom left of your screen to bring up the Start menu. Choose Settings, or alternatively use the Windows + I shortcut.
-
In the Settings app, click on the Update & Security tile. This is where you can find most of your Windows Update settings.
-
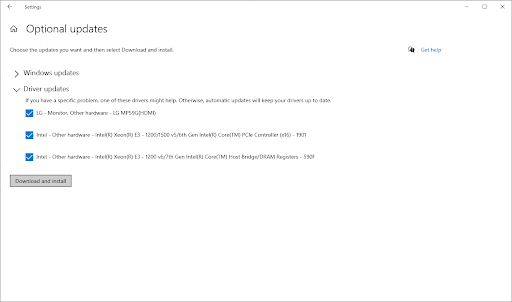
Go to the Windows Update section, and then click on the View optional updates link if available.
-
Expand the Driver updates section, and review what drivers currently need an update. To update the drivers, simply place a checkmark next to them, and then click the Download and install button.
- Allow Windows to update your drivers, and then reboot your computer.
Update drivers using the Device Manager
-
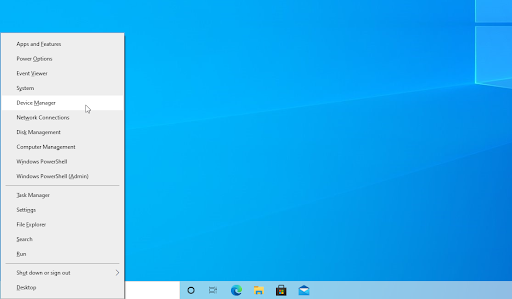
Press Windows + X keys on your keyboard and click on the Device Manager option from the WinX menu.
-
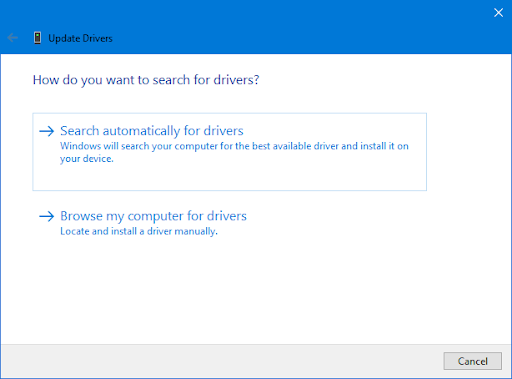
Right-click on the driver you want to update. If the problem was caused by a graphics card driver, for example, you would need to extend the Display adapters section. Choose Update Driver from the context menu.
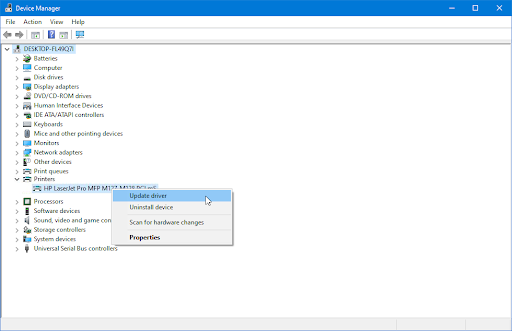
-
Select Search automatically for drivers from the options. This will allow Windows to connect to the internet and locate the latest drivers for your device. You may be prompted to select a driver if multiple updates are found.
- Wait for the driver installation to complete and restart your computer to apply the changes.
Method 5. Update Group Policies
Windows 10/11 is still restarting randomly? You may be able to troubleshoot the problem by making a few modifications to your Group Policies. This happens especially if you have incorrectly migrated group policies.
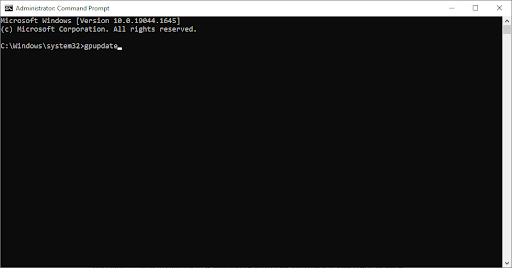
- Right-clicking on the Start menu icon and selecting Command Prompt (Admin). When the UAC prompt appears, select Yes to grant admin access. Click here to learn how to make your account into an administrator.
-
Input the gpupdate command and hit Enter on your keyboard to execute it.
- Wait for the command to finish updating your Group Policy, and then check if you’re still having random or unexpected reboots.
Method 6. Scan Your Computer for Malware
If you're still having problems, it's possible that your computer is infected with malware. To fix the issue, you'll need to scan your system for viruses and remove any malicious programs.
To scan your computer, you can use the built-in Windows Defender application. We recommend investing in a dedicated antivirus software if you want to do a deep scan.
Here’s how to scan your computer using Windows Defender on both Windows 10 and Windows 11 operating systems.
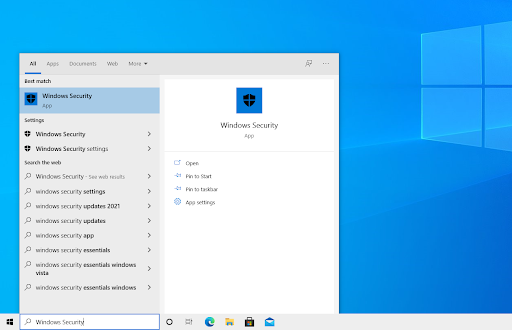
- Open the search bar in your taskbar by clicking on the magnifying glass icon. You can also bring it up with the Windows + S keyboard shortcut.
-
Type in Windows Security and launch it from the search results.
-
Switch to the Virus & Threat Protection tab using the home screen or the menu in the left-side pane. Click on the Scan Options link.
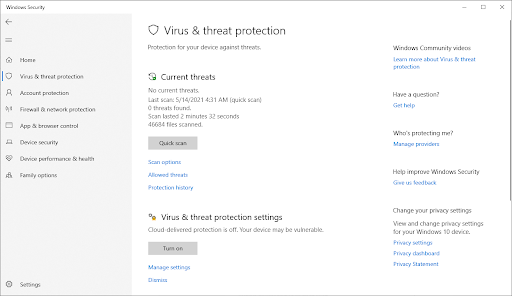
-
Select the Full scan option. This is going to check every single file on all of your drives to ensure no threats can hide. Take note that this scan may last over 1-2 hours, depending on how many files you have on your system.
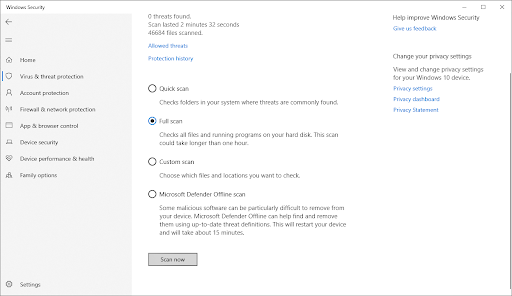
- Click on the Scan now button to begin the scan. If a threat is detected, Windows will automatically quarantine or remove it entirely. You can review the scan results afterward.
Method 7. Run the System File Checker (SFC Scan)
If none of the above methods worked, you can try running the System File Checker. This is a built-in Windows tool that can fix corrupt system files. Here's how to run the System File Checker:
- Open the search bar in your taskbar by clicking on the magnifying glass icon. Press Windows + S on your keyboard as a shortcut.
-
Type Command Prompt in the search box. When you see it in the results, right-click on it and choose Run as Administrator. If you're using a local account that doesn't have administrator permissions, click here to learn how to grant admin access.
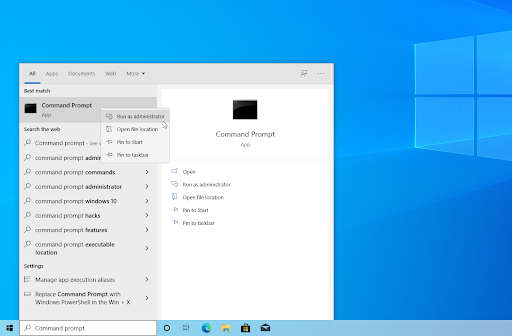
- When prompted by the User Account Control (UAC), click Yes to allow the app to launch with administrative permissions.
-
Type in the following command and press Enter to execute it: sfc /scannow
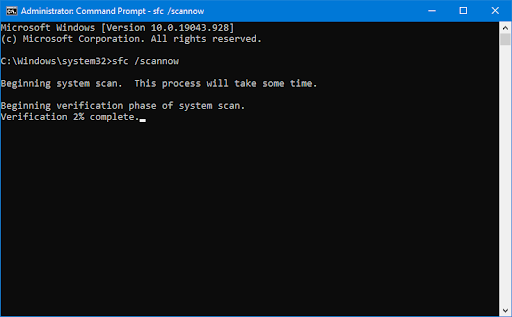
- Wait for the System File Checker to finish scanning your computer. In the case of a discrepancy, the utility will restore system files and fix all errors related to them.
Method 8. Run the CHKDSK Command
Still no luck? You can try running the CHKDSK command. This is a utility that can fix errors on your hard drive and help improve its overall performance and health, and fix various problems. Here's how to run the CHKDSK command:
- Open the search bar in your taskbar by clicking on the magnifying glass icon. You can also bring it up with the Windows + S keyboard shortcut.
- Type Command Prompt in the search box. When you see it in the results, right-click on it and choose Run as Administrator. If you're using a local account that doesn't have administrator permissions, click here to learn how to grant admin access.
- When prompted by the User Account Control (UAC), click Yes to allow the app to launch with administrative permissions.
-
Type in the following command and press Enter to execute it: chkdsk C: /r
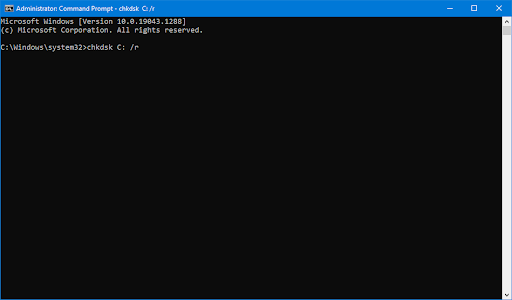
- Wait for the scan to complete.
Method 9. Stop Overclocking
Many users have reported that their computer starts randomly restarting after they overclocked their CPU or GPU.
Overclocking is the process of pushing your hardware beyond its limits to increase its performance. If you're overclocking your computer, try resetting your clock speeds back to their default values and see if that fixes the problem.
While overclocking is a great way to get more out of your hardware, it's not without its risks. If you're not careful, you can damage your hardware. That's why we recommend that you only overclock your computer if you're an experienced user and know what you're doing. Misconfigured settings can lead to a lot of issues, like making your computer automatically restart.
Recover Lost Files After Random Restart
The most frustrating part of your computer randomly restarting is that you may lose unsaved work or open files. But don't worry, there are ways to recover lost files after a restart. More often than not, these files are impossible to recover, leading to hours of lost work.
There are a few things you can try to recover lost files after an unexpected restart:
- Check the Recycle Bin: The first place you should look is the Recycle Bin. If you accidentally deleted a file, it may be there.
- Restore previous versions: If you have System Restore enabled, you can try restoring your computer to a previous point in time when the file was not deleted.
- Use data recovery software: Data recovery software can help you recover lost files that were not saved before the restart. We recommend using data recovery software like Disk Drill to scan your computer for lost files. Disk Drill is a powerful data recovery tool that can recover lost files from any storage device, including your hard drive, external hard drive, USB drive, memory card, and more.
We hope this guide has helped you fix your lost files after the random restart issue. If you're still having trouble or have any questions, feel free to reach out to our experts here at SoftwareKeep for help!
Summary: How To Fix Random Restart Problems in Windows 11?
First, check your power supply. If it's not providing enough power to your computer, that could be causing the random restarting. Make sure all the cables are plugged in properly and that the power supply is switched on.
Next, check your drivers. Outdated or corrupted drivers can often cause problems like this. Update all your drivers and see if that fixes the issue.
Finally, check your hardware. If you have any damaged or defective hardware, that could be causing the random restarting. Try replacing the hardware with a working one to see if that solves the problem.
If none of these troubleshooting tips help, you may need to contact a computer technician for further assistance!
Final Thoughts
That’s it: This article has shown you how to fix random restarts on Windows 10/11.
We hope that at least one of them worked for you!
Now, we’d like to turn it to you.
Were you able to fix your computer restarting randomly with these methods? Are you still having trouble or have any questions?
Feel free to reach out to our experts here at SoftwareKeep for help. We're always happy to assist our customers in any way we can!
Thank you for reading this guide!
One More Thing
Follow our Blog and our Help Center for more great articles like this one and other information on how to troubleshoot various issues.
Sign up for our newsletter and get early access to our blog posts, promotions, and discount codes. We hope to see you again soon.
Recommended Articles
» How to Fix Windows 10 Stuck on Welcome Screen
» How To Fix the WaasMedic.exe High CPU Issue on Windows 11/10?
» How To Hide Taskbar in Fullscreen in Windows 10/11
Feel free to reach out with questions or requests you’d like us to cover.