Windows 10 requires a plethora of system processes to operate. Most of these processes aim to improve your user experience with the system, however, they’re not perfect. Users have been reporting high CPU and Memory usage from the SysMain process (also known as Superfetch).
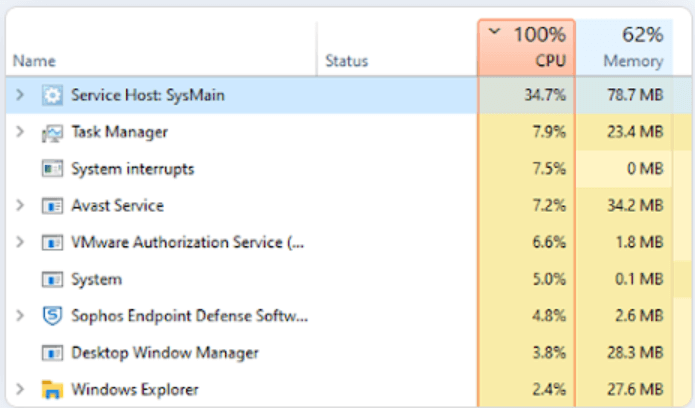
This issue can be dangerous. If your resources are constantly at a high percentage, the performance of your computer will significantly decrease. It may even lead to blue screen errors, data loss, or physical damage to your hardware.
In this article, you can learn how to fix the problem of SysMain using high CPU and Memory on Windows 10. We’ll outline the best methods that still work today in order to restore your system.
Table of Contents
- What is SysMain? Can I disable it?
- How to fix the SysMain process’ high CPU and Memory usage on Windows 10
- Method 1. Disable the SysMain service in Services
- Method 2. Disable SysMain with the Command Prompt
- Method 3. Disable SysMain using the Registry Editor
- Method 4. Run the System File Checker (SFC)
- Final thoughts
What is SysMain? Can I disable it?
SysMain is a certified Windows 10 process. It aims to analyze your computer usage and improve it by using the collected data. For example, it’s able to speed up app launch times and performance.
Unfortunately, having SysMain enabled may cause more harm than good. Many users have reported that the process is consuming a large amount of resources on its own, slowing down the system and putting physical hardware at risk. Luckily, it isn’t an essential system process and can be disabled if necessary.
If you think that SysMain is causing you issues, it’s better to disable it. Using our methods below, you can find a solution to help restore your computer.
How to fix the SysMain process’ high CPU and Memory usage on Windows 10
Note: Some of the guides below may require you to have access to a local administrator account.
Read: How to make a local user an administrator in Windows 10 guide.
Method 1. Disable the SysMain service in Services
The steps below show you how to disable SysMain directly in the Service Manager.
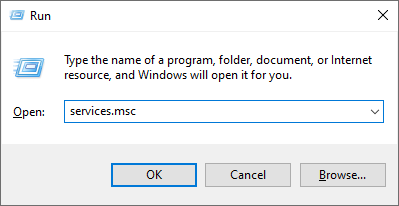
- Press the Windows + R keys on your keyboard. This is going to bring up the Run utility.
-
Type in “services.msc” without the quotation marks and press the Enter key on your keyboard. This will open the Services window.
-
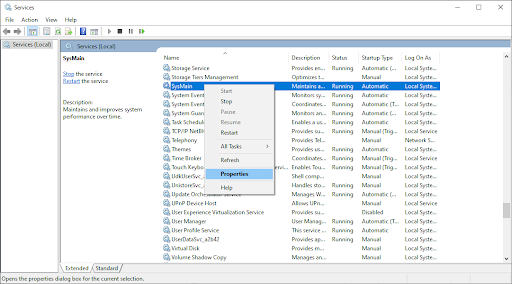
Scroll down until you see the SysMain service. Right-click on it, and then choose Properties from the context menu.
-
Stay on the General tab. Ensure that the Startup type is set to Disabled, and then click on the Stop button next to Service status. Doing so will stop the service from starting when you boot up your computer.
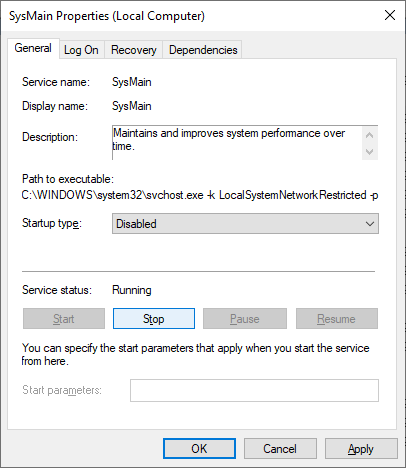
- Click Apply, and then OK to exit out of the window. You should be able to see significant improvement in your system performance.
Method 2. Disable SysMain with the Command Prompt
Use the steps below if you want to disable SysMain with the elevated Command Prompt. We recommend this method for intermediate users, as it requires you to enter and execute a command with an administrator account.
If you need any help, don’t hesitate to get in touch with us on our Live Chat. Our experts will guide you through the troubleshooting process.
- Open the Command Prompt in one of the following ways:
-
Open the Search function in your taskbar, or alternatively use the Ctrl + S keyboard shortcut to bring up the search bar and look up “Command Prompt”. When you see it in the results, right-click on it and choose Run as Administrator.

-
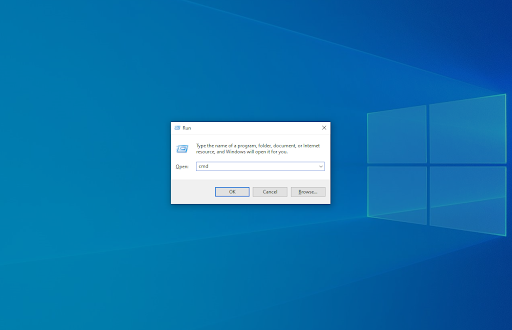
Press the Windows + R keys on your keyboard to bring up the Run utility. Type in “cmd” and press the Ctrl + Shift + Enter keys on your keyboard. By doing so, you’re launching the Command Prompt with administrative permissions.
-
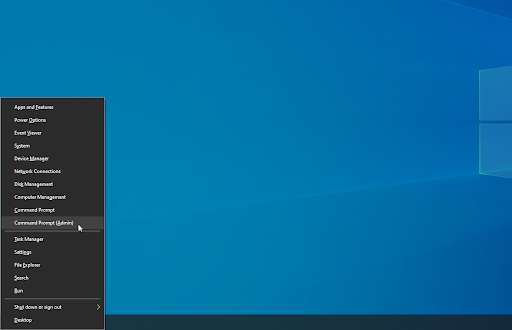
Press the Windows + X keyboard shortcut, then select Command Prompt (Admin).

- When prompted by the User Account Control (UAC), click Yes to allow the app to launch with administrative permissions.
-
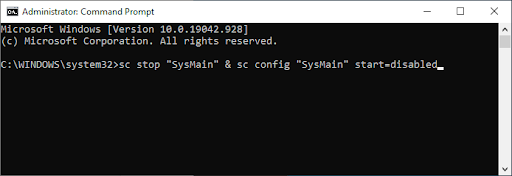
Execute the following command: sc stop "SysMain" & sc config "SysMain" start=disabled
- Restart your computer after successfully executing the command.
Method 3. Disable SysMain using the Registry Editor
The steps below require you to use the Registry Editor in order to disable the SysMain service.
Before you proceed, take note of the possible risks of performing this method. It’s highly recommended to create a backup of your registry in case something goes wrong.
- Press the Windows + R keys on your keyboard. This is going to bring up the Run utility.
-
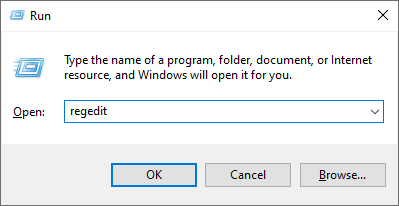
Type in “regedit” without the quotation marks and press the Enter key on your keyboard. This will launch the Registry Editor application.
-
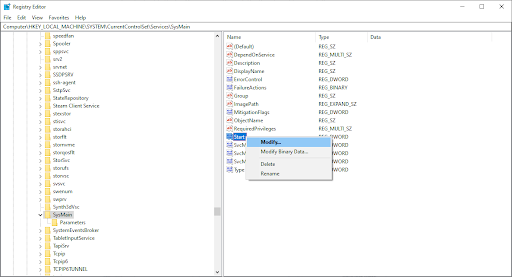
Navigate to the following key: HKEY_LOCAL_MACHINE\SYSTEM\CurrentControlSet\Services\SysMain
-
You can use the address bar in the Registry Editor to type or paste the key as well, making navigation faster.

-
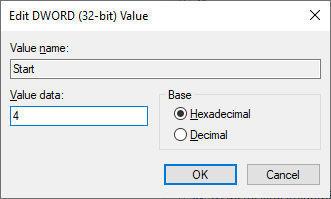
Select the Start value. Right-click on it, and then choose Modify from the context menu.
-
Change the Value data to 4. Click OK to save your settings. Make sure not to modify any other settings in order for this method to work as intended.
- Exit the Registry Editor and restart your computer.
Method 4. Run the System File Checker (SFC)
The System File Checker is a tool available in most versions of Windows by default. It’s also called an “SFC scan,” and it’s your quickest way to automatically fix corrupted system files and a plethora of other issues.
- Open the Command Prompt in one of the following ways:
-
Open the Search function in your taskbar, or alternatively use the Ctrl + S keyboard shortcut to bring up the search bar and look up “Command Prompt”. When you see it in the results, right-click on it and choose Run as Administrator.

-
Press the Windows + R keys on your keyboard to bring up the Run utility. Type in “cmd” and press the Ctrl + Shift + Enter keys on your keyboard. By doing so, you’re launching the Command Prompt with administrative permissions.

-
Press the Windows + X keyboard shortcut, then select Command Prompt (Admin).
- When prompted by the User Account Control (UAC), click Yes to allow the app to launch with administrative permissions.
-
First, we’ll run the System File Checker. Type in the following command and press Enter to execute it: sfc /scannow
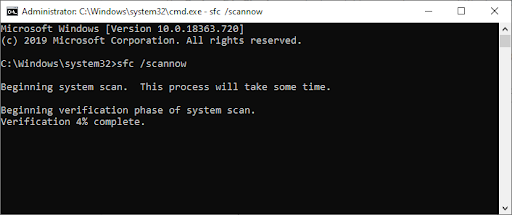
- Wait for the SFC scan to finish scanning your computer and repairing corrupt files. This may take a long time; ensure that you don’t close the Command Prompt or shut your computer down.
- Restart your device once the command has been executed.
Final thoughts
We hope you found this article helpful. If you need more articles like this, our Help Center offers hundreds of guides to assist you if you’re in need of further help. Return to us for more informative articles, or get in touch with our experts for immediate assistance.
One more thing
Would you like to receive promotions, deals, and discounts to get our products for the best price? Don’t forget to subscribe to our newsletter by entering your email address below! Be the first to receive the latest news in your inbox.
You may also like
» How to Fix the “Critical Structure Corruption” Error on Windows 10
» How to Fix Inaccessible Boot Device Error In Windows 10
» How to Fix the “Side by Side Configuration Is Incorrect” Error on Windows 10