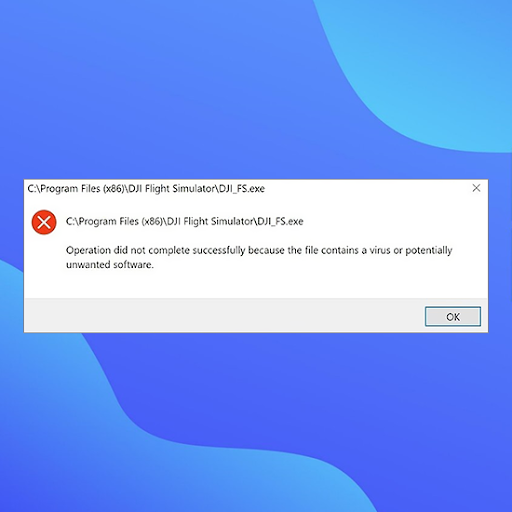
Can’t open a file because Windows 10 detects a virus in the file location? Learn here how to solve the “Operation did not complete successfully” error with 7 easy methods.
If you’ve been on the internet for a while now, you probably downloaded something from a shady website. Maybe you wanted to get an application for free to try it before committing to a purchase or just clicked on a misleading link. Whether or not the download is legitimate, Windows 10 may flag it as an infected file.
This error shows up when Windows 10’s built-in antivirus application, Windows Defender, detects a file as dangerous. The file may contain a false positive or actual malware. In this article, we’ll explore methods to remove malware from a downloaded file, or bypass the warning if it falsely detects a safe file.
Let's get started!
Jump To:
- How to Fix Operation Did Not Complete Successfully Because the File Contains a Virus
- Method 1. Temporarily Disable Windows Defender
- Method 2. Turn Off Third-Party Antivirus Program
- Method 3. Add the File or Folder to the Exclusions List
- Method 4. Repair the File Explorer
- Method 5. Fix Windows Backup
- Method 6. Run the Disk Cleanup Utility
- Method 7. Run an Antivirus Scan
What Causes the “Operation Did Not Complete Successfully” Error Message?
Depending on your situation, the error message could come up for a few different reasons.
- You downloaded a genuine file, but Windows Defender detects a virus. If you downloaded something from a genuine website, it’s possible that Windows Defender detected a false positive. This is a general issue with all antivirus software — if code or behavior matches a known malware, Windows Defender may flag the file as dangerous.
- You downloaded an infected file. Typically, misleading links and malicious users spread files that appear genuine but contain malware. If this happens, Windows Defender gives you a warning after protecting your computer.
The methods below will guide you to open a file and bypass the “Operation did not complete successfully because the file contains a virus” message.
How to Fix Operation Did Not Complete Successfully Because the File Contains a Virus
Before proceeding, keep in mind that your computer may be in danger. If the file does contain malware, it may be too dangerous to open the file. If you’re not certain that the file you downloaded is genuine, run an antivirus scan and find a new, legitimate download.
Method 1. Temporarily Disable Windows Defender
If you believe that the file you downloaded is genuine, you can bypass the “Operation did not complete successfully because the file contains a virus” warning. To do this, you’ll have to temporarily disable Windows Defender, and open the file while it’s turned off.
Option 1. Disable Windows Defender in Settings
The fastest way of disabling the built-in antivirus is going to the Settings menu.
- Click on the Windows icon in the bottom left of your screen to bring up the Start menu.
-
Choose Settings, or alternatively use the Windows + I shortcut.

-
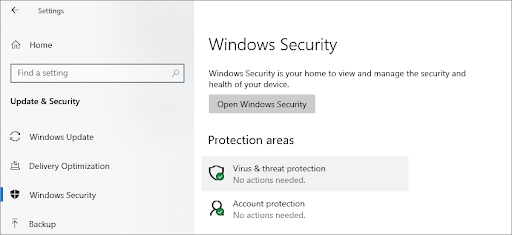
Click on the Update & Security tile. This is where you can find most of your security settings.
-
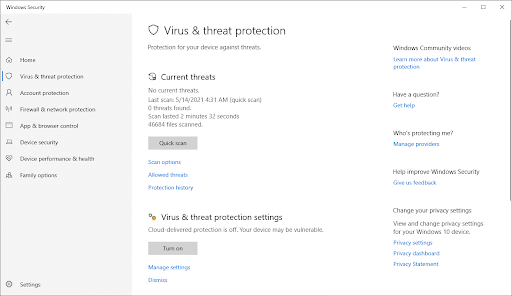
Here, switch to the Windows Security tab, and then click on Virus & threat protection.
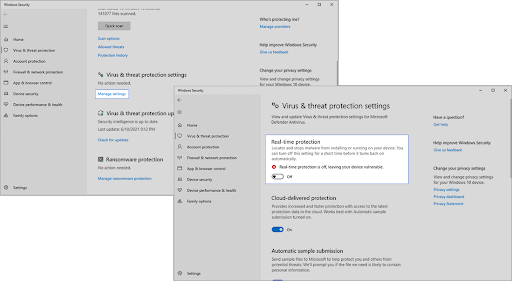
- First, click on the Manage settings link under the Virus & threat protection settings header. You’ll be redirected to a new page. Here, click on the Real-time protection toggle to turn off Windows Defender.
Try opening the file again. If you still get an error, perform the same steps and turn off Cloud-delivered protection as well. If you’re still unable to bypass the warning, you may have to disable Windows Defender using the Registry.
Option 2. Disable Windows Defender in the Registry
Some users may not be successful in disabling Windows Defender antivirus software the traditional way. If you can’t perform the method above, try and turn off the application using the Registry Editor.
- Open the search bar in your taskbar by clicking on the magnifying glass icon. You can also bring it up with the Windows + S keyboard shortcut.
-
Type Registry Editor in the search box and click on the first matching search result.

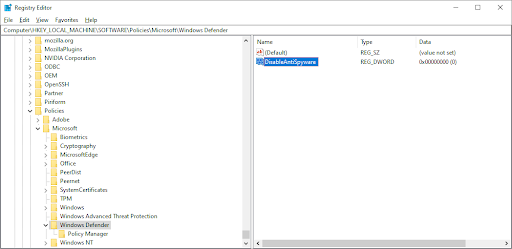
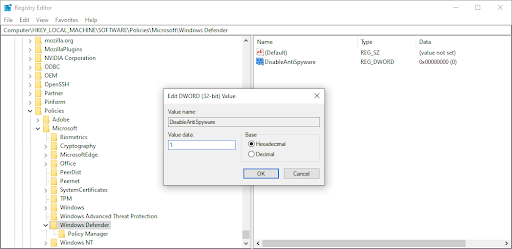
- Navigate to the following key, or copy-paste it in the address bar of the Registry Editor: HKEY_LOCAL_MACHINE\SOFTWARE\Policies\Microsoft\Windows Defender
-
Locate a registry entry named DisableAntiSpyware, then double click on it.
-
If you don't see this key, right-click on any empty space and choose New → DWORD (32-bit) Value. Name the key DisableAntiSpyware, and then double-click on it to open its properties.

-
Set the Value data to 1 in order to disable Windows Defender and Antimalware Service Executable (MsMpEng.exe) in Windows 10.
- Exit the Registry Editor and restart your computer. You may notice improvements with your device's performance.
Once again, let us remind you that it's risky to operate your device without having an antivirus application installed. You may become vulnerable to malware, hackers, and other types of cyberattacks. We highly recommend using Malwarebytes if you need a free and lightweight solution. We also offer Malwarebytes Premium for the best market price.
Method 2. Turn Off Third-Party Antivirus Program
Antivirus applications are known to cause issues on computers by blocking apps and services from running properly. You can test if the antivirus program you’re using at the moment is causing the error by temporarily disabling it.
Note: This method is not recommended as it is unsafe to use your computer without protection. Only proceed if you’re aware of the possible risks and have a backup of your system to revert any damage that may happen.
-
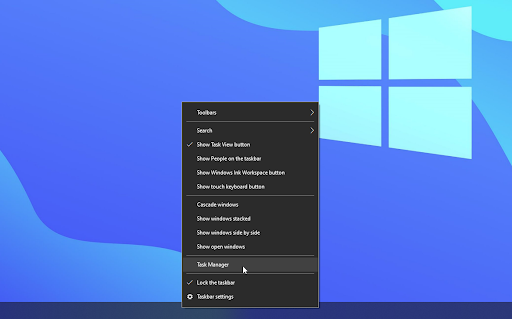
Right-click on an empty space in your taskbar and choose Task Manager. If the Task Manager launches in compact mode, make sure to expand details by clicking on the “Mode details” button.
-
Switch to the Start-up tab using the header menu located at the top of the window. Find your antivirus application from the list and select it by clicking on it once.
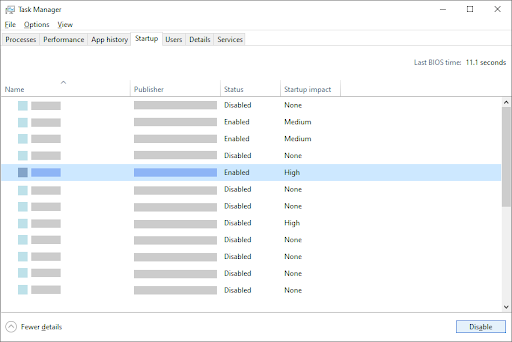
- Click on the Disable button now visible in the bottom-right of the window. This will disable the application from launching when you start your device.
- Restart your computer.
Method 3. Add the File or Folder to the Exclusions List
If you want to bypass the warning without having to turn off Windows Defender or your third-party antivirus, you can. Simply add the file itself, or the entire folder containing it to the exclusions list. By doing so, Defender won’t look for any suspicious files in that specific directory.
- Open the File Explorer and navigate to the file’s location. Click on the address bar and copy the full file path to the file with the Ctrl + C keyboard combination.
- Open the search bar in your taskbar by clicking on the magnifying glass icon. You can also bring it up with the Windows + S keyboard shortcut.
-
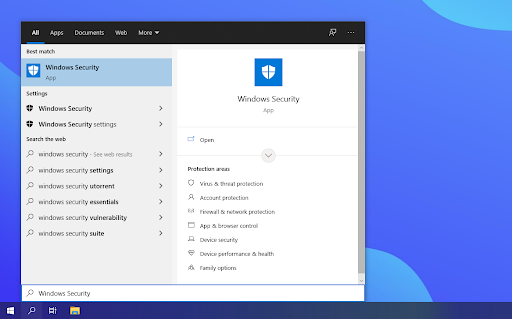
Type in Windows Security and launch it from the search results.
-
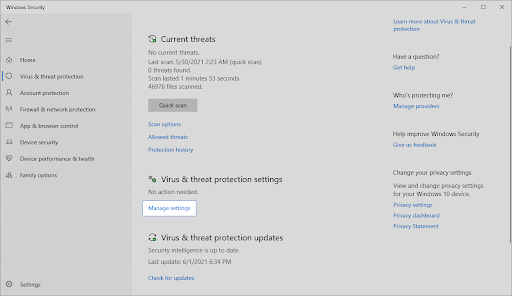
Switch to the Virus & Threat Protection tab using the home screen or the menu in the left-side pane. Here, click on the Manage settings link under Virus & threat protection settings.
-
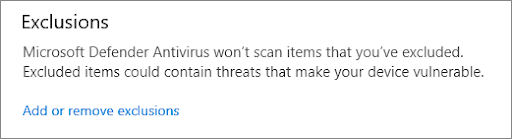
Under Exclusions, click the Add or remove exclusions link. You'll be redirected to a new page.
-
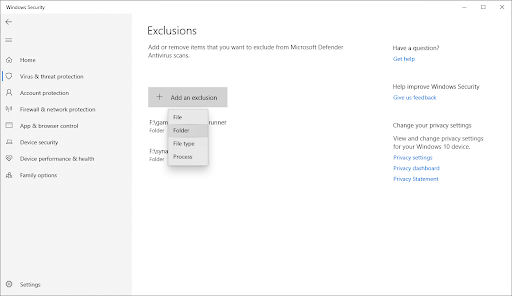
Click the Add an exclusion button. From the drop-down menu, select File or Folder, depending on what you want to open.
-
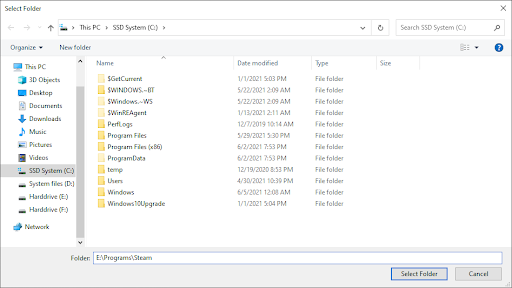
Paste the path you copied from the address bar by pressing the Ctrl + V keys. Click the Select Folder button when you're done.
After adding the file as an exclusion, you’ll be able to open it. We recommend running an antivirus scan afterward to ensure no real malware was in the file.
Method 4. Repair the File Explorer
It’s possible that the “Operation did not complete successfully because the file contains a virus” error message shows up because of a File Explorer problem. In this case, follow the steps below to repair the File Explorer.
- Open the search bar in your taskbar by clicking on the magnifying glass icon. You can also bring it up with the Windows + S keyboard shortcut.
-
Type Command Prompt in the search box. When you see it in the results, right-click on it and choose Run as Administrator. If you need help, check out our How to make a local user an administrator in Windows 10 guide.
- When prompted by the User Account Control (UAC), click Yes to allow the app to launch with administrative permissions.
-
Once the Command Prompt window is open, type in the following commands and press Enter after each line to execute them:
- sfc /SCANFILE=c:\windows\explorer.exe
-
sfc /SCANFILE=C:\Windows\SysWow64\explorer.exe

- After both commands have been executed, restart your computer and see if you’re able to open the file.
Method 5. Fix Windows Backup
In some cases, the error message shows up because of temporary Internet files and cache being stored in your backups. You can easily fix this by performing the next steps.
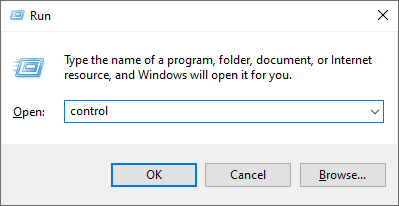
- Press the Windows + R keys on your keyboard. This is going to bring up the Run utility.
-
Type in “control” without the quotation marks and press the Enter key on your keyboard. This will launch the Control Panel application.
-
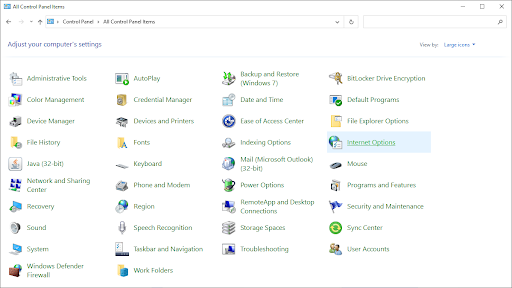
Change the view mode to Large icons, and then click on the Internet Options button.
-
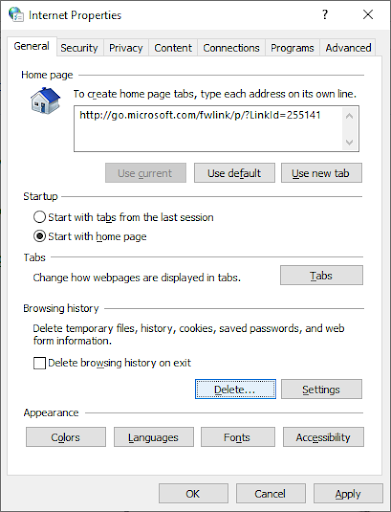
Stay on the General tab. Click on the Delete… button under the Browsing history heading. A new window will open.
-
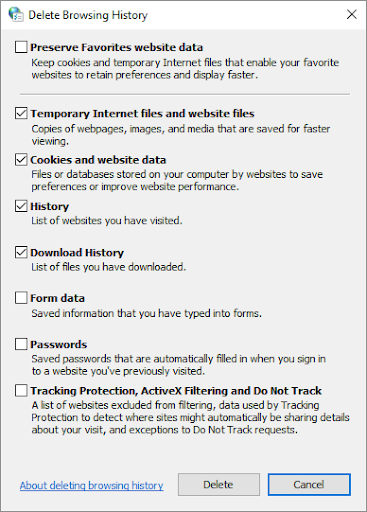
Uncheck the Preserve Favorites website data option.
-
Next, check the following options, and then click on the Delete button:
- Temporary Internet files and website files
- Cookies and website data
- History
- Download History
- Restart your computer and see if you’re able to open the file without a warning message. If not, you can try resetting your browser and clearing browser data, cookies, and browsing history.
Method 6. Run the Disk Cleanup Utility
Windows 10 often creates temporary files and folders. If they accumulate, it can affect your computer and may cause misleading errors. Delete junk files using the Disk Cleanup utility to save space and fix computer problems.
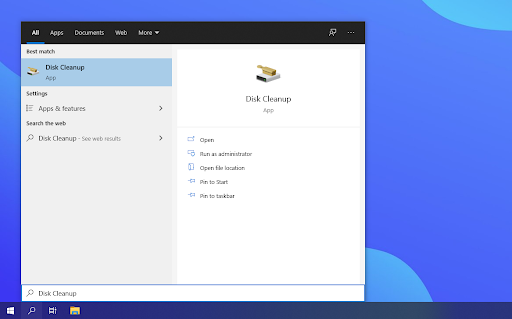
- Open the search bar in your taskbar by clicking on the magnifying glass icon. You can also bring it up with the Windows + S keyboard shortcut.
-
Type in Disk Cleanup and click on the first search result.
-
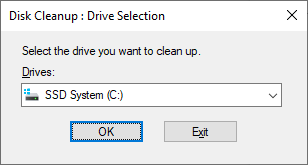
Select the Windows 10 system drive, and then click the OK button. Usually, the system is installed on disk C:.
-
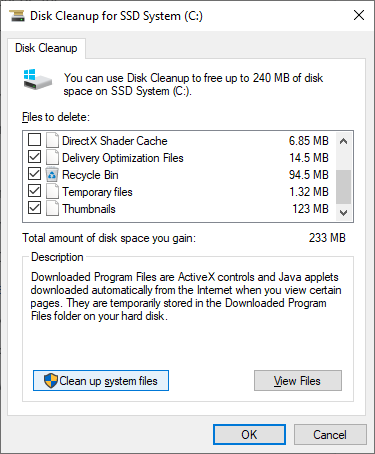
In the new window, you’ll see all space taken by temporary files. Make sure that Temporary Internet Files and Temporary Files are selected. You may also delete other junk files, such as Thumbnails or DirectX Shader Cache. When you're done selecting what you want to remove, click OK.
-
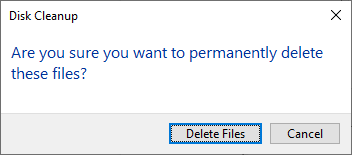
Click on the Delete Files button in the dialog box that pops up. The removal process will start and free up space on your device.
Method 7. Run an Antivirus Scan
We recommend running a security scan to ensure that you don’t have a malicious file. It can also detect if your system is not currently infected by malware. We’ll be using the built-in Windows Defender to perform a system scan, however, a more focused third-party solution may work better.
- Open the search bar with the Windows + S keyboard shortcut. Type Windows Security and launch it from the search results.
-
Switch to the Virus & Threat Protection tab using the home screen or the menu in the left-side pane. Click on the Scan Options link.
-
Select the Full scan option. This is going to check every single file on all of your drives to ensure no threats can hide. Take note that this scan may last over 1-2 hours, depending on how many files you have on your system.
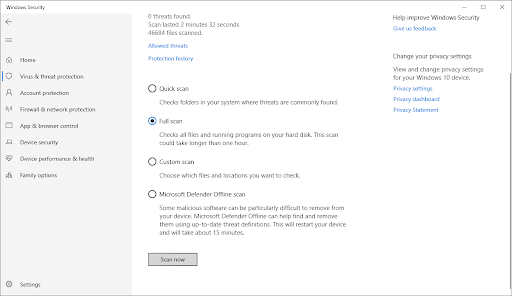
- Click on the Scan now button to begin the scan. If a threat is detected, Windows 10 will automatically quarantine or remove it entirely. You can review the scan results afterwards.
After completing these steps, you may be able to successfully open the problematic file. If the file has been removed by Windows Defender, it’s likely that the file was unsafe and misleading to begin with. In this case, finding a different download is your best bet.
Final Thoughts
That wraps up the guide to opening a file even if Windows 10 detects a virus in the file directory. We hope this helps.
In the future, be careful with what you download from the internet. Unofficial websites often hide malware and potentially unwanted programs (PUPs) in their downloads. Avoid these websites to lower the possibility of this error from happening again.
Our Help Center offers hundreds of guides to assist you if you’re in need of further help. Return to us for more informative articles, or get in touch with our experts for immediate assistance.
One More Thing
Would you like to receive promotions, deals, and discounts to get our products for the best price? Don’t forget to subscribe to our newsletter by entering your email address below! Be the first to receive the latest news in your inbox.
You May Also Like
» How To Fix System Service Exception Error In Windows 10
» Fixed: DirectX Encountered an Unrecoverable Error
» Slow Internet on Windows 10? Here’s How To Solve It