If you're a gamer, running into the “DirectX encountered an unrecoverable error” problem can be a huge headache. Click here to learn how to fix this DirectX error, and how you can prevent it from happening in the future.
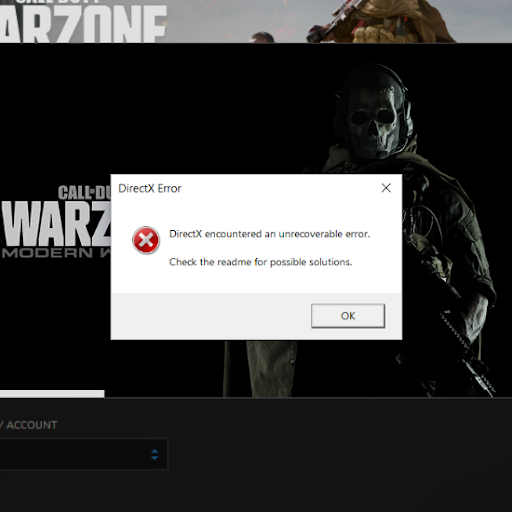
Fans of many titles, such as Call of Duty: Warzone has been dealing with an annoying error message which prevents players from running a game. If you see “DirectX encountered an unrecoverable error” upon launch, the application will automatically close and not allow you to proceed further into gameplay.
Without a doubt, this is incredibly frustrating. Don’t worry — we’re here to help you resolve “DirectX encountered an unrecoverable error” with easy and quick methods.
Jump to:
- What Causes the DirectX Encountered an Unrecoverable Error Message?
- My Most VIRAL Fortnite Sketches (2023)
- How To Fix DirectX Encountered an Unrecoverable Error
- Method 1. Make Sure Your System Meets the Requirements
- Method 2. Ensure DirectX Is Up-to-Date
- Method 3. Quit Third-Party Applications and Overlays
- Method 4. Update Video Card Drivers
- Method 5. Make a Registry Modification
- Method 6. Change Your Display Scaling Settings
- Method 7. Use the Scan and Repair Option in Battle.net Launcher
- Method 8. Delete the Battle.net Cache Folder
- Final Thoughts
What Causes the DirectX Encountered an Unrecoverable Error Message?
There are a number of different things that may cause this DirectX error. Let’s go over the most common causes, and how you can identify them to help you during troubleshooting.
-
Unexpected bugs. Sometimes, games or your system may encounter a random bug that prompts the “DirectX encountered an unrecoverable error” message. In this case, simply try to launch the game again after restarting your computer. If the error persists, you can rule out this cause.
-
Corrupt game files. There’s a possibility that your game files are corrupt, or some key files have been deleted. You can try repairing the game, or simply uninstalling it and installing a fresh copy.
-
Outdated software or drivers. Have you updated your game recently? What about your drivers? If you leave software outdated, the chances of seeing the “DirectX encountered an unrecoverable error” problem are higher.
- Compatibility issues. In many cases, applications such as antivirus or PC boosters may block your game from launching properly. This leads to the DirectX error, which makes it impossible to play. You can temporarily disable these apps to test whether or not they’re compatible with the game.
Now, let’s see what you can do in order to fix “DirectX encountered an unrecoverable error.”
My Most VIRAL Fortnite Sketches (2023)
How To Fix DirectX Encountered an Unrecoverable Error
The methods below were written using the latest version of Windows 10. If you’re on a different operating system, some steps may vary. Note that some solutions may require you to have an administrative local account.
Method 1. Make Sure Your System Meets the Requirements
It’s possible that your current PC build or gaming laptop is not compatible to run the game you’re trying to play. To ensure your machine is able to run the game with a playable frame rate and without errors, always double-check the system requirements.
Check the Call of Duty: Warzone system requirements here. Alternatively, navigate to CanYouRunIt.com in your browser and find the game you’re having issues with. After allowing the website to analyze your build, it’ll tell you whether or not your computer meets the requirements.
If your device does not meet these requirements, it’s time to upgrade. Identify which parts are falling behind, and replace them with newer, more powerful parts that fit well into your build.
Method 2. Ensure DirectX Is Up-to-Date
While looking at the system requirements for a game, you might notice that there’s a specific DirectX requirement. In order to run the game, you need to make sure your DirectX is up-to-date with the game’s requirements. For example, Call of Duty requires you to have at least DirectX 11.
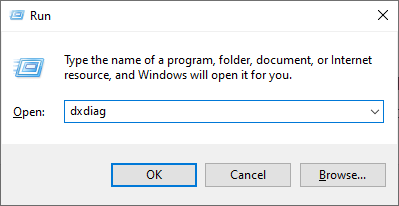
- Press the Windows + R keys on your keyboard. This is going to bring up the Run utility.
-
Type in “dxdiag” without the quotation marks and press the Enter key on your keyboard.
-
Stay on the System tab, and look for the “DirectX Version” line. Check if your current version is compatible with the game you’re trying to run. If not, you’ll need an update.

- If you need to update DirectX:
- Windows 10, Windows 8, and Windows 8.1 — Your system will automatically install the latest version of DirectX on your computer during the Windows Update process. Check How to Update Windows 10 for more information.
- Windows 7 and Windows XP — You may need to manually install an update package to get the latest DirectX in your computer.
Method 3. Quit Third-Party Applications and Overlays
Some users have observed that not all video games support features like overlays. In some cases, your antivirus app may be the source of the issue. We’ve compiled a list of possible applications that may conflict with video games and cause the “DirectX encountered an unrecoverable error” message.
Try quitting the following applications, or disable the in-game overlay when possible:
- MSI Afterburner
- MSI DragonCentre
- Riva Stats Server
- Razer Cortex
- GeForce Experience Overlay
- Discord Overlay
- Third-party antivirus applications
After ensuring that none of these apps are running on your device, try to launch the problematic game again. No luck? Don’t give up yet! We have many more things for you to try below.
Method 4. Update Video Card Drivers
It's extremely important that your graphics card driver is always up-to-date. Outdated drivers can cause more issues than you’d imagine. After major Windows 10 updates, compatibility issues can appear and cause all sorts of errors as well.
Your display driver may be outdated or damaged, which can cause the “DirectX encountered an unrecoverable error” issue. To fix this, you have 3 options for updating your driver:
Option 1. Update display adapter driver manually
-
Check the type of graphics card you’re using:
-
Press the Windows + R keys. Type in “dxdiag” and press the OK button. This is the shortcut to reach the DirectX Diagnostics tool.

-
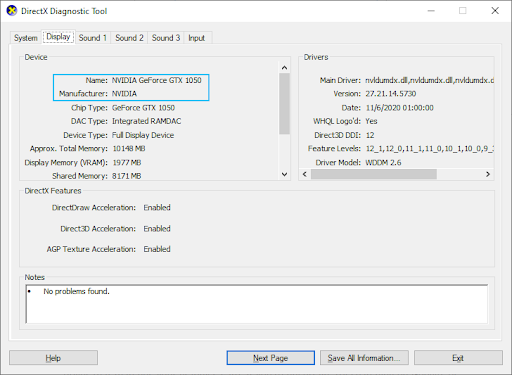
Switch to the Display tab. Under Device, take note of the name and manufacturer of your graphics card.
-
Press the Windows + R keys. Type in “dxdiag” and press the OK button. This is the shortcut to reach the DirectX Diagnostics tool.
- Go to the manufacturer’s website, and then navigate to their download page. Here are some of the most common manufacturers’ web pages where you can find driver downloads:
-
Find your graphics card model using the provided search tools, and download its newest driver.
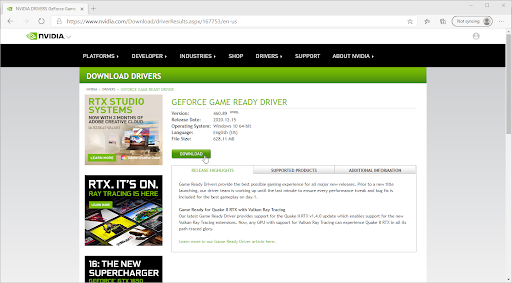
- Download and install the latest driver by double-clicking on the downloaded file and follow the on-screen instructions. You might be prompted to restart your device.
Note: Always make sure that you’re always downloading and installing the correct driver that matches your graphics card. If you’re uncertain, try searching on Google, or contact the customer service of your manufacturer.
Option 2. Update display adapter driver automatically
-
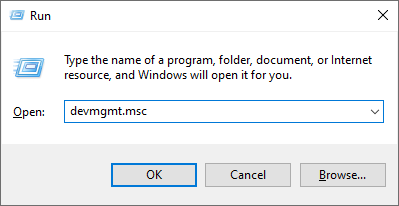
Press the Windows + R keys. Type in “devmgmt.msc” without the quotation marks, and press the OK button. This will take you to the Device Manager window.
-
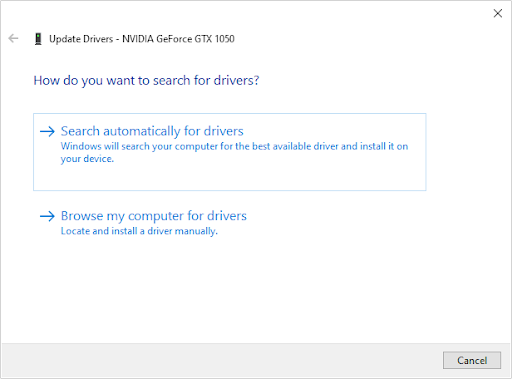
Expand the Display adapters section by clicking on the arrow icon to the left. Right-click on your current driver, and then select the Update driver option.

-
Click on Search automatically for updated driver software to allow Windows 10 to automatically update your driver. When you’re done, feel free to exit out of the Device Manager and restart your computer.
Option 3. Update your drivers with a third-party app
While it’s not necessary to use a third-party app for driver updates, it’s an option that is available to all Windows 10 users. You can also find and download third-party updater tools such as Driver Booster, DriverHub, or DriverPack Solution to automatically update drivers.

Most of these tools are free and easy to use. If you’re not satisfied with the service, we recommend searching the internet for more advanced apps.
Always make sure that the app you’re using is trustworthy. Some applications that offer to fix or update your drivers contain malware, adware, or spyware. We recommend searching the name of the product and reading reviews made by real users before downloading any software.
Method 5. Make a Registry Modification
Advanced users can make a simple modification in a Registry key in order to fix the detrimental DirectX error. If you’re not familiar with this process, note that modifying the Registry may cause errors if done wrong — make sure to stick to our steps closely. We highly recommend creating a Registry backup or a restore point on your device before proceeding.
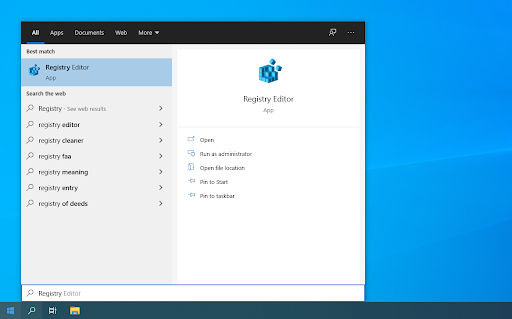
- Open the search bar in your taskbar by clicking on the magnifying glass icon. You can also bring it up with the Windows + S keyboard shortcut.
-
Type in Registry Editor and click on the matching search result to launch the app.
-
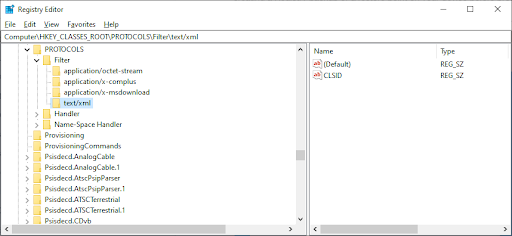
Navigate to the following Registry key, or use the address bar and copy-paste the file’s location: HKEY_CLASSES_ROOT\PROTOCOLS\Filter\text/xml
-
Right-click on the text/xml entry in the left-side pane, and then select Delete from the context menu. Confirm the action when prompted.
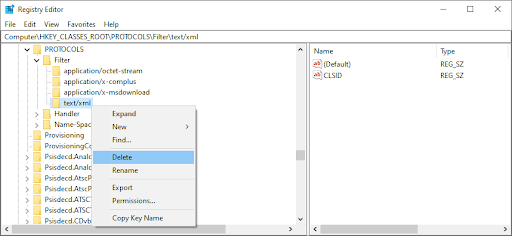
- Exit the Registry Editor and reboot your system.
Method 6. Change Your Display Scaling Settings
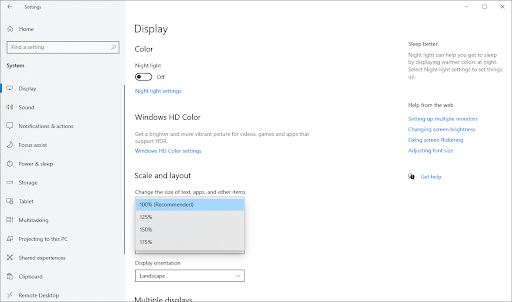
Configuring your display scale may help you resolve errors with DirectX. Users in the community have found this to be a source for “DirectX encountered an unrecoverable error” among many other issues related to gaming.
-
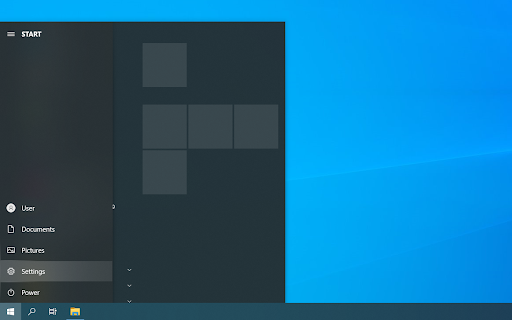
Click on the Windows icon in the bottom left of your screen to bring up the Start menu. Choose Settings, or alternatively use the Windows + I shortcut.
-
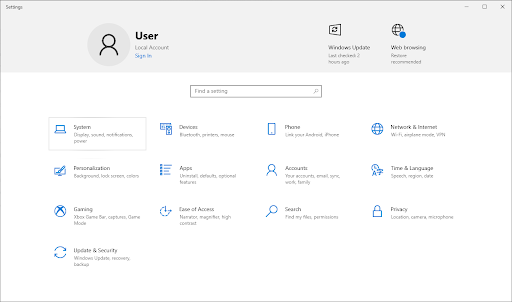
Click on the System tile.
-
Switch to the Display tab. Make sure to set Scale and layout to 100%. Having this setting above or below this percentage may lead to errors.
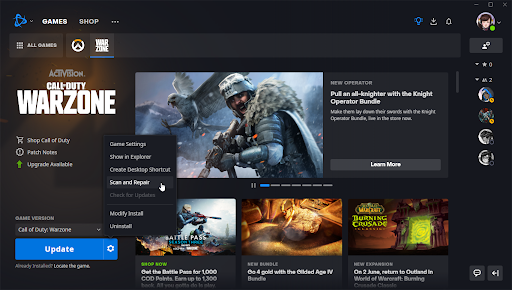
Method 7. Use the Scan and Repair Option in Battle.net Launcher
If you’re trying to run a game from the Battle.net launcher such as Call of Duty or Overwatch, you can easily repair it with a built-in tool. If your game comes with a different launcher, try to see if there’s a similar repair tool included, and follow the developer’s instructions on how to use it.
-
Open the Battle.net launcher, and navigate to the game you want to fix. Click on the Options button, and then select Scan and Repair from the context menu.
-
Click Begin Scan and wait for the process to finish. If any issues are identified with your installation, the launcher may download and replace files.
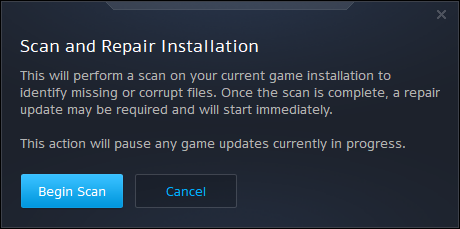
- After the scan is finished, try launching the game again and see if you still get the “DirectX encountered an unrecoverable error” message.
Method 8. Delete the Battle.net Cache Folder
If your issue is specific to Call of Duty games, or a different game in the Battle.net launcher, another way to put an end to the error is by simply deleting your cache. This can be done by following the steps below.
- Close Call of Duty: Warzone (or any other Battle.net game running) and quit the Battle.net launcher.
-
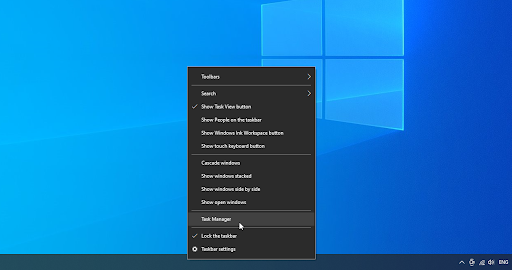
Right-click on an empty space in your taskbar and choose Task Manager.
-
Switch to the Processes tab. If Blizzard Update Agent (agent.exe) is running, select it and click on the End task button.

-
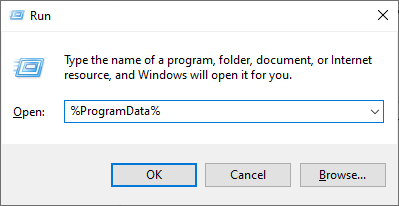
Press the Windows + R keys on your keyboard. Type in %ProgramData% and press the OK button in the Run utility.
-
Right-click on the Blizzard Entertainment folder, and select Delete from the context menu. Confirm the action if prompted.

- Restart the Battle.net desktop app, and try to relaunch the game.
Final Thoughts
we hope this helps. Our Help Center offers hundreds of guides to assist you if you’re in need of further help. Return to us for more informative articles, or get in touch with our experts for immediate assistance.
One More Thing
Would you like to receive promotions, deals, and discounts to get our products for the best price? Don’t forget to subscribe to our newsletter by entering your email address below! Be the first to receive the latest news in your inbox.
You May Also Like
» How to Optimize Windows 10 for Gaming
» How to Turn Off Notifications on Windows 10