
Are you interested in learning more about networks and how to configure them? You’re in the right place. Here at SoftwareKeep, we provide guides written for users to better understand how networks and systems work. Need any assistance? Don’t hesitate to contact us.
What is the DHCP lease time? How is it used?
A DHCP-assigned IP address is not permanent and expires in about 24 hours. This is what's referred to as a DHCP lease time. Unless modified from default settings, DHCP servers assume that your IP address is temporary and expires after a set amount of time.
This practice can be extremely beneficial as IP addresses become available for other devices to use when needed. This creates a more streamlined system and makes staying organized a whole lot easier.
Here is an example of how this scenario works in action:
You connected two devices to the network, computer A and computer B. The DHCP server assigns unique, static IP addresses to both devices. By default, these IP addresses would be static meaning that only those two devices can use them.
The next day, if you connect computer C as a new device, it'd require an entirely new unique IP address, which is a waste of resources.
On the other hand, when using DHCP lease time, the IP address of computers A and B would become available for computer C (or any other device on the network) after a specified amount of hours. This means that already existing IP addresses that have expired can be allocated to a new device.
This is one of the best practices of DHCP lease time and the most important benefit of utilizing the feature.
How to check your DHCP lease time on Windows
The DHCP lease time can be configured to any amount of time, however, it’s set to 24 hours by default. If you want to check your current time period configuration, follow the guide below.
You can check the current DHCP lease time on your Windows system by looking at your IP configuration with the Command Prompt. This process is easy and can be done by anyone — simply follow the steps below.
-
Open the Command Prompt in one of the following ways:
-
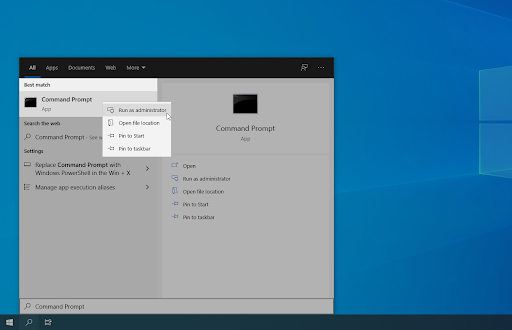
Open the Search function in your taskbar, or alternatively use the Ctrl + S keyboard shortcut to bring up the search bar and look up “Command Prompt”.
-
When you see it in the results, right-click on it and choose Run as Administrator.
-
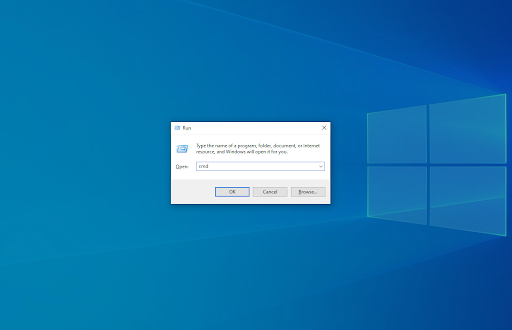
Press the Windows + R keys on your keyboard to bring up the Run utility. Type in “cmd” and press the Ctrl + Shift + Enter keys on your keyboard. By doing so, you’re launching the Command Prompt with administrative permissions.
-
Press the Windows + X keyboard shortcut, then select Command Prompt (Admin).

-
Open the Search function in your taskbar, or alternatively use the Ctrl + S keyboard shortcut to bring up the search bar and look up “Command Prompt”.
-
When prompted by the User Account Control (UAC), click Yes to allow the app to launch with administrative permissions.
- Need help? Check out our How to make a local user an administrator in Windows 10 guide.
-
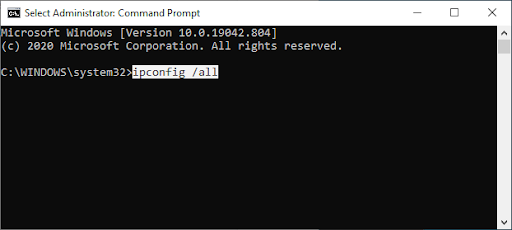
Once the Command Prompt has opened, type in the following command and press Enter on your keyboard to execute it: ipconfig /all
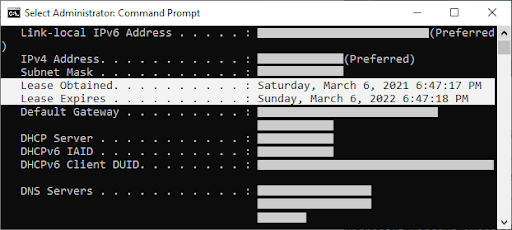
- Scroll down until you see the Lease Obtained and Lease Expires lines. Here, you should notice the dates listed. The difference between these dates is the current configuration of your computer.
-
For example, in the image below, you can see that the expiration date is a year after the IP address has been first obtained. This means that the DHCP lease time has been configured to be exactly 1 year.
- After taking a look at this, you can exit out of the Command Prompt.
How to modify the DHCP lease time period
To change the default lease time period, you’ll need to have access to your router login credentials. If necessary, get in touch with an administrator for assistance. If you simply want to renew, skip to the next section of our guide.
-
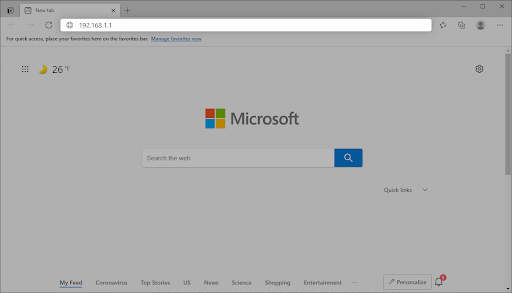
Open any web browser of your choice while connected to the network/server. Most routers can be accessed by typing 192.168.1.1 or 192.168.0.1 into the address bar. If unsure, check your router’s manual for instructions on how to connect.
-
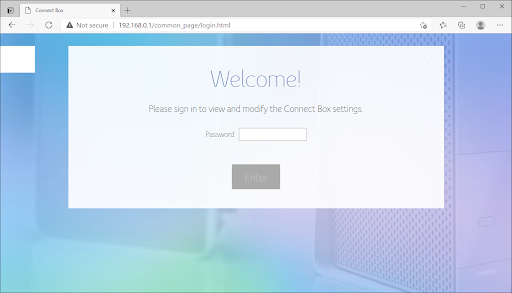
Once the router’s page has loaded, you’ll be asked to log in with the correct credentials. If you don’t know the login information, check your router’s manual or get in touch with a network or server administrator.
- After you've signed in, go to your router's Settings menu and search for the Network/LAN Settings or DHCP Settings section. If you can't find it, refer to your user manual for more details.
-
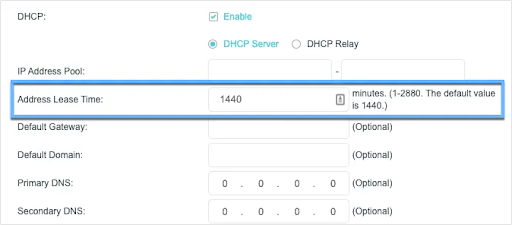
The DHCP lease value is referred to in several ways. This value is known as the Address lease period on a TP-Link router, for example. For this sort of router, you can set the time in minutes up to a limit of 2880 (the equivalent of 48 hours).
-
You can modify the value to any period of time within your routers’ limits. The maximum period can be longer or shorter depending on your model. Once again, you should be able to find details in your user manual.
-
You can modify the value to any period of time within your routers’ limits. The maximum period can be longer or shorter depending on your model. Once again, you should be able to find details in your user manual.
- Save your settings before exiting the router page. After modifying your DHCP lease time, the new time will be applied to all devices connected to the network.
How to renew your DHCP lease on Windows
If your DHCP lease period has changed, you can compel any connected devices to release and renew the DHCP lease. Any modifications to your time period will be applied immediately as a result of this.
- Open the Command Prompt in one of the following ways:
- Open the Search function in your taskbar, or alternatively use the Ctrl + S keyboard shortcut to bring up the search bar and look up “Command Prompt”. When you see it in the results, right-click on it and choose Run as Administrator.
- Press the Windows + R keys on your keyboard to bring up the Run utility. Type in “cmd” and press the Ctrl + Shift + Enter keys on your keyboard. By doing so, you’re launching the Command Prompt with administrative permissions.
- Press the Windows + X keyboard shortcut, then select Command Prompt (Admin).
-
When prompted by the User Account Control (UAC), click Yes to allow the app to launch with administrative permissions.
- Need help? Check out our How to make a local user an administrator in Windows 10 guide.
-
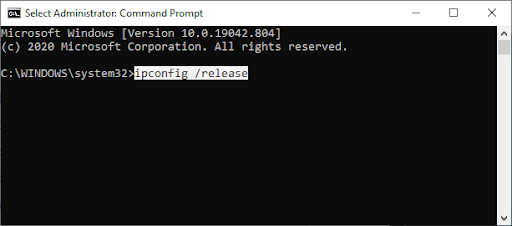
Once the Command Prompt has opened, type in the following command and press Enter on your keyboard to execute it: ipconfig /release
-
Next, type in the following command and press Enter on your keyboard to execute it: ipconfig /renew

- Your lease time should be renewed after performing these steps. This will apply the new time period you set in the previous guide, allowing your device(s) to use the same IP address on the network for a custom amount of time.
Final thoughts
If you need any further help with Windows or DHCP, don’t hesitate to reach out to our customer service team, available 24/7 to assist you. Return to us for more informative articles all related to productivity and modern-day technology!
Would you like to receive promotions, deals, and discounts to get our products for the best price? Don’t forget to subscribe to our newsletter by entering your email address below! Receive the latest technology news in your inbox and be the first to read our tips to become more productive.
Keep Learning
» What is YourPhone.Exe in Windows 10?
» What is the WMI Provider Host? Is it Safe?
» What is the WSAPPX Service and How to Fix WSAPPX High Disk Usage