
What is System interrupts? System interrupts is an official part of the Windows operating system. It manages the communication between your computer hardware and system. You can find it shown as a process in Task Manager. That's used to display the CPU usage of all hardware interrupts.
Have you encountered System interrupts process hogging CPU on your Windows shows like the image below?
Users have reported having encountered Windows 10 System interrupts 100 percent CPU usage, which in most cases results in a system crash.
So, in this guide, we will help you understand what is System interrupts and how to fix System interrupts high CPU usage in Windows 10.
Table of Contents
- What is system interrupts?
- Is system interrupts a virus?
- How to fix system interrupts using high CPU in Windows 10
- Preliminary workarounds
- Fix #1: Disable USB root hubs
- Fix #2: Check or Update Hardware Drivers
- Fix #3: Disable internal devices
- Fix #4: Disable sound effects (disable audio enhancements)
- Fix #5: Update your computer’s Bios
- Final Thoughts
What is system interrupts?
System interrupts refers to a placeholder used to display the system resources used by all the hardware interrupts happening on your PC. Also, System interrupts is one of the programs you’ll see displayed when you open the Windows Task Manager. Besides, it is a Windows background processing program that you may not even notice.

System Interrupts is an essential program component of the Windows Operating system that manages the communication between the Windows OS (system) and the computer hardware.
System interrupts operate like an alert (alarm alert) system for the CPU. It alerts or reminds the CPU of any priority scenario that needs the attention of the CPU. The CPU then stops or suspends its immediate task and save it to take care of that high priority task to only return to the other task once the important one is complete.
What this means is that although System interrupts seem like a PC process, it’s not. If the System interrupts is consuming up to 10%, and above the CPU, you may need to pay attention to it because this is an indication that there is a hardware error somewhere.

If the System interrupts the process is consuming 10% or more CPU power, you may need to do some troubleshooting. High CPU usage is a telltale sign that there is a hardware error somewhere on your device. By fixing this issue, you can speed up your computer and avoid detrimental system crashes.
Is system interrupts a virus?
No. System interrupts is not a virus. It is an official and essential Windows component that coordinates the Windows system and computer hardware.
Normally, the System Interrupts process should not use too much computer CPU power. However, some users have reported high CPU usage of system interrupts in some cases, making them think it is a virus.
Furthermore, because system interrupts is not an actual process and not associated with any running .exe or .dll files. There’s no way that any malware or virus can hijack it directly.
But, it could still be possible that malware or a particular virus is interfering with a specific hardware driver that is affecting the “System interrupts.”
How to fix system interrupts using high CPU in Windows 10
A steady high CPU usage (10% and above) caused by System Interrupts is usually an indication that a hardware driver is malfunctioning or the hardware itself has an issue. Fortunately, this is something that can be fixed.
Preliminary workarounds
Before you proceed to the solutions to fix system interrupts, you may try some non-technical workarounds that can also help you fix the issue.
- Restarting your PC: many users have reported that a PC restart helped them fix the system interrupts problem.
- Scan your PC quality antivirus or antimalware software to remove any malware or viruses that might be interfering with your hardware and causing the problem.
- Unplug or disable all attached external devices: many external hard drives, such as USB, can cause high CPU usage of system interrupts. Disabling these external devices can help sort out the issue.
If these workarounds don’t work, proceed to the following effective fixes that have helped many other users fix system interrupts in their PCs.
Fix #1: Disable USB root hubs
To disable USB roots hubs i.e., block external hardware from interrupting the CPU:
- Press Wins Key + S to open Windows search and type device manager.
- Click on the Device Manager
- In the Device Manager, locate entry Universal Serial Bus controllers.
- Locate the USB Root Hub entries
-
Right-click on each USB root hub > select disable the device (except the once for your mouse and keyboard).
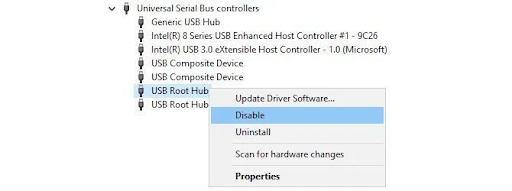
Note: it is important to check which USB Root Hub is for your mouse and keyboard. To do this,
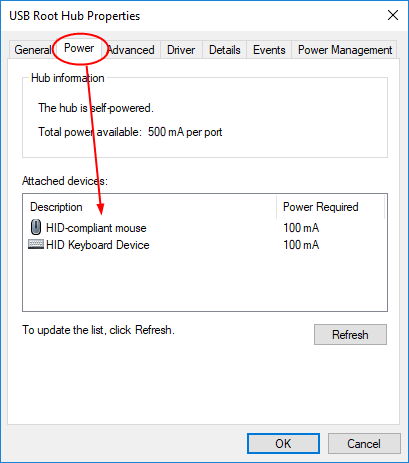
- Right-click on a USB Root Hub > choose Properties.
-
Go to the power tab > see the Attached devices.
Once done, reboot your PC and check if the system interrupts is still using a high CPU.
Recommended: How to Fix Sedlauncher.exe Full Disk Usage on Windows 10
Fix #2: Check or Update Hardware Drivers
It is possible that the computer has outdated hardware drivers, or a rogue or faulty hardware driver is causing the system interrupts problem. This means it's time to check for drivers that need to update or update all hardware drivers.
To check for driver updates
- Click Wins start > go to Settings > Update and Security
- Go to the Windows Updated section.
- Check if there is any available hardware driver update.
- If there is, click Next to update all of them.
If you have an idea of the device drivers that are causing the problem, then you can update each of them manually. If you aren’t sure of the drivers, look for devices that have yellow exclamation marks next to them and update them.
To update specific drivers:
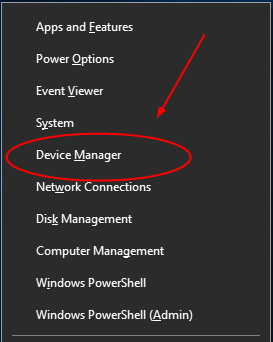
- Press Winkey + X
-
In the menu, click Device Manager.
- Expand the device manager dialog box and right-click the driver
-
Choose Update driver > then select ‘Search automatically for updated driver software.'
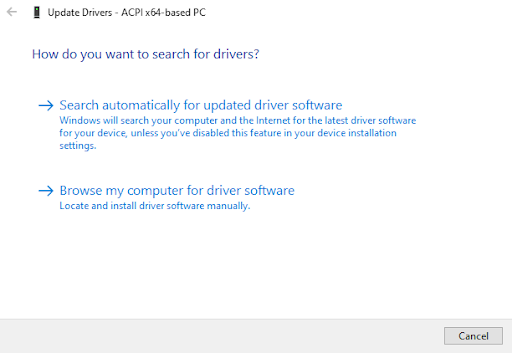
Windows will start the process of driver update. Wait for this driver update to complete, then do the same to the other device drivers. Once done, restart your PC and see if the system interrupts problem is still occurring.
Fix #3: Disable internal devices
Instead of randomly updating your device drivers, you may decide to start with disabling individual device drivers to locate the particular culprit.
If you have potential offenders in mind, you can disable those first. Otherwise, the internal devices that you may need to disable (usual culprits) include:
- Network adapters
- Internal sound devices
- Internal modems
- Any add-on cards, such as modems, TV tuner cards, DSL or ISDN adapters
Note: You’ll disable all these internal devices through the Device Manager
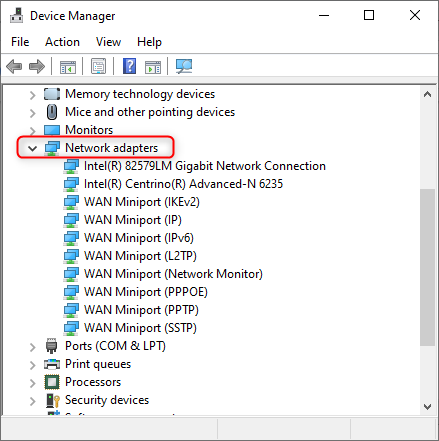
Disable Network adapters
- Press Winkey + X
- In the menu, click Device Manager.
-
Locate Network adapters and expand its dialog.
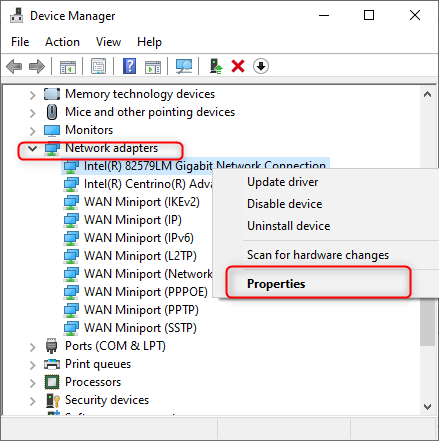
-
Right-click on your network adapter > then choose Properties.
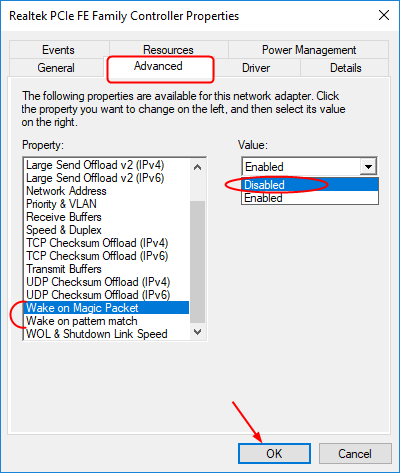
- Select the Advanced pane > under the Property scroll down to ‘Wake on Magic Packet and Wake on pattern match.’
- From the drop-down, set their Value to be Disabled one by one.
-
Click OK to save your settings.
This process should help you fix system interruptions.
Fix #4: Disable sound effects (disable audio enhancements)
When you play sounds, such as music or video files, your computer’s System interrupts CPU usage. Disable the sound enhancement to try and fix the issue.
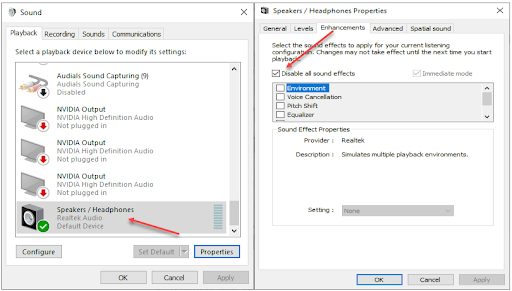
- Go to the taskbar and right-click the speaker icon (sound icon)
- Now, double-click your Default Device (speaker) > open Properties
- Click the Enhancements tab.
- Check the box which says ‘Disable all sound effects.’
-
Click Ok to save the settings
Fix #5: Update your computer’s Bios
If the system interrupts high CPU usage in Windows 10 is not hardware-related, then the problem might be outdated BIOS. In this case, you may need to update the BIOS to fix the problem.
To do so, you’ll need to first identify the BIOS version you are running.
- Open the Windows search > type CMD > run Command Prompt
-
Next, type the following commands one by one > hit Enter after each command
systeminfo | findstr /I /c:bios
wmic bios get manufacturer, smbiosbiosversion
These commands will help you identify the BIOS version. Next, you need to go to the manufacturer’s website to update the BIOS. Follow the manufacturer’s instructions while updating the BIOS.
Note: updating PC BIOS is a bit complicated and generally risky. A small mistake - knowing or unknowing - can damage your system and render your system unbootable. So, you need to ensure that you backup your system before updating the BIOS.
Final Thoughts
We believe that the methods we’ve outlined here in this article will help you fix System interrupts high CPU usage. Now that your computer's resource usage is back to normal, you can enjoy it to the fullest. Make sure to continue monitoring what processes are hogging your CPU, memory, and disk usage.
Our Help Center offers hundreds of guides to assist you if you’re in need of further help. Return to us for more informative articles, or get in touch with our experts for immediate assistance.
One More Thing
Would you like to receive promotions, deals, and discounts to get our products for the best price? Don’t forget to subscribe to our newsletter by entering your email address below! Be the first to receive the latest news in your inbox.
You May Also Like
» How to Fix Sedlauncher.exe Full Disk Usage on Windows 10
» How to Fix High CPU Usage By Antimalware Service Executable (MsMpEng)
» Fixed: SysMain High CPU and Memory Usage in Windows 10