In the past, Skype used to be the biggest private messaging and conferencing application. However, as time went by, many people started looking for different platforms to expand to. In this article, you can learn how to disable or completely remove Skype from your Windows 10 system.

Leaving Skype on your device may or may not cause some “side effects”. Other than taking up a small amount of disk space, Skype could easily hinder your internet connection or experience errors where disk usage shoots up to above 90%. To ensure this doesn’t happen to you.
Recommended: How to Disable Windows 10's Tabs From Showing in Alt+Tab View
Jump to Methods to Disable Skype in Windows 10:
- Method 1. Disable Skype from opening on startup
- Method 2. Uninstall Skype via the Control Panel
- Method 3. Directly remove Skype
- Method 4. Uninstall Skype through the Settings app
- Method 5. Remove Skype’s residual files after uninstall
Since Skype comes pre-installed on most Windows 10 devices, it might seem like a tough job to completely remove the application. The 5 methods below help you entirely get rid of Skype and the residual files it leaves behind even after you uninstall it. Let’s get started.
Method 1. Disable Skype from opening on startup
Every time your system boots up, various applications launch at startup. This is a feature used by many apps that you might want to have ready from the moment you gain access to your computer, such as antivirus software. However, by default, your device will always load Skype upon startup too.
If you still use Skype every once in a while or have any reason why you don’t want to fully remove it, you can simply disable it. This can be done easiest through the Task Manager, by following the steps below.
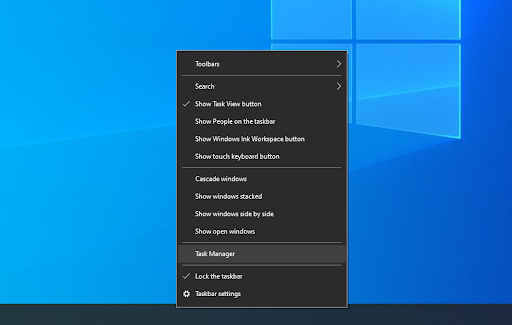
- Open the Task Manager using one of the following ways:
- Right-click on any empty space in your taskbar. This will open up a context menu. Here, click on Task Manager.
- Alternatively, press the Ctrl, Alt, and Esc keys simultaneously on your keyboard.
-
If your Task Manager launched in the compact view, click on the More details option seen in the bottom left of the window. This will expand the window and show you the necessary taps to access startup applications.

-
Switch to the Startup tab using the menu at the top of the Task Manager window. Here, you can see all of the applications that start along with your computer at launch.
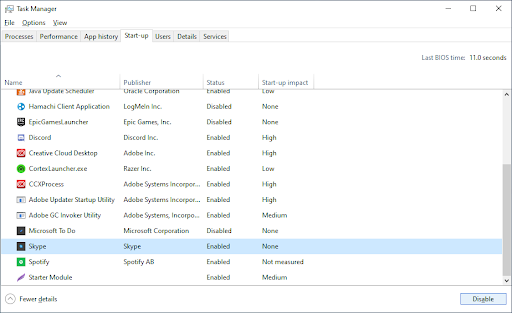
- Select the Skype application, then click on the Disable button in the bottom right of the window. Its status should change to Disabled.
- Restart your computer.
Now, your computer should launch up without any Skype automatically launching along with it. This gives you the ability to still access Skype whenever it's needed, but it won’t get in your way during your day to day life.
Method 2. Uninstall Skype via the Control Panel
The standard procedure of removing applications from your Windows 10 computer is by using the Control Panel itself. This action center used to be the main way of getting around on your device and altering settings — however, it was overshadowed by Settings in recent updates.
This doesn’t mean that the Control Panel is no longer available. You can access it, and carry out the process of quickly uninstalling the Skype software. Keep in mind that this might leave some junk files behind — to combat this, make sure to perform Method 5 after completing the uninstallation process.
-
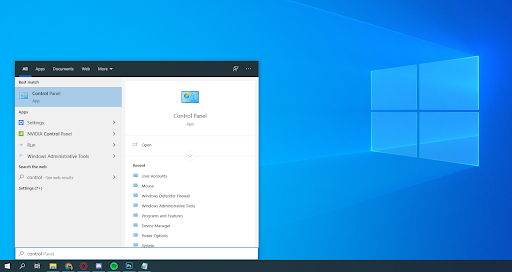
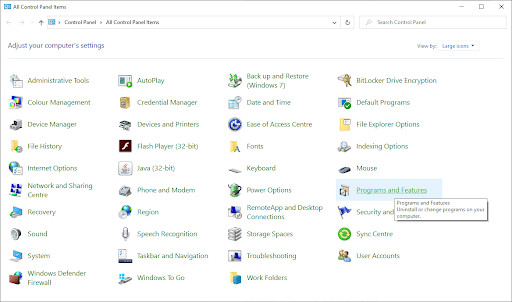
Use the Windows 10 Search bar in your taskbar and look up “control”. When the results are loaded, launch the Control Panel. This will open up the classic Control Panel instead of going to the new Settings app.
-
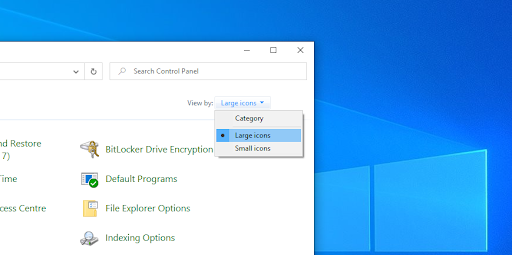
Use the top-right dropdown menu to change the View mode to Large icons.
-
Click on the Programs and Features button.

-
Find Skype from the programs list. You can click on Name to have the list organized into alphabetical order, or use the built-in search to locate the application.
- Click the Uninstall button, or right-click on Skype, and choose the Uninstall option. This may launch Skype’s built-in uninstaller, which shows you instructions on the screen.
- Follow the uninstaller’s instructions and remove Skype from your device. A reboot may be necessary to finalize the process.
Method 3. Directly remove Skype
If you installed Skype through the Microsoft Store or directly from the Skype.com installer, you’ll have the option to directly remove it. For this, the following steps will be required.

- Use the Windows 10 Search bar in your taskbar and look up “Skype”.
-
When the results are loaded, right-click on the Skype application.
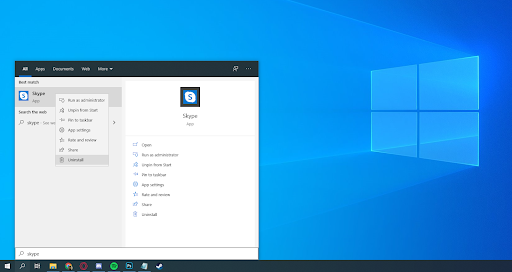
- If available, select the Uninstall option from the context menu. This may launch Skype’s built-in uninstaller, which shows you instructions on the screen.
- Follow the uninstaller’s instructions and remove Skype from your device. A reboot may be necessary to finalize the process.
Method 4. Uninstall Skype through the Settings app
As mentioned above, the Settings app has taken over many of the tasks the Control Panel was primarily used for. This means that you’re able to remove and uninstall applications through Settings as well. What you need to do is follow the guide below.
-
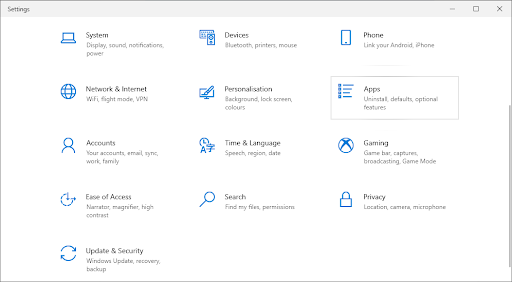
Open the Settings application using the Windows + I keyboard shortcut, or the gear icon from your Start menu.

-
Click on the Apps tab.
-
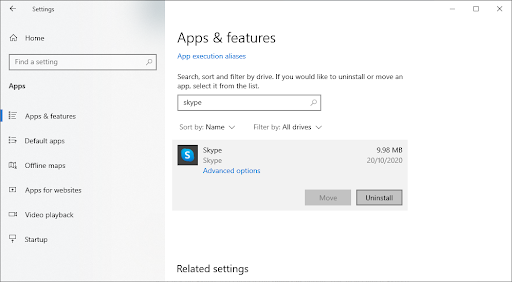
Find Skype from the programs list. You can click on Name to have the list organized into alphabetical order, or use the built-in search to locate the application.
-
Click on Skype and choose the Uninstall option.
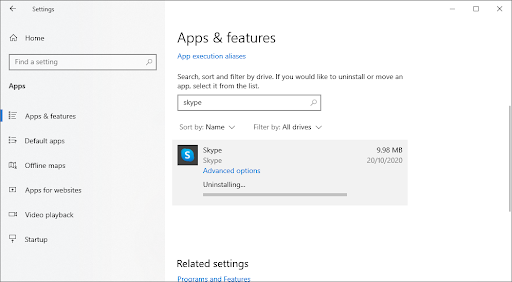
- Click Uninstall again to let Windows 10 remove Skype from your device. A reboot may be necessary to finalize the process.
Method 5. Remove Skype’s residual files after uninstall
Skype, and most other applications, tend to leave leftover residue after you uninstall them. These are usually files such as logs, chat history, user preferences, and other junk that usually just takes up space on your device if left unattended. To completely and fully get rid of Skype, you’ll need to manually delete these files.
-
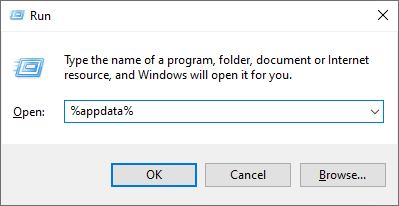
Press the Windows + R keys on your keyboard. This is going to bring up the Run utility.
-
Type in “%appdata%” and click on the OK button. This will immediately redirect you to the AppData folder in File Explorer.
-
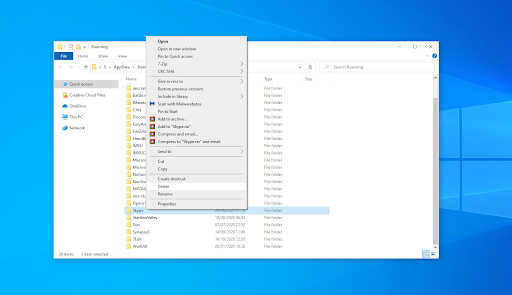
Locate the Skype folder, then right-click on it and choose Delete. This will remove most residual files, however, not all.
Note that doing this will remove your messaging history. if you want to save your history, open the Skype folder and find the folder containing your Skype username. Copy and paste that file on your Desktop.
To restore the history in the future, simply copy and paste the file to its original location.
-
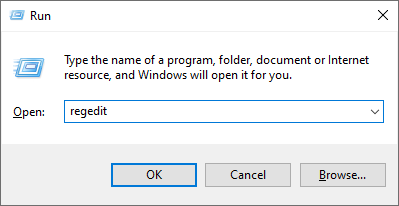
The last thing you need to do is use the Registry Editor to remove further leftover files. Press the Windows + R keys on your keyboard again, then type in “regedit” without the quotation marks. Click OK to launch.
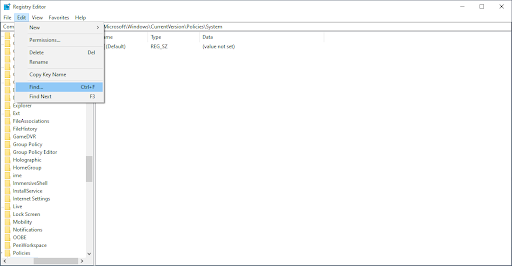
-
Click on the Edit menu in the header, then select Find.

- Type in Skype and click Find. You should see a number of entries show up in the results.
- Remove each result related to Skype by right-clicking on the key and choosing Delete, then restart your computer.
Final thoughts
If you need any further help, don’t be afraid to reach out to our customer service team, available 24/7 to assist you. Return to us for more informative articles all related to productivity and modern day technology!
Would you like to receive promotions, deals, and discounts to get our products for the best price? Don’t forget to subscribe to our newsletter by entering your email address below! Receive the latest technology news in your inbox and be the first to read our tips to become more productive.
You may also like
> How to Disable Click-to-Run in Microsoft Office
> How to Change or Disable the Lock Screen Timeout on Windows 10
> How to Disable Hardware Acceleration on Windows 10