A number of new Windows 10 users keep searching for ‘how to get help with File Explorer in Windows 10.’ This is because Windows 10 now doesn’t have built-in help for File Explorer, like Windows 7. So, because Microsoft makes users search the web for ‘how to get help with File Explorer in Windows 10,’ here you’ll learn all you need to know about using File Explorer in Windows 10.
Table of Contents
- What is File Explorer?
- How to Access Windows 10 File Explorer
- Basics of Windows 10 File Explorer Interface
- Basics of the File Explorer Ribbon in Windows 10
- How to pin ‘frequently used commands’ on File Explorers
- Useful Keyboard Shortcuts for File Explorer Windows 10
- How to Sync files with OneDrive in Windows 10
- Key Points in OneDrive Setup
- What if File Explorer Won’t Start or Open
- Wrapping Up
What is File Explorer?
File Explorer is an essential application and component of your Windows 10 Operating System. File Explorer was formerly known as Windows Explorer in the previous Windows versions. It provides a targeted graphical user interface to navigate, browse, and access all the Windows drives, folders, and files in a user’s computer.
Your computer has a lot of files and folders stored in different locations. In Windows 10, File Explorer helps you quickly and easily access the stored files and folders you may be searching for without breaking a sweat.
Some new users wonder, ‘where are my documents stored in Windows 10?’ To find your documents in Windows 10, you may need to open File Explorer.
If you’re wondering how you can access, open and use of Windows File Explorer in Windows 10 continue reading this post. You’ll also learn about some cool features and shortcuts that can make your work easy.
How to Access Windows 10 File Explorer
There are a number of ways you can use to access File Explorer in Windows 10.
Method #1: Windows Start
The most common way is to access it through the Windows Start Menu using the following path:
- Click Windows Start and type File Explorer.
- Select File Explorer in the results.
Method #2: Power User Task Menu
You can also access File Explorer through the Power User Task Menu:
- Right-click Windows Start
- Select File Explorer in the list of items.
Alternatively, press the Windows logo key + X together to load the Power User menu, then select File Explorer in the list of items.
Method #3: Taskbar
You can also access File Explorer through the Windows 10 Taskbar. but this will need that you have the program already locked on the taskbar prior to this operation.
Method #4: Keyboard Shortcut Key
The easiest method to access the File is through the Windows Keyboard shortcuts. You just need to press the Windows Key + E together and you’ll go straight to the File Explorer.
Basics of Windows 10 File Explorer Interface
If you’ve previously used Windows Explorer in Windows 7, you’ll not have any difficulty in using “File Explorer” in Windows 10. Microsoft basically renamed the application. However, File Explorer does have some new pleasant features.
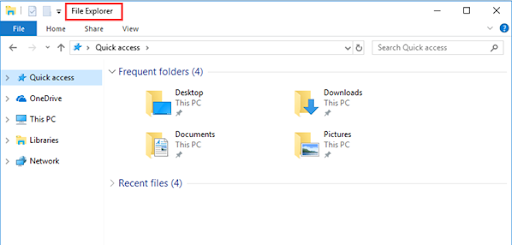
Once you open File Explorer in Windows 10, you’ll see five categories of items from the left pane. These are (in order):
- Quick access
- OneDrive
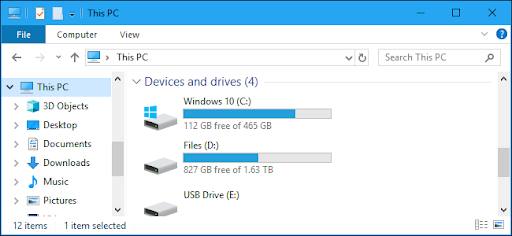
- This PC
- Libraries
- Network
Quick Access on Windows 10 replaces “Favorites” on Windows 7. Like ‘Favorites’ it allows you to drag and drop folders and to “pin” them for easy future access. In addition, Windows 10 automatically adds your recently used folders to this area.
Besides, Windows 10 also allows you to customize Quick Access. For example, to remove a folder from Quick Access, right-click on it, and then select “Unpin From Quick Access.”
This PC in File Explorer in Windows 10 replaces “My Computer” on Windows 7. This component contains shortcuts to the PC’s user data folders as well as other drives, such as DVD drives and USB drives.
OneDrive is an additional component in File Explorer that was missing in Windows Explorer. It enables you to sync your files to the cloud. It gives users an important back up to their files and folders.
Basics of the File Explorer Ribbon in Windows 10
When you open File Explorer, you’ll see the ribbon at the top. Basically, the File Explorer ribbon works in a similar way to the ribbon in Microsoft Office applications such as Word and Excel, but with a few differences. In the File Explorer ribbon, you’ll see three command tabs, located in the top-left corner, such as:
- Home: this is the tab that you land on whenever you tap Windows + E to access File Explorer. This is a tab in File Explore that makes most of the tasks and commands easier to access. The tasks that you can perform through the home tab include copying, pasting, deleting, or renaming a file as well as opening a new folder and folder properties.
- Share: this tab allows you to share files and folders. It offers such functionalities as emailing, zipping, and printing files. Through the share tab, you also get the option to burn your file to disc and share them on your local network.
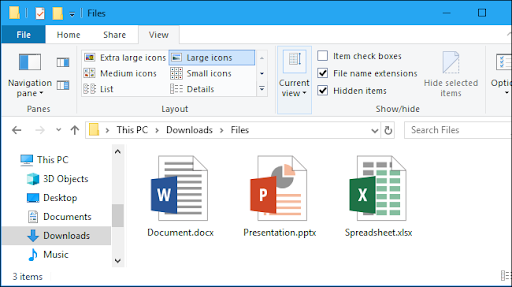
- View: This tab is very important in File Explorer. It has options for controlling the appearance and assorting of files in File Explorer. You can also preview your documents and pictures if you click the Preview pane or even change the file preview e..g from small icons showing details to large icons showing titles. You also have the option to choose to hide or show filename extensions. If you click the “Hidden items” checkbox you’ll be able to show hidden files.
Here’s a trick!
If you need more space in your File Explorer browsing window, you can collapse (minimize) the ribbon. To do so, click the arrow at the top right corner of File Explorer or press Ctrl+F1.
Even when the ribbon is collapsed, you can still click the tabs - Home, Share, or View. When you click any of the tabs, the ribbon will appear temporarily.
If you prefer seeing the ribbon all the time, you can expand it or leave it expanded by default.
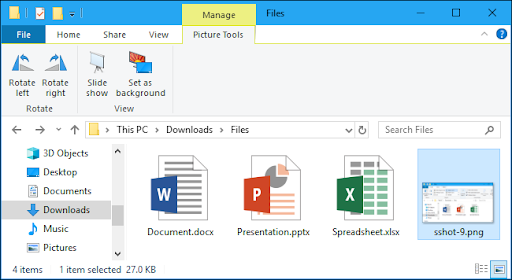
Sometimes, the Manage tab will appear on the ribbon of File Explorer. But this occurs with contextually appropriate commands. For instance, you’ll see it when you select a picture, where you’ll also see the “Picture Tools” tab.
How to pin ‘frequently used commands’ on File Explorers
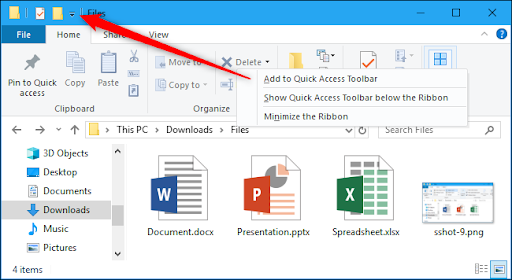
At the top left corner of the File Explorer window, you’ll see a drop-dop arrow. If you place your cursor on that arrow, it will display a message saying “Customize Quick Access Toolbar.” this drop-down arrow is the Quick Access Toolbar.
Through the Quick Access Toolbar, you get convenient access to the commands you frequently use. And you can add or remove the command to the Quick Access.
To add a particular command to the Quick Access, right-click it on the ribbon and select “Add to Quick Access Toolbar.”
If you want more space for commands, you’ll right-click anywhere on the ribbon or tab bar above it and then select “Show the Quick Access Toolbar Below the Ribbon.” This will turn it into a more standard toolbar.
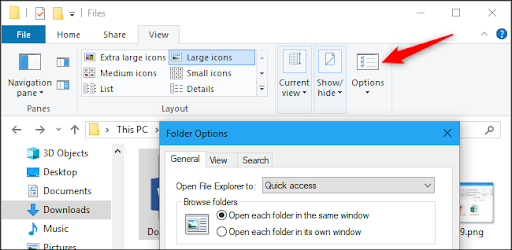
How to change settings in File Explorer
You can change the settings of File Explorer. In the File Explorer Window:
- Go to the Ribbon
- Click the “View” tab
- Click the “Options” icon.
- Click on the ‘Change folder and search options’ prompt.
- Follow the on-screen instructions to select the settings that you want.
This is one of the improvements in File Explorers.
Useful Keyboard Shortcuts for File Explorer Windows 10

File Explorer has a number of useful keyboard shortcuts to help you finish tasks faster. As we promised, here’s a list of some of the useful keyboard shortcuts:
- Windows +E: Open File Explorer in Windows 10.
- Alt + D: got to the address bar
- Alt + Enter: Display the selected file or folder’s Properties.
- Alt + P: Hide/Show the Preview pane.
- Ctrl + D: Move file/folder to Recycle Bin.
- Ctrl + E: Go to the search box/Activate File Explorer Search bar.
- Ctrl + N: Open a new File Explorer window (works only File Explorer).
- Ctrl + W: Close the current File Explorer window.
- Ctrl + F1: collapse (minimize) the File Explorer ribbon.
- Ctrl+F, Ctrl + E, or F3: Focus the Search box to quickly start typing a search.
- Ctrl + Mousewheel Up or Down: zoom in out to change the size of files and folder icons.
- Ctrl + Shift + N: Create a new folder
- Ctrl+L, Alt + D, or F4: Focus the address (location) bar to quickly start typing a folder address.
- Backspace or Alt + Left arrow: View the previous folder (go back.)
- Alt + Right arrow: View the next folder (go forward.)
- Alt + Up arrow: View the folder the current folder is in.
- F11: Maximize the File Explorer window (shrink the window).
To find a complete guide of keyboard shortcuts, visit Microsoft’s website.
How to Sync files with OneDrive in Windows 10
OneDrive is one of the new built-in features of Windows 10 connected with File Explorer. To use OneDrive you need a Microsoft account. You’ll then be able to synchronize files online and into the cloud. OneDrive works similarly to Dropbox, iCloud, and Google Drive.
To start working with OneDrive:
- Click “OneDrive” in File Explorer.
- You’ll be prompted to sign in to OneDrive. You need to have a Microsoft account. If you dont have it, it is important that you create one. If you don’t want to create one, you can just upload files to OneDrive and they’ll all be uploaded to Microsoft’s servers.
- Once the files are uploaded you can access them in the OneDrive folder. Still, it is important to have an account because you’ll need to you sign in to the Microsoft account.
Key Points in OneDrive Setup
When setting up One Drive, you'll see two screens in the OneDrive Setup that your need to watch for:
- Go to This is your OneDrive folder screen, and click Next to accept your OneDrive files’ default folder location. You can change the folder location if you select Change location.
- Go to the All your files, ready and on-demand screen, and see marked files as - always available, online-only, and locally available. You can access all the files in your drive by accessing the Files On-Demand. Select Next.
What if File Explorer Won’t Start or Open
Sometimes, the File Explorer in Windows 10 may stop working. Many users have noted this behaviour when they right-click File Explorer. There are a few things you can do to fix File Explorer not working after right-clicking:
- Restart your computer: restarting your computer should always the first thing you do when you experience a crash on File Explorer.
- Command prompt (winstock reset): press Wins key + X together > Click Command prompt (Admin) > in the elevated command prompt type netsh and press Enter > again type winstock reset and press Enter. Wait for the process to complete then restart your PC and check if the issue is resolved.
- Check for Windows Updates: press the Windows Start key> go to Settings > Update & Security > Windows Update . once in the Windows Update, select Check for updates. Wait for the available updates to download hen install them and restart your device.
Wrapping Up
We believe this article was informative and helpful to Photoshop Error: Scratch disks are full. For more information about how to repair Windows errors, please return to our website. In addition, you’ll get better deals on Microsoft Office software, along with helpful guides and articles.
Would you like to receive promotions, deals, and discounts to get our products for the best price? Don’t forget to subscribe to our newsletter by entering your email address below! Receive the latest technology news in your inbox and be the first to read our tips to become more productive.
Read Next
> How to access and use Steam screenshot folder on Windows 10
> How to Get and Use Our Ultimate Affiliate Toolkit
> How to Optimize Your Outlook Inbox in 5 Easy Steps