Microsoft Word is one of the staples of the modern world’s offices. You can find it pretty much in any existing industry out there as one of their main programs to use for text editing and documentation.
To put this into perspective, in the United States alone, about 731,000 companies use Microsoft Office, a package that includes Microsoft Word alongside other Microsoft products.
Microsoft Word has always been a familiar sight and for good reason. It is seemingly updated constantly, with its latest iteration being included in Microsoft Office 2021 with new features and updates to come to boot.
With all these new features and updates, it’s oftentimes hard to know all the nooks and crannies that the entire software provides so in this article, we’ll be discussing 20 secret functions that you can use to up your productivity and maximize your use of Microsoft Word.
From beginner to intermediate tips all the way down into hidden features you might haven’t had the slightest clue about. There are also examples presented for some of the features for you to have a better grasp of what their uses are.
Table of Contents
-
Beginner Tips
- Quick Zooming Through Ctrl + Scroll
- Securing Your Document Through Passwords
- Utilizing Smart Search in Microsoft Word
- Double Clicking In The Document = Free Writing
- MS Word Templates & Designs
- Find & Replace Tool
- Microsoft Word’s Built-in Language Translator
- Holding Ctrl in Selecting Whole Sentences
- Using Focus Mode
- Checking Document Readability
-
Intermediate Functions
- Building Your Personal Custom Templates
- Automating Audio File Transcription
- Convenience in Quick Parts
- Saving Document Instantly To Google Drive
- The Document Inspector
-
Super Secret Features
- Creating Random Filler Text
- Automatic Date & Time Adjustment
- Recovering Crashed MS Word Files
- Converting PDF & HTML Documents
- Finding Hidden Characters
- Conclusion
Beginner Tips
These tips are pretty helpful in general and easy to do. Most of these are already included in the main tabs of Microsoft Word so you won’t have to circle around options to make these work.
Quick Zooming Through Ctrl + Scroll
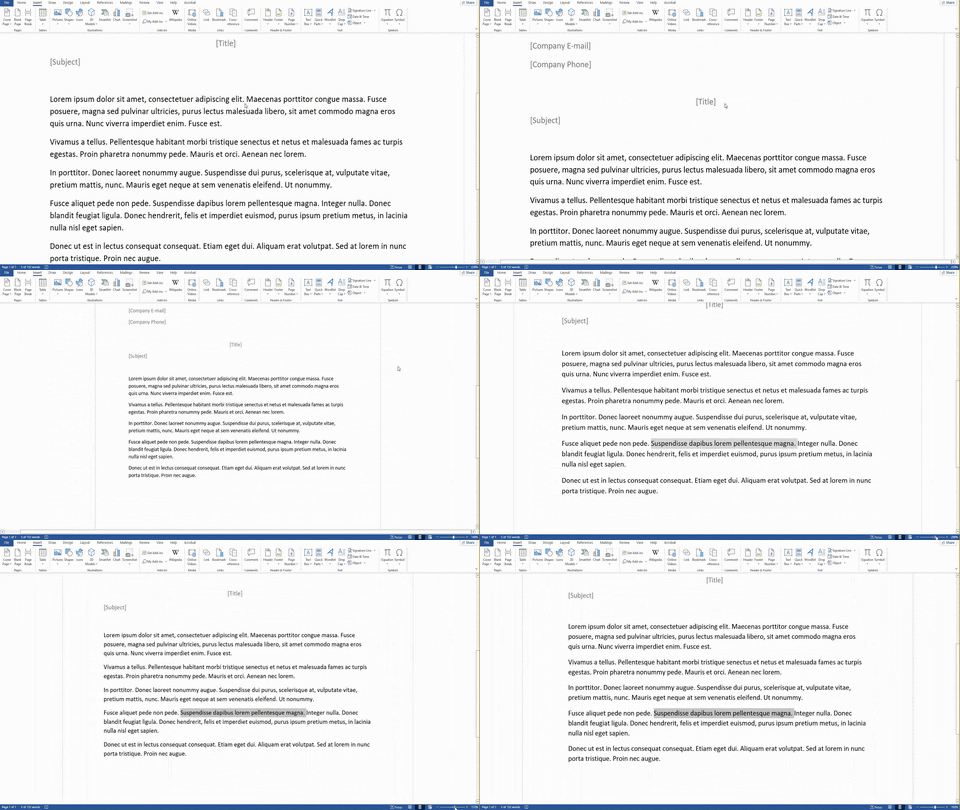
The first beginner tip is a simple zoom-in and zoom-out function. Pressing and holding CTRL + scrolling your mouse wheel will instantly zoom in or out of your document.
You won’t have to trouble yourself having to manually click through the zoom options in the bottom left corner but instead, you can do it all by just holding one key and doing everything else with your mouse.
If you want a precise calculation of how much you want to zoom, however, it’s still best to manually adjust the number on the zoom bar as the scroll wheel function is just for a general quick way to use zoom functions in documents.
Procedure: Holding CTRL + Scrolling Mouse
Securing Your Document Through Passwords
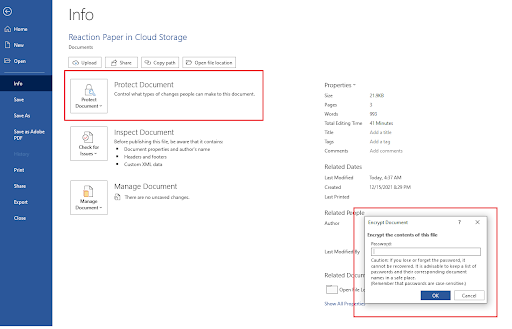
Perhaps one of the most important beginner functions that not a lot of people keep in mind is protecting their documents and data through Microsoft's built-in password encryption feature.
How secure is the encryption you ask? Well, it uses AES (Advanced Encryption Standard) with 256-bit keys which means it’s using a pretty reliable encryption system that is well-known in the industry.
This encryption already easily eliminates a lot of people from accidentally or just conveniently opening and reading the contents of your file.
However, those that are dedicated to reading the contents can still do so but the effort required is really tedious and unnecessary. Use this system to secure your personal files or business transactions.
If you are operating an eCommerce business such as those of an Amazon FBA or even a marketplace that involves important client data and accounting like WhatsGood then this will definitely secure your files from falling into the wrong hands.
Just make sure you remember your password!
Procedure: Open File > Info Tab > Protect Document > Encrypt Document > Insert Password > Ok
Utilizing Smart Search in Microsoft Word
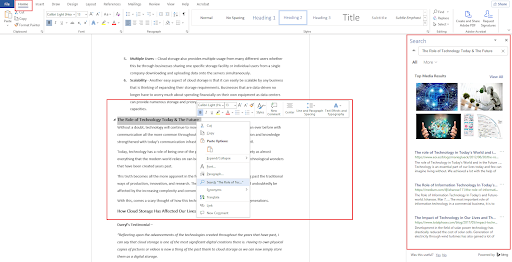
One of the most powerful and convenient features of Microsoft Word is Smart Search. It’s pretty much just the integration of a search engine inside the editor so whenever you have something in your document that you need to search, you just highlight it and click on smart search to instantly see the most accurate results regarding the item.
This feature is very powerful for writers the most as they can easily search terms that they are unfamiliar with, let’s put this into an example.
In the case of a business that focuses on rehabilitation for addiction, they use predictive dialers for outreaching to potential clients, but what is a predictive dialer in the first place? Well, you can easily look that up on the search engine with Smart Search.
You’ll be greeted with results directly from Bing but you can also change this into Google, whichever you prefer.
Procedure: Highlight Text > Right Click on Highlighted Text > Click Search “Text Name”
Double Clicking In The Document = Free Writing
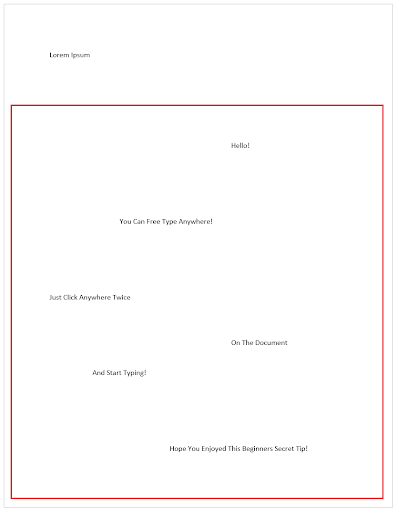
This tip is as simple as it can be and some people seemingly don’t even notice that this feature exists but it can be a great help in saving precious time in editing and writing text instantly without having the need to get bothered by formatting.
If you want to go ahead and just type anywhere you want or need to edit on a specific place that is out of bounds from your usual document then just double click on that specific spot and get typing! No need to manually click space or tab multiple times just to reach it.
Procedure: Find Area > Double Click > Type!
MS Word Templates & Designs

It’s a given that Microsoft Word offers a long list of powerful features and customizations that you can do a lot within terms of creating your own designs. But, what if you don’t have the time to do all the creative work in the first place? What if you don’t have the necessary skills or experience to use these powerful and long-list of tools and you don’t have the time to do both?
Luckily, Microsoft Word also features an extensive list of ready-made designs with their templates! You can grab anything here and customize them for your own use.
These templates can be used for almost anything. If it’s Halloween and you are making posters or making your own kid masks and want to promote them then that all can be done in Microsoft Word with the templates that they have. Just a little bit of text editing and you’re good to go!
Procedure: File > New > Search For Online Templates > Choose a Template > Create > Customize
Find & Replace Tool
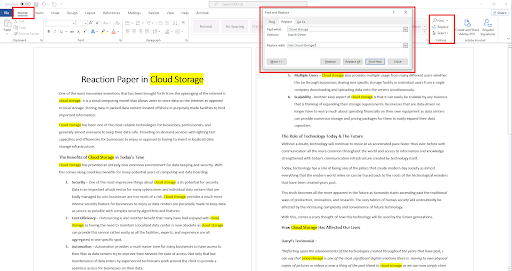
The Find and Replace tool is another feature that Microsoft Word has which can easily and conveniently detect all similar words that you are trying to find in the document.
This highlights these words which can provide an easier time detecting any errors with that particular set of words plus, it also makes it easier to find specific keywords that you want to change.
Not only that but you can also replace these words with another making it easy to change one specific word if you made a mistake with its spelling or use from the start.
Procedure: Home Tab > Find > Replace > Pick an Option
Microsoft Word’s Built-in Language Translator
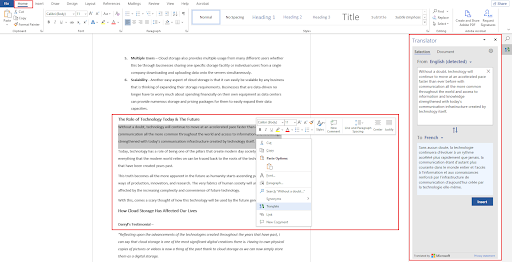
Gone are the days that you had to manually find another application to translate your text for you as Microsoft Word also includes a specific function that allows you to translate words within the program.
With Microsoft Word’s built-in Translator, you can highlight specific text that you need translation for and get the results accurately and at a lightning-fast pace. You have access to around 103 languages for translation making it highly convenient to use while sticking to just one software.
Procedure: Highlight Text > Right Click on Highlighted Text > Translate > Choose Language > Insert
Holding Ctrl in Selecting Whole Sentences
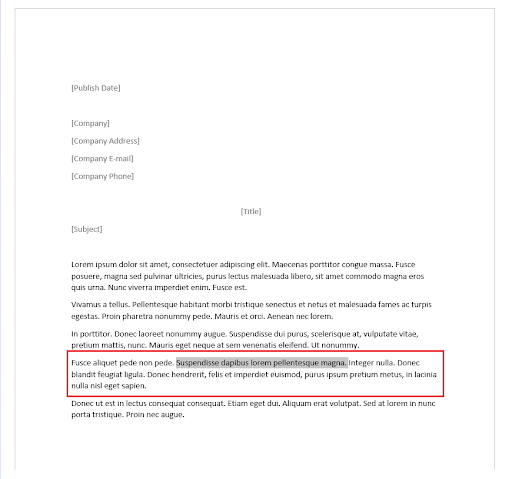
Oftentimes, you have to just cut out sentences that either doesn't fit or you might have exceeded the word count on that paper you are working on. Manually selecting each individual text can be difficult but you really don’t have to do that.
Holding CTRL while selecting a single text within a sentence automatically lets you highlight the entire sentence without having the need to find the start and the end of it. Just click, delete, or edit straight away.
Procedure: Hold CTRL > Select Sentences
Using Focus Mode
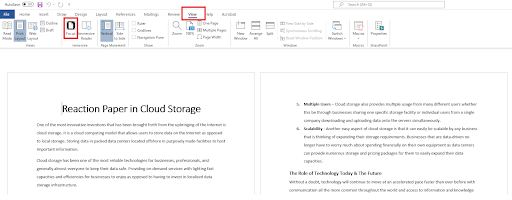
For this example, let’s use a cart abandonment email strategy as a way where this feature would prove helpful and beneficial.
Focus Mode is a feature in Microsoft Word that lets you view the entire document without having all the unnecessary user interfaces bother your clean-up. This is especially effective whenever you are dealing with large amounts of data that can be hard to view.
For proofreading purposes in a successful email marketing campaign, you would have to manually look into each name, address, and all other details to make sure that no errors are present and Focus Mode can definitely help you get a clearer view of the details.
You can still edit within Focus Mode, just click on the three visible dots above and you’ll be greeted with the interface and have all your necessary tools back to edit the document and go straight right back to proofreading.
Procedure: View > Focus > Scroll Through
Checking Document Readability
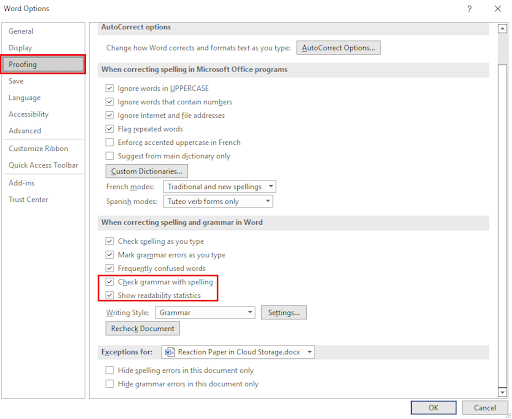
If you ever wondered how your entire write-up is scored or considered in terms of quality then you probably would have a good time knowing that there is a feature in Microsoft Word that provides readability statistics to you.
This can supplement the existing grammar and spell checks that Microsoft Word already offers to you by default but for Document Readability then you would have to tick and activate this first before proceeding in getting the details that you want.
Once you do this, however, readability status reports will also be included each time you conduct a grammar and spell check for your document.
Procedure: File > Options > Proofing > Tick “Check Grammar With Spelling” & “Show Readability Statistics” Ok > Back To Document > Review > Spelling & Grammar
Intermediate Functions -
Intermediate functions are a bit different. This often requires you to do some process first before being able to accurately execute these features. However, they are still worth the time and effort to do.
Building Your Personal Custom Templates
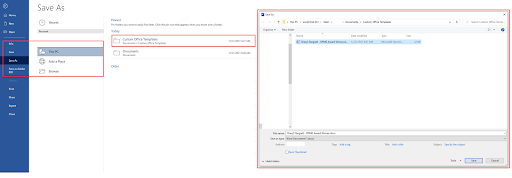
It was already mentioned before that you can get pre-made templates supplied by Microsoft but what about your own custom templates? You can do that as well!
If you have already made your own design and custom-made templates that suit your audience then you can easily integrate these templates into Microsoft Word.
Procedure: File > Save as > Into Folder (Users/User/Documents/Custom Office Templates) > Save
Automating Audio File Transcription
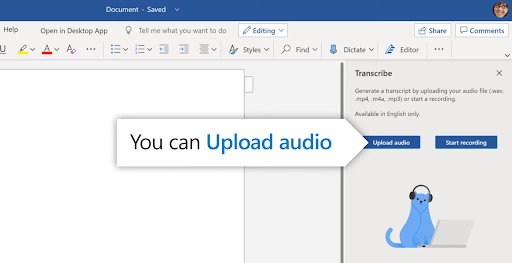
This feature really shines best if you are prone to using videos and audio for your document. If you are a content creator that is involved in video sharing platforms like YouTube then this would greatly help for transcripts.
However, there is a problem with regards to translation on technical details.
Let’s say you want to create a video about camera stabilizers and often would have to go deep into detail with technical words and brands. These would create some issues on how the software transcribes so it would still be best to look over and review the text afterward.
While a very powerful feature in Microsoft Word, this is limited to English transcriptions only but that is still a lot better to have as a feature. You have two options for this whether you go for recording your audio live or uploading an already recorded audio file.
Procedure: Home > Dictate > Transcribe > Upload / Start Recording
Convenience in Quick Parts
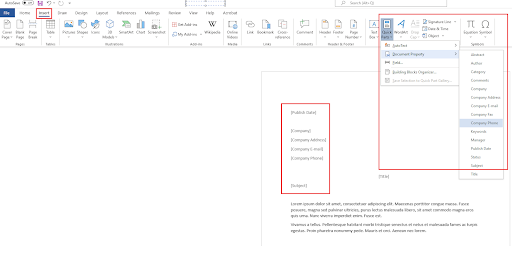
Quick Parts is another feature for Microsoft Word that allows you to input “templates” into your document where text is automatically assigned. This feature is particularly effective for company emails for outreaches.
Once you’ve applied the company name into the tab, quick parts will automatically detect this and input the name into all the Quick Part templates that you’ve applied in your document.
This makes it easy for you not to manually add the name for each document. This becomes all the more important if you are dealing with multiple company names or addresses as well.
Procedure: Insert > Quick Parts > Document Property > Choose Whichever Templates > Apply to Document
Saving Document Instantly To Google Drive

This one is a bit trickier to do as it requires installing another platform but if ever you are using a cloud storage service like Google Drive, it’ll be well worth the time integrating the application to your Microsoft Word.
By default, you won’t be able to automatically save Word files into Google Drive in the get-go but if you have Google Drive installed on your computer then it will be included as one of the areas to potentially save your documents which makes things all the more easier.
Procedure: Install Google Drive > Restart Microsoft Word > File > Save as > Google Drive
For Manual Saving: Install Google Drive > Restart Microsoft Word > File > Save as > File Explorer > Google Drive
The Document Inspector
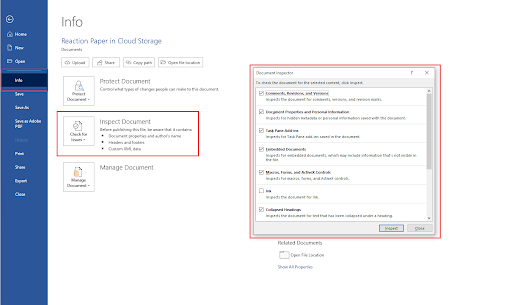
The Document Inspector is a lot like the Find & Replace tool but this one is built for targeting specific data on the document. For example, this can include hidden text, invisible content comments, personal information, custom properties, and more.
You can easily check documents with this tool as opposed to manually checking which to search in the Find & Replace Tool as you can just simply tick boxes in the Inspect Document tool to instantly find the data that you need.
Procedure: File > Info > Check For issues > Inspect Document
Super Secret Features -
Not really super secret but these are features that you probably won’t even know exist in Microsoft Word simply because they are not really discussed enough. However, they can just be as helpful if you want them to be and in specific situations, might just be the tools that you need.
Creating Random Filler Text

Whenever you need to make filler text for your document you don’t need to search for random text on the net or have to go through the effort of making your own but instead, you can do this in Microsoft Word with Lorem Ipsum.
It also follows through with all the formatting and style that you need so it is a lot more convenient than having to take random text from external sources.
Procedure: Type “=lorem(a,b)” on your document where “A” is the number of paragraphs that you want and “B” is the number of sentences that you want in each paragraph
Automatic Date & Time Adjustment
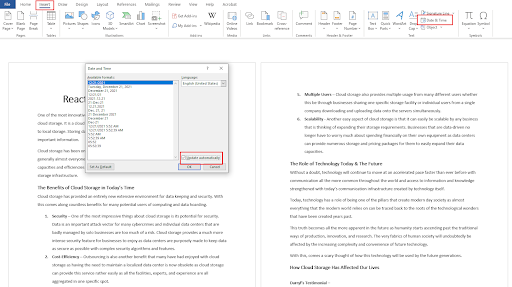
Whenever you are working on files and updating each document constantly, you’ll find yourself having to manually add in the dates each different time that you work on them. This can often be an inconvenient way to do things especially if you are working on this with many other files.
This works best for documents that have a lot of numbers involved in them such as for Cloud Accounting Services. Having an automatic Date & Time can do wonders in reducing the time that you have to work on each specific number.
Procedure: Insert > Date & Time > Tick “Update Automatically”
Recovering Crashed MS Word Files
One of the most tragic situations that can happen while working on a document is having unexpected accidents or situations such as errors, crashes, BSOD’s, and more.
What’s even worse is that in these unexpected situations, you might not even have saved your document yet which is the worst-case scenario that can possibly happen. Luckily, all is not lost.
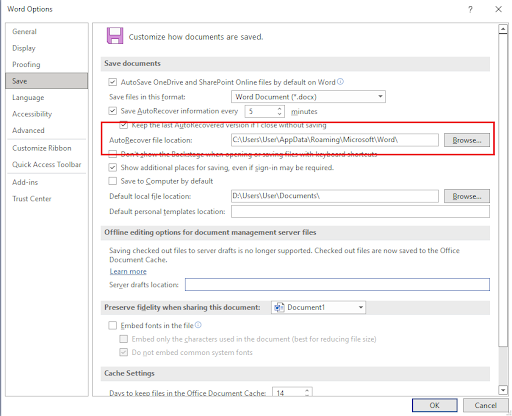
Microsoft Word has one specific feature that auto-saves your documents consistently during your progress. Microsoft Word labels this feature as “AutoRecover”. Normally, a prompt will show up next time you open your Microsoft Word telling you to start from the nearest recovery save but what if it doesn’t show up?
You can manually go through the file directory itself and check for any recoveries that Microsoft Word has made during your document and chances are, everything might have been saved or a majority of content is still there.
Procedure: File > Options > Save > AutoRecover File Location > Browse
Converting PDF & HTML Documents
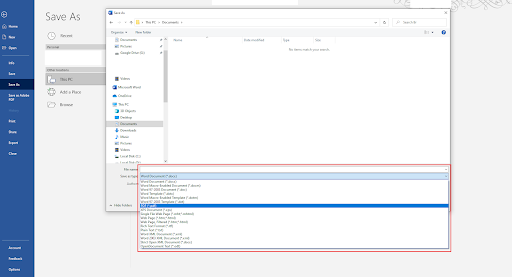
Another feature that you probably haven’t realized is that you can convert your Word documents into PDF and HTML files. This also works if you are a web developer such as in the case of Aloa and you need a platform for software developers to view some HTML code or create one through MS word, although that’s not really a convenient idea in itself but it is still an available option to choose.
Once you save them as these file types, they’ll function akin to HTML files that you’ve coded or PDF files that you have created. The same goes vice-versa as well.
Procedure: File > Save As > Save as Type
Finding Hidden Characters
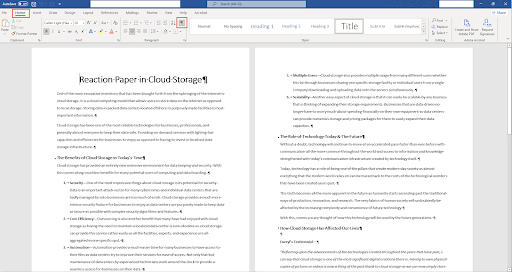
If you are making or reviewing a document, you want to be thorough as you go about it and the likelihood that there might be some hidden content in the document can be possible, especially if you have co-workers and a company culture that wants to give jokes on April Fools.
If you want to erase that chance and get the last laugh then open up the hidden characters tool for your document to see everything that is going on.
Procedure: Home > Show/Hide or (CTRL + Shift + 8)
Conclusion
There are still plenty of features that Microsoft Word offers and this is just the tip of the iceberg. Knowing everything will take some time and experience but if you want to maximize your use of the platform then learning the platform will be worthwhile and undoubtedly be even considered as a growth hacking strategy for productivity.
If you are interested in more details about Microsoft Word; Take a look at this article as to what you can expect from Microsoft Office 2021 as it is Microsoft’s newest update in their software package.
