Microsoft Word is an indispensable tool for creating and saving documents. Whether you're a student writing an essay or a business owner preparing a report, Word has got you covered. But for beginners, creating a new Word document can be daunting. That's why we're here to help you. In this article, we'll guide you through the entire process of making a new Word document, including different options for starting your work.
This is a beginner-friendly guide that covers newer versions of Word, as well as older releases. From creating a blank document to using templates, we'll show you how to make the most out of Word's word-processing capabilities.
In addition to creating and saving documents, we'll cover how to edit them. From simple text editing to more advanced features like editing text in pictures, we'll show you how to get the most out of Word's editing tools. Whether you're a beginner or an advanced user, this article has everything you need to know about using Microsoft Word for your word processing needs.
What is a Word Document?
A Word document is a digital file created using Microsoft Word or other word processing software. It is a type of electronic document that is designed to be viewed and edited on a computer. A Word document can contain text, images, tables, charts, and other types of multimedia content. It is a versatile tool for creating a wide range of documents, from simple letters and memos to complex reports and academic papers.
Word documents are designed to be easily edited and formatted, which makes them a popular choice for document creation. The software lets you change fonts, colors, sizes, margins, and other formatting options to create visually appealing documents.
Additionally, Word provides several features that enhance document creation, such as spell check, grammar check, and thesaurus. Overall, word documents are a versatile and powerful tool for creating professional documents quickly and efficiently.
How to Create a New Word Document
Creating a new Word document is a straightforward process that can be done in just a few clicks. A blank document is the starting point for any document created in Word, whether it's for personal or professional use. You can write anything from an article, report, or even a book with a new doc. Microsoft Word is a popular document creator that many people use for its user-friendly interface and features.
A blank Word document is a white space where you can write anything you want. It is the most basic form of document creation that you can customize to suit your needs. You can choose from different fonts, sizes, and colors to create a unique look for your document.
Creating a document in Microsoft Word is an essential skill that anyone who uses a computer should know. There are different ways to create a new document in Word. You can use the menu bar, a keyboard shortcut, or double-click the Word icon on your desktop. Here are the steps to create a new document from the menu bar:
On a Windows Computer
- Launch Microsoft Word by clicking the icon or searching for it in the Start menu.
-
Click on the "File" menu at the top left corner of the screen.

- Click on "New" in the menu that appears.
-
Select "Blank Document" to create a new document from scratch.
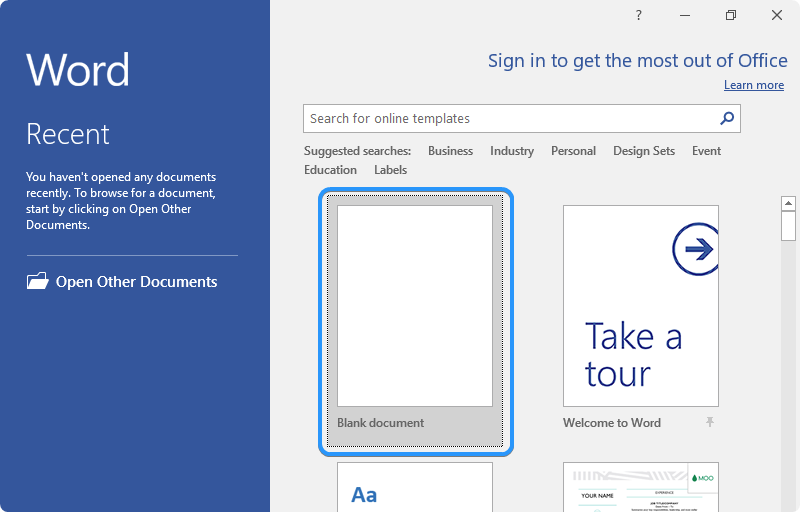
Windows Tip: You can use the keyboard shortcut "Ctrl + N" to create a new blank document.
On a Mac Computer
- To open Microsoft Word, click on the Word icon in the Dock or Applications folder.
-
Click on "File" in the menu bar and select ”New” > "Blank Document."
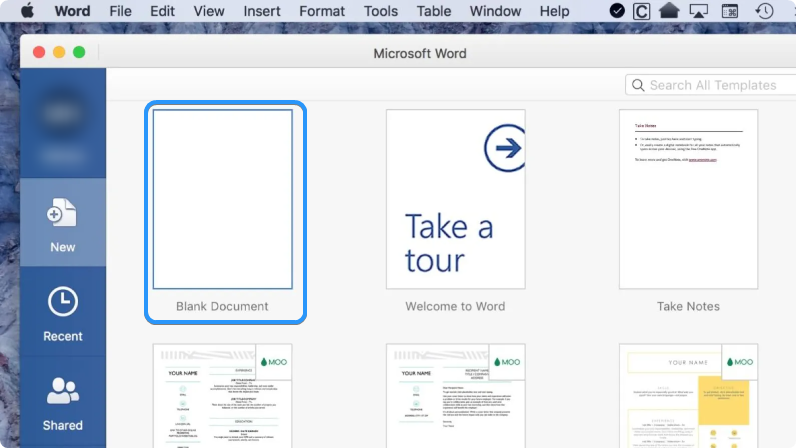
- Once you've created a new document, you can start typing.
macOS Tip: You can use the "⌘ + N" keyboard shortcut to create a new blank document in Word for Mac.
How to Create a Word Document From a Template
You don't have to create a blank Word document to get started. You can pick from various templates to quickly create documents for different purposes. This section will show you how to create a Word document from a template on Windows and Mac computers.
- Launch Microsoft Word by clicking the icon or searching for it in the Start menu.
- Click on the "File" menu at the top left corner of the screen.
-
Click on "New" and select "From Template."
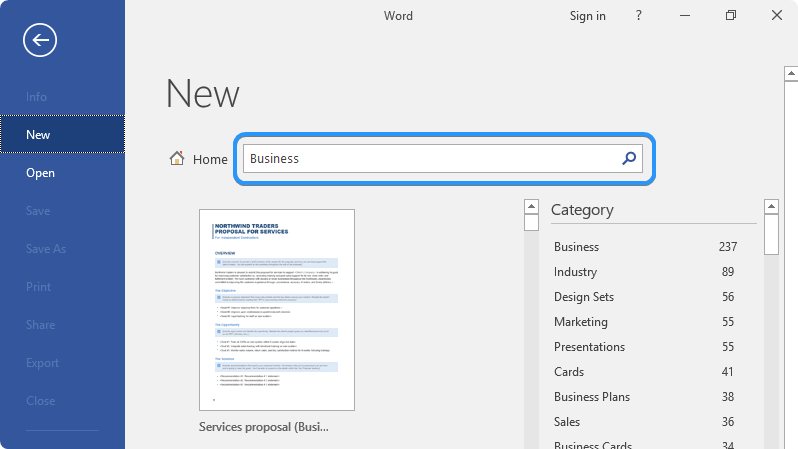
- Choose a template to begin editing your document. Word has built-in templates for all purposes; you can also download new ones online. With millions of templates out there, you'll surely find one that suits your needs.
- Once you've chosen a template, you can edit it as you like. You can change font styles, add images, and more.
Using these steps, you'll kickstart your document in no time. Working with templates eliminates many of the early steps of creating a document. You can focus on creating impactful content instead of designing everything from scratch.
Writing and Formatting Your Document in Word
Once you have a new document open, you can start typing your content. You can change the font, size, and style using the "Home" tab formatting tools. Here are a few tips to help you write and format your document effectively:
- Use clear and concise language. Avoid using jargon or complicated words that may confuse your readers.
- Use headings and subheadings to organize your content. Reserve Heading 1 for your main title, and use Heading 2, 3, and 4 for subheadings.
- Use bullet points or numbered lists to break up large chunks of content. This makes your document easier to read
- Use bold or italic font to emphasize key points or important information.
- Enable spell check to catch any typos or errors before saving your document.
- Proofread your document before you save it. Even a small spelling mistake can greatly impact the quality of your work.
These tips will help you easily write and format your document in Word. With some practice, you'll be creating professional-looking documents in no time.
How To Add Text to Your Document
Now that you've created a new Word document, it's time to start adding text and formatting it. This section will cover the basics of adding and formatting text in Word.
- To add text to your Word document, simply start typing. You can also copy and paste text from other documents or sources.
-
You can format your text using the formatting options in the Home tab on the ribbon. You can change the font, font size, color, and alignment.
You can copy and paste text from an external source by right-clicking anywhere in the document and selecting "Paste." The keyboard shortcut for this is "Ctrl + V" on Windows and "⌘ + V" on a Mac.
How To Add Shapes, SmartArt, Charts, and Pictures in Word
In addition to text, you can also add various shapes, SmartArt, charts, and pictures to your Word document. This section will cover how to add these elements to your document.
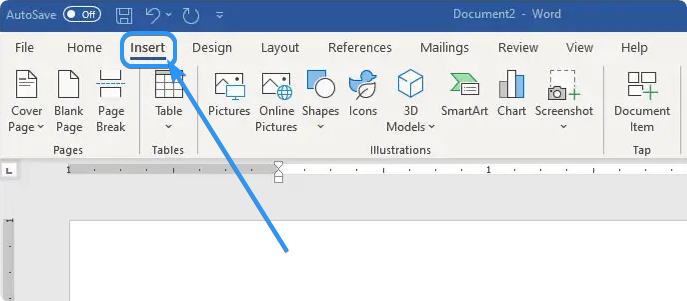
- To add a shape, click "Insert" in the menu bar and select "Shapes." Choose the shape you want to add, then click and drag to draw it on your document.
- To add SmartArt, click "Insert" in the menu bar and select "SmartArt." Choose the type of SmartArt you want to add, then click on the placeholder text to edit it.
- To add a chart, click "Insert" in the menu bar and select "Chart." Choose the type of chart you want to add, then click and drag to draw it on your document.
- To add a picture, click "Insert" in the menu bar and select "Pictures." Browse your computer to find the picture you want to add, then click "Insert."
How To Save Your Document in Word
Since you've created and formatted your Word document, saving your work is important so you don't lose it. Word supports various file formats, starting with its own proprietary file format, DOCX. However, you can also export your documents as PDF, HTML, and other popular formats. This makes it easy to store and share your documents.
When you save a document in Word, it's important to give it a descriptive name so you can easily find it later. You can also assign tags or even password-protect the file so it's not accessible to unauthorized users. With a vast selection of saving options, Word makes it easy to save, store, and share your documents.
To save your document in Word, follow these steps:
-
Click on "File" in the menu bar and select "Save" or "Save As." The "Save" option will replace an old document with a new one. The "Save As" option creates a copy of the document and gives it a different name in different formats like DOCX, PDF, HTML or other file types.

- Choose where you want to save your document, then enter a file name.
- Choose the file format you want to save your document as. The default file format for Word documents is .docx, but you can also choose to save your document as a .pdf, .txt, or another file format.
How To Save Your Document to OneDrive in Microsoft Word
If you want to save your Word document to OneDrive, Microsoft's cloud storage service, you can do so directly from within the Word app. This section will cover how to save your document to OneDrive.
OneDrive makes accessing your documents from any device easy so you can work on them anywhere. It's a popular choice for backing up and sharing documents since files stored in OneDrive are secure and encrypted. It's worth noting that OneDrive is an online storage service, so you'll need to be connected to the internet when working with it.
To save your document to OneDrive in Microsoft Word, follow these steps:
- Click "File" in the menu bar and select "Save As."
-
Choose "OneDrive" from the list of options.
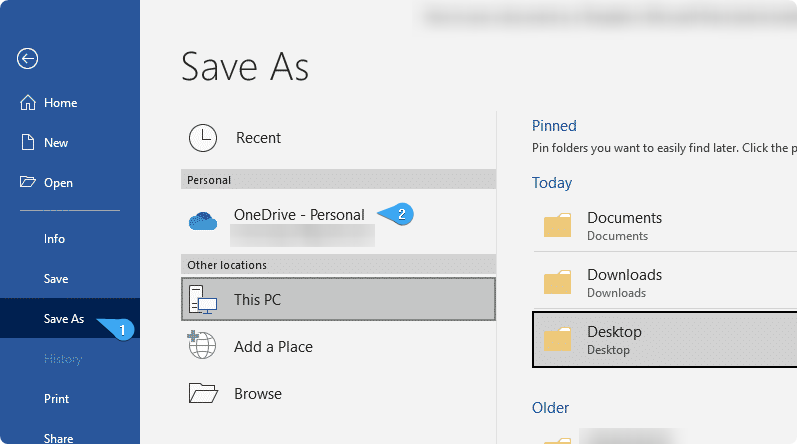
- Choose the location where you want to save your document, such as "OneDrive - Personal" for personal files or "OneDrive - Business" for work or school files.
- Enter a file name.
- Click "Save" to save your document to OneDrive
Your document is now saved in OneDrive, and you can access it anytime from any device with an internet connection.
FAQ
How do I create a new document in Microsoft Word?
To create a new document in Microsoft Word, click "File" and "New" to choose a template or a blank document.
Can I save my Word document in different file formats?
Yes. You can save your document in different formats, such as DOCX, PDF, and RTF.
What is the difference between the "Save" and "Save As" options?
"Save" updates an existing document with the changes made, while "Save As" creates a new copy of the document with a new name or file format.
Can I save my Word document automatically?
Yes. Go to File > Options > Save in Word. Check the box that says AutoSave. You can also choose how often your document should be saved automatically.
Can I change the default file location in Word?
Yes. Navigate to File > Options > Save. The current location is in the "Default local file location" field. Click the "Browse" button to select a new default location.
Can I password-protect my Word document?
Yes. To make your document secure, go to the "File" menu. Choose "Info" and then click on "Protect Document." Click "Encrypt with Password," make up a password, and click OK.
Conclusion
Creating a new document in Word is a straightforward process that anyone can learn. With the right tools and techniques, you can write and format your document effectively and save it for future use. Remember to use clear and concise language, organize your content, and save your work often to avoid losing any progress.
Now that you know how to create and save documents in Microsoft Word, you’re well on your way to becoming a master of productivity! With these tips and techniques, you can write up professional documents quickly and securely without worrying about losing progress or compromising important information. So get typing - happy writing!