Are you experiencing issues with connecting to a remote computer through Remote Desktop Services? In this article, you can learn what to do if the remote desktop can’t connect to the remote computer.
Work-from-home culture made remote connections and accessing remote computers increase in popularity. With many people working online and remotely, it’s more important than ever to be able to access your company’s computers from a physical location far away from the local device itself.
Whether you’ve run into error messages regarding the Remote Desktop Services or a connection that simply can’t be established, this article is for you. We’ll explore how to fix the “Remote Desktop Can’t Connect to the Remote Computer” problem on Windows.
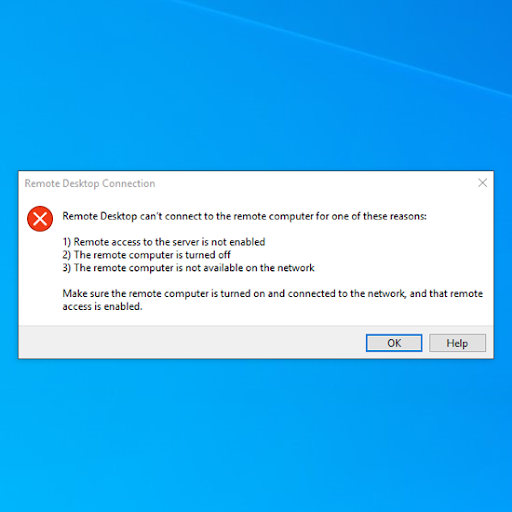
Table of Contents
- Method 1. Enable Remote Desktop connections
- Method 2. Modify your firewall settings
- Method 3. Change your network profile
- Method 4. Reset the Remote Desktop Credentials
- Method 5. Add the remote address to the “hosts” file
- Method 6. Add the RDGClientTransport key to your Registry
- Final thoughts
Solved: Remote Desktop Services can’t connect to the Remote Computer
Note: Certain solutions below may contain steps that require users to get in touch with an administrator for assistance.
Method 1. Enable Remote Desktop connections
It’s entirely possible that your device simply doesn’t have Remote Desktop Services enabled yet. This makes it impossible to establish remote connections and often results in an error.
If this is the case, start troubleshooting by enabling this option from your settings.
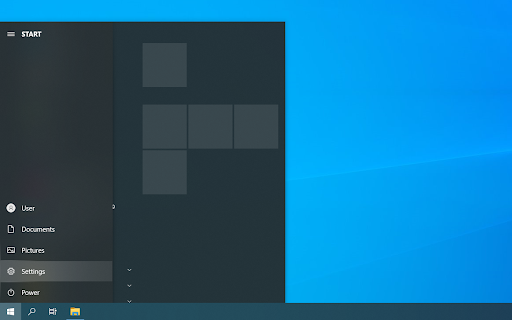
- Click on the Windows icon in the bottom left of your screen to bring up the Start menu. Choose Settings, or alternatively use the Windows + I shortcut.
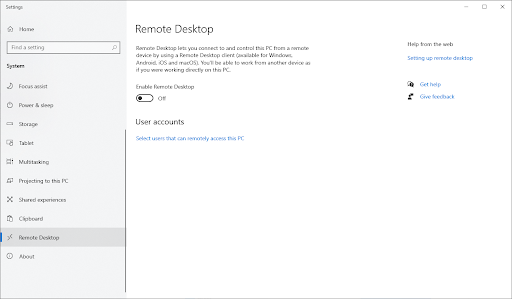
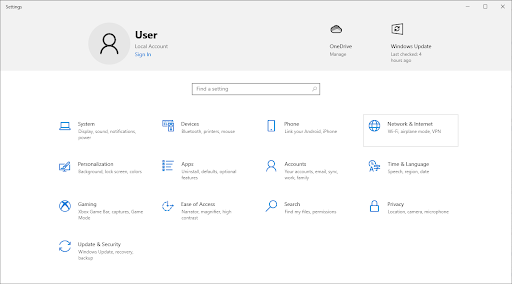
- Click on the System tile. This is where you can find most of your Windows settings.
-
Scroll down in the left-side pane and switch to the Remote Desktop tab. Here, toggle the Enable Remote Desktop option On.
-
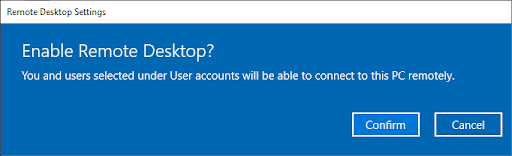
A pop-up will appear prompting you to confirm the change. Click on the Confirm button to enable the remote desktop services.
- Check if the remote connection can be established after making this change.
Method 2. Modify your firewall settings
Based on user reports, we were able to determine one of the most common reasons for experiencing issues with Remote Desktop Services caused by the firewall. This is common — in order to filter everything and secure your device, the firewall often tends to block remote connections.
Luckily, there’s a way to get around this without having to disable the firewall itself:
- Open the search bar in your taskbar by clicking on the magnifying glass icon. You can also bring it up with the Windows + S keyboard shortcut.
-
Type in Allow an app through Windows Firewall and click on the first search result.

-
Click on the Change settings button. Bear in mind that this action may require you to have access to an administrator account.
-
Need help? Check out our How to make a local user an administrator in Windows 10 guide.

-
Need help? Check out our How to make a local user an administrator in Windows 10 guide.
-
If you don’t have access to an account with the appropriate permissions, get in touch with your network administrators.
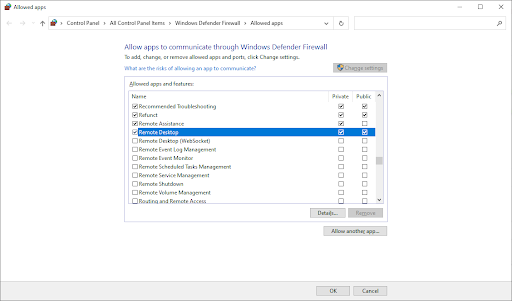
- Scroll down and locate Remote Desktop in the entry list. Make sure that the checkboxes in its row are all ticked to fully enable the service. (See image below)
- Click the OK button to finalize the change. Try connecting to the remote desktop once again after altering your firewall settings.
Method 3. Change your network profile
Your network profile may be set to public for personal reasons, or it could’ve been changed by a different person and even malware. We recommend changing it to private and then testing if you can establish remote desktop connections.
-
Click on the Windows icon in the bottom left of your screen to bring up the Start menu. Choose Settings, or alternatively use the Windows + I shortcut.
-
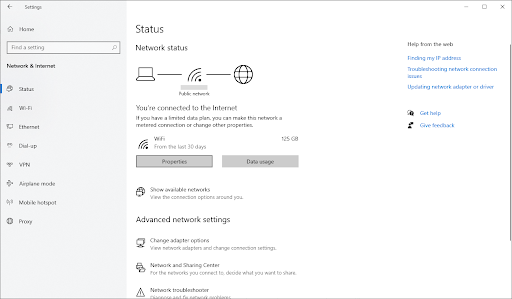
Click on the Network & Internet tile. This is where you can find most of your network settings.
-
Stay on the default Status tab, and then click on the Properties button for your connection. For older versions of Windows 10, click on the “Change Connection Properties” link.
-
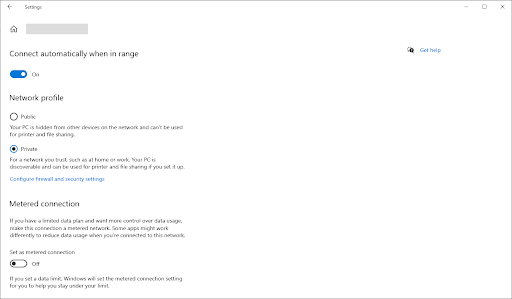
Under Network profile, select the option to make your network Private. If this option is already selected, choose Public instead.
- Check if you still have issues related to the remote desktop connection you’re trying to establish on your computer.
Method 4. Reset the Remote Desktop Credentials
If you’ve already established a remote connection in the past, you should have credentials saved for the IP address. These credentials may be outdated or corrupted, which in turn causes you to be unable to connect to the remote computer.
If this happens to you, the solution is to delete the existing credentials and generate new ones. Keep in mind that this method will only work if you’ve made at least 1 successful connection to the remote computer in the past!
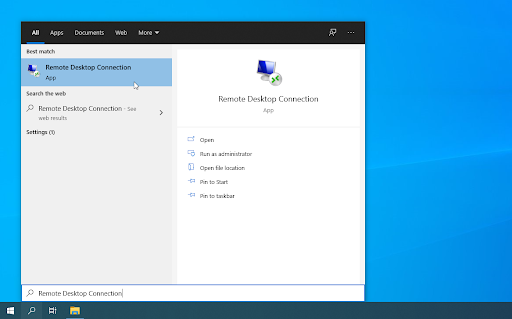
- Open the search bar in your taskbar by clicking on the magnifying glass icon. You can also bring it up with the Windows + S keyboard shortcut.
-
Type in Remote Desktop Connection and click on the first search result.
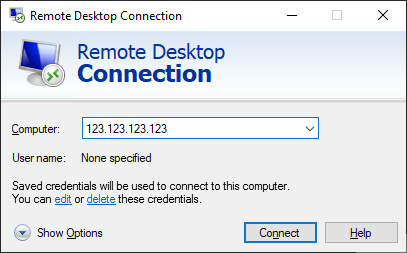
- Use the drop-down menu to select the remote computer you want to connect to. If the address for the problematic device isn’t visible here, feel free to skip this method and try a different one.
-
Click on the “delete” option underneath your user name. When prompted, confirm that you want to remove the existing credentials.
- Try connecting to the remote computer once again to see if the connection is properly established with a new set of credentials.
Method 5. Add the remote address to the “hosts” file
The “hosts” file on your computer stores addresses to various connections you’ve established in the past. If you have trouble connecting to specific remote desktops, it’s recommended to manually add the remote address to your “hosts” file.
-
Open the Command Prompt in one of the following ways:
-
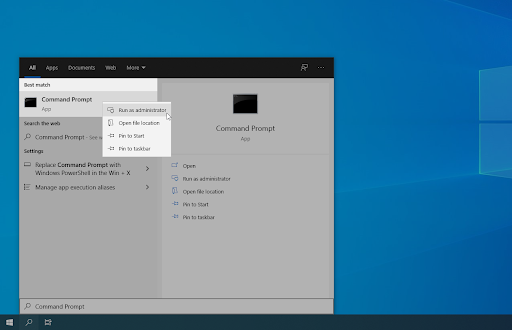
Open the Search function in your taskbar, or alternatively use the Ctrl + S keyboard shortcut to bring up the search bar and look up “Command Prompt”. When you see it in the results, right-click on it and choose Run as Administrator.
-
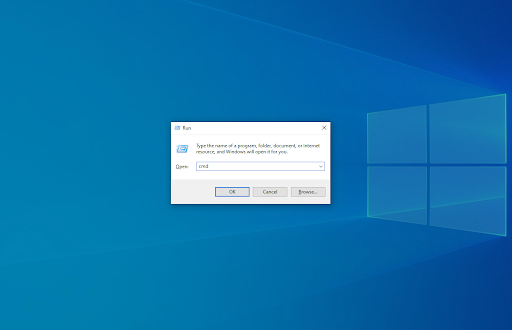
Press the Windows + R keys on your keyboard to bring up the Run utility. Type in “cmd” and press the Ctrl + Shift + Enter keys on your keyboard. By doing so, you’re launching the Command Prompt with administrative permissions.
-
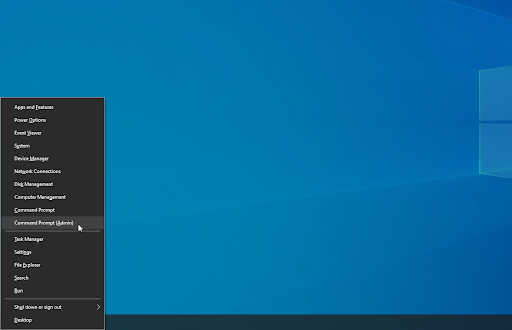
Press the Windows + X keyboard shortcut, then select Command Prompt (Admin).
-
Open the Search function in your taskbar, or alternatively use the Ctrl + S keyboard shortcut to bring up the search bar and look up “Command Prompt”. When you see it in the results, right-click on it and choose Run as Administrator.
- When prompted by the User Account Control (UAC), click Yes to allow the app to launch with administrative permissions. If you don’t have access to an account with the appropriate permissions, get in touch with your network administrators.
-
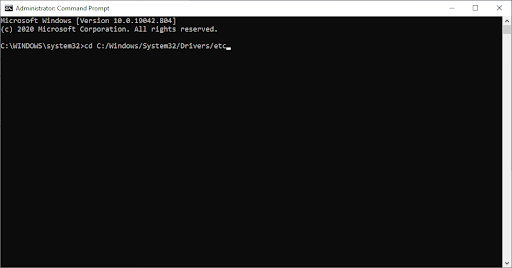
Type in the following command, then press the Enter key to execute it: cd C:/Windows/System32/Drivers/etc
-
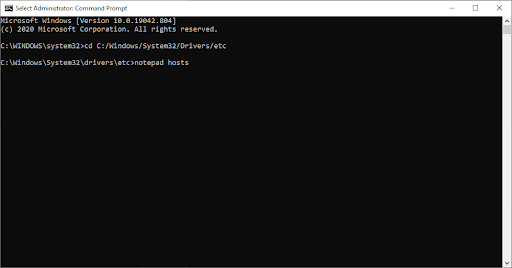
Next, type in and execute the following command: notepad hosts
-
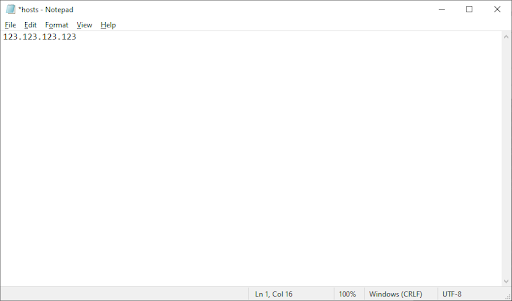
The Notepad application should open, displaying the contents of your “hosts” file. Here, simply type in the address of the remote computer.
-
Click on the File menu, and then select Save from the context menu. You can also use the Ctrl + S keyboard shortcut.
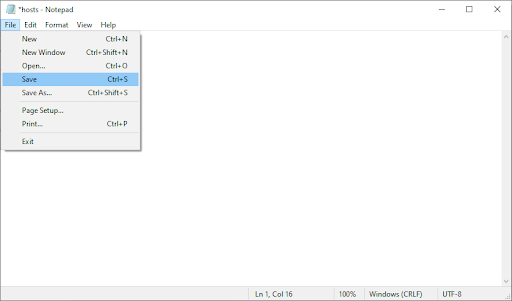
- Check if you’re able to use remote desktop connections with the remote computer you’re trying to access.
Method 6. Add the RDGClientTransport key to your Registry
- Press the Windows + R keys on your keyboard. This is going to bring up the Run utility.
-
Type in “regedit” without the quotation marks and press the Enter key on your keyboard. This will launch the Registry Editor application.

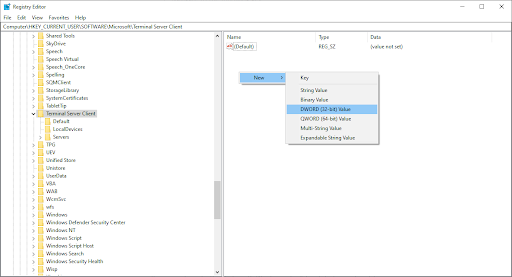
- Navigate to the following key: HKEY_CURRENT_USER/Software/Microsoft/Terminal Server Client
-
You can use the address bar in the Registry Editor to type or paste the key as well, making navigation faster.

-
Right-click on any empty space in the right-side panel of the Registry Editor. From the context menu, select New → DWORD (32-bit Value).
-
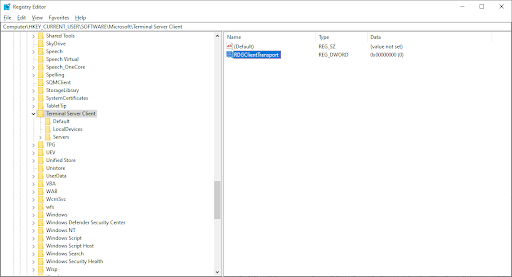
Name the new value RDGClientTransport and then double-click on it.
-
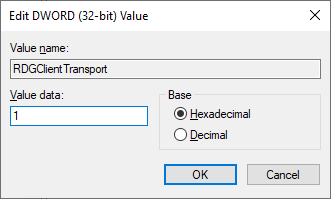
Change the Value data to 1. Make sure not to alter any of the other settings in the editor, and click OK.
- You can exit the Registry Editor now. Check if you’re able to establish remote connections with a remote computer.
Final thoughts
If you need any further help with Windows, don’t hesitate to reach out to our customer service team, available 24/7 to assist you. Return to us for more informative articles all related to productivity and modern-day technology!
Would you like to receive promotions, deals, and discounts to get our products for the best price? Don’t forget to subscribe to our newsletter by entering your email address below! Receive the latest technology news in your inbox and be the first to read our tips to become more productive.
You may also like
» How to Enable Remote Desktop On Windows
» Top 6 Tech Tools to Work Remotely in 2021
» How to Speed up Windows 10